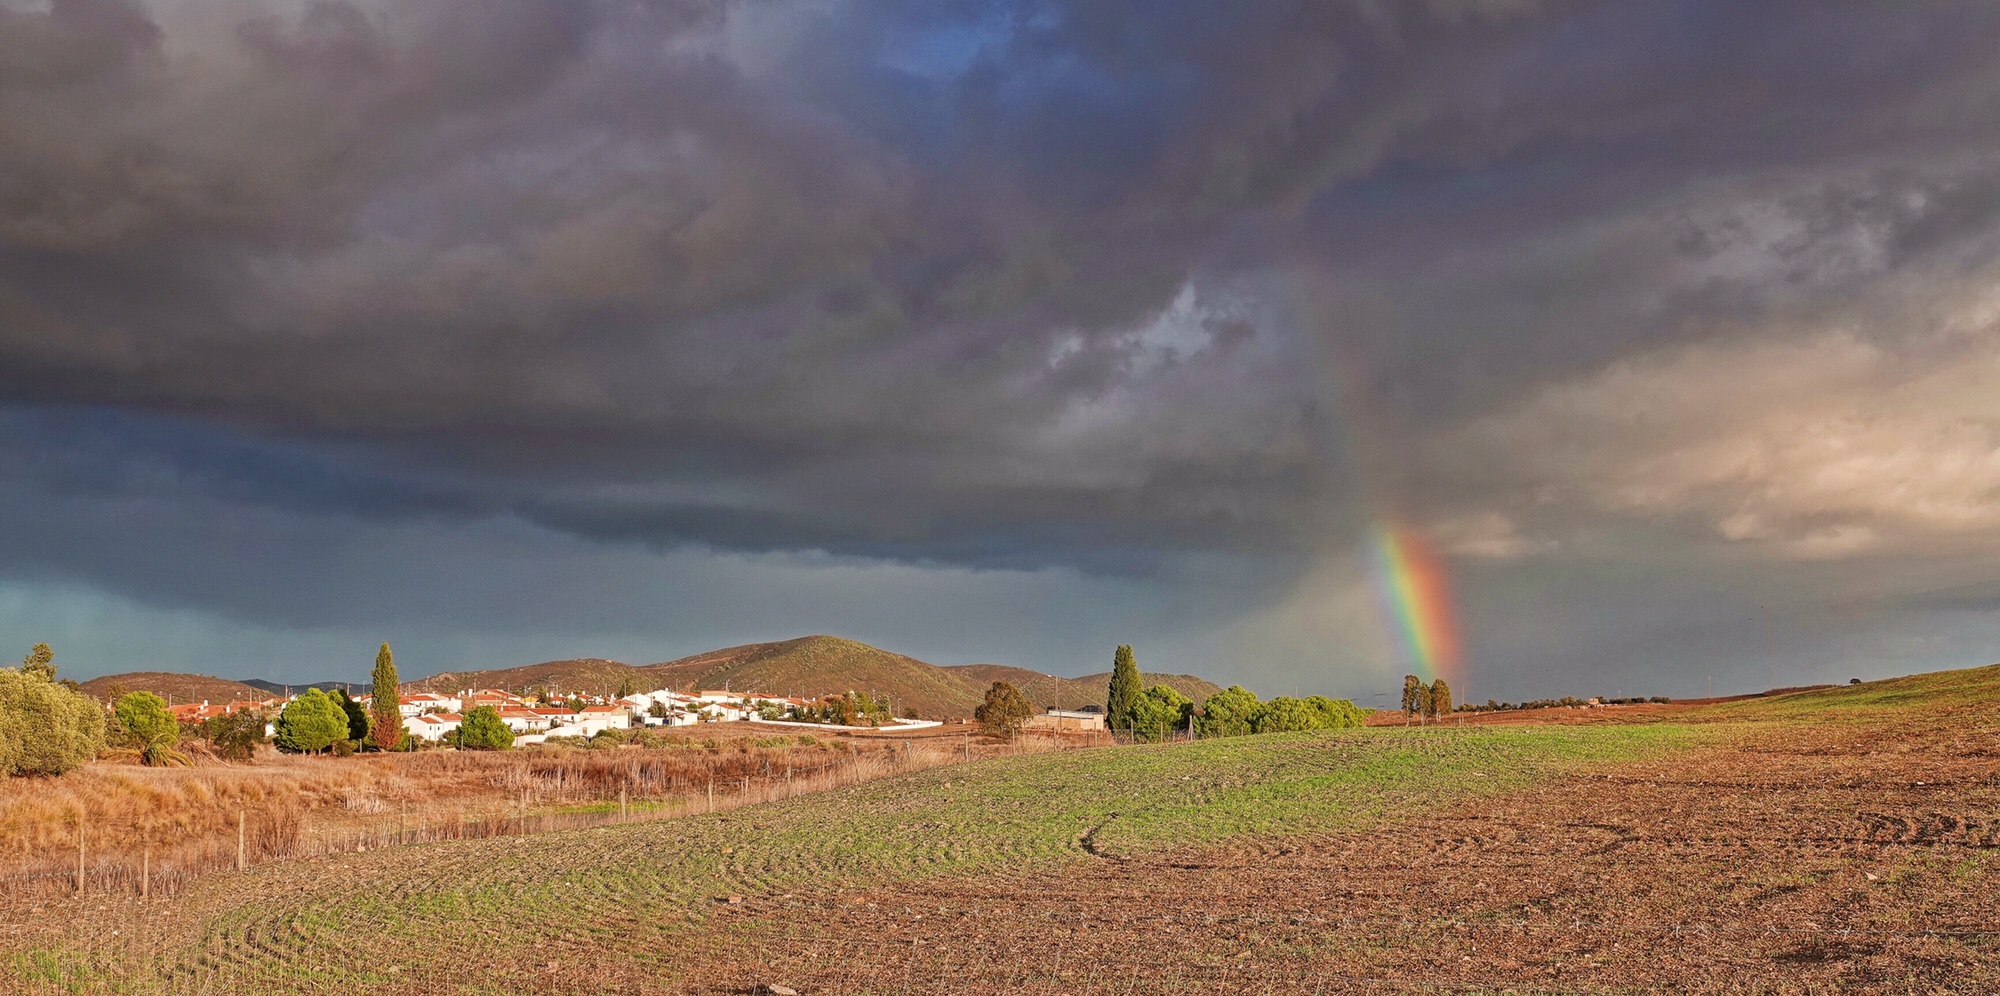
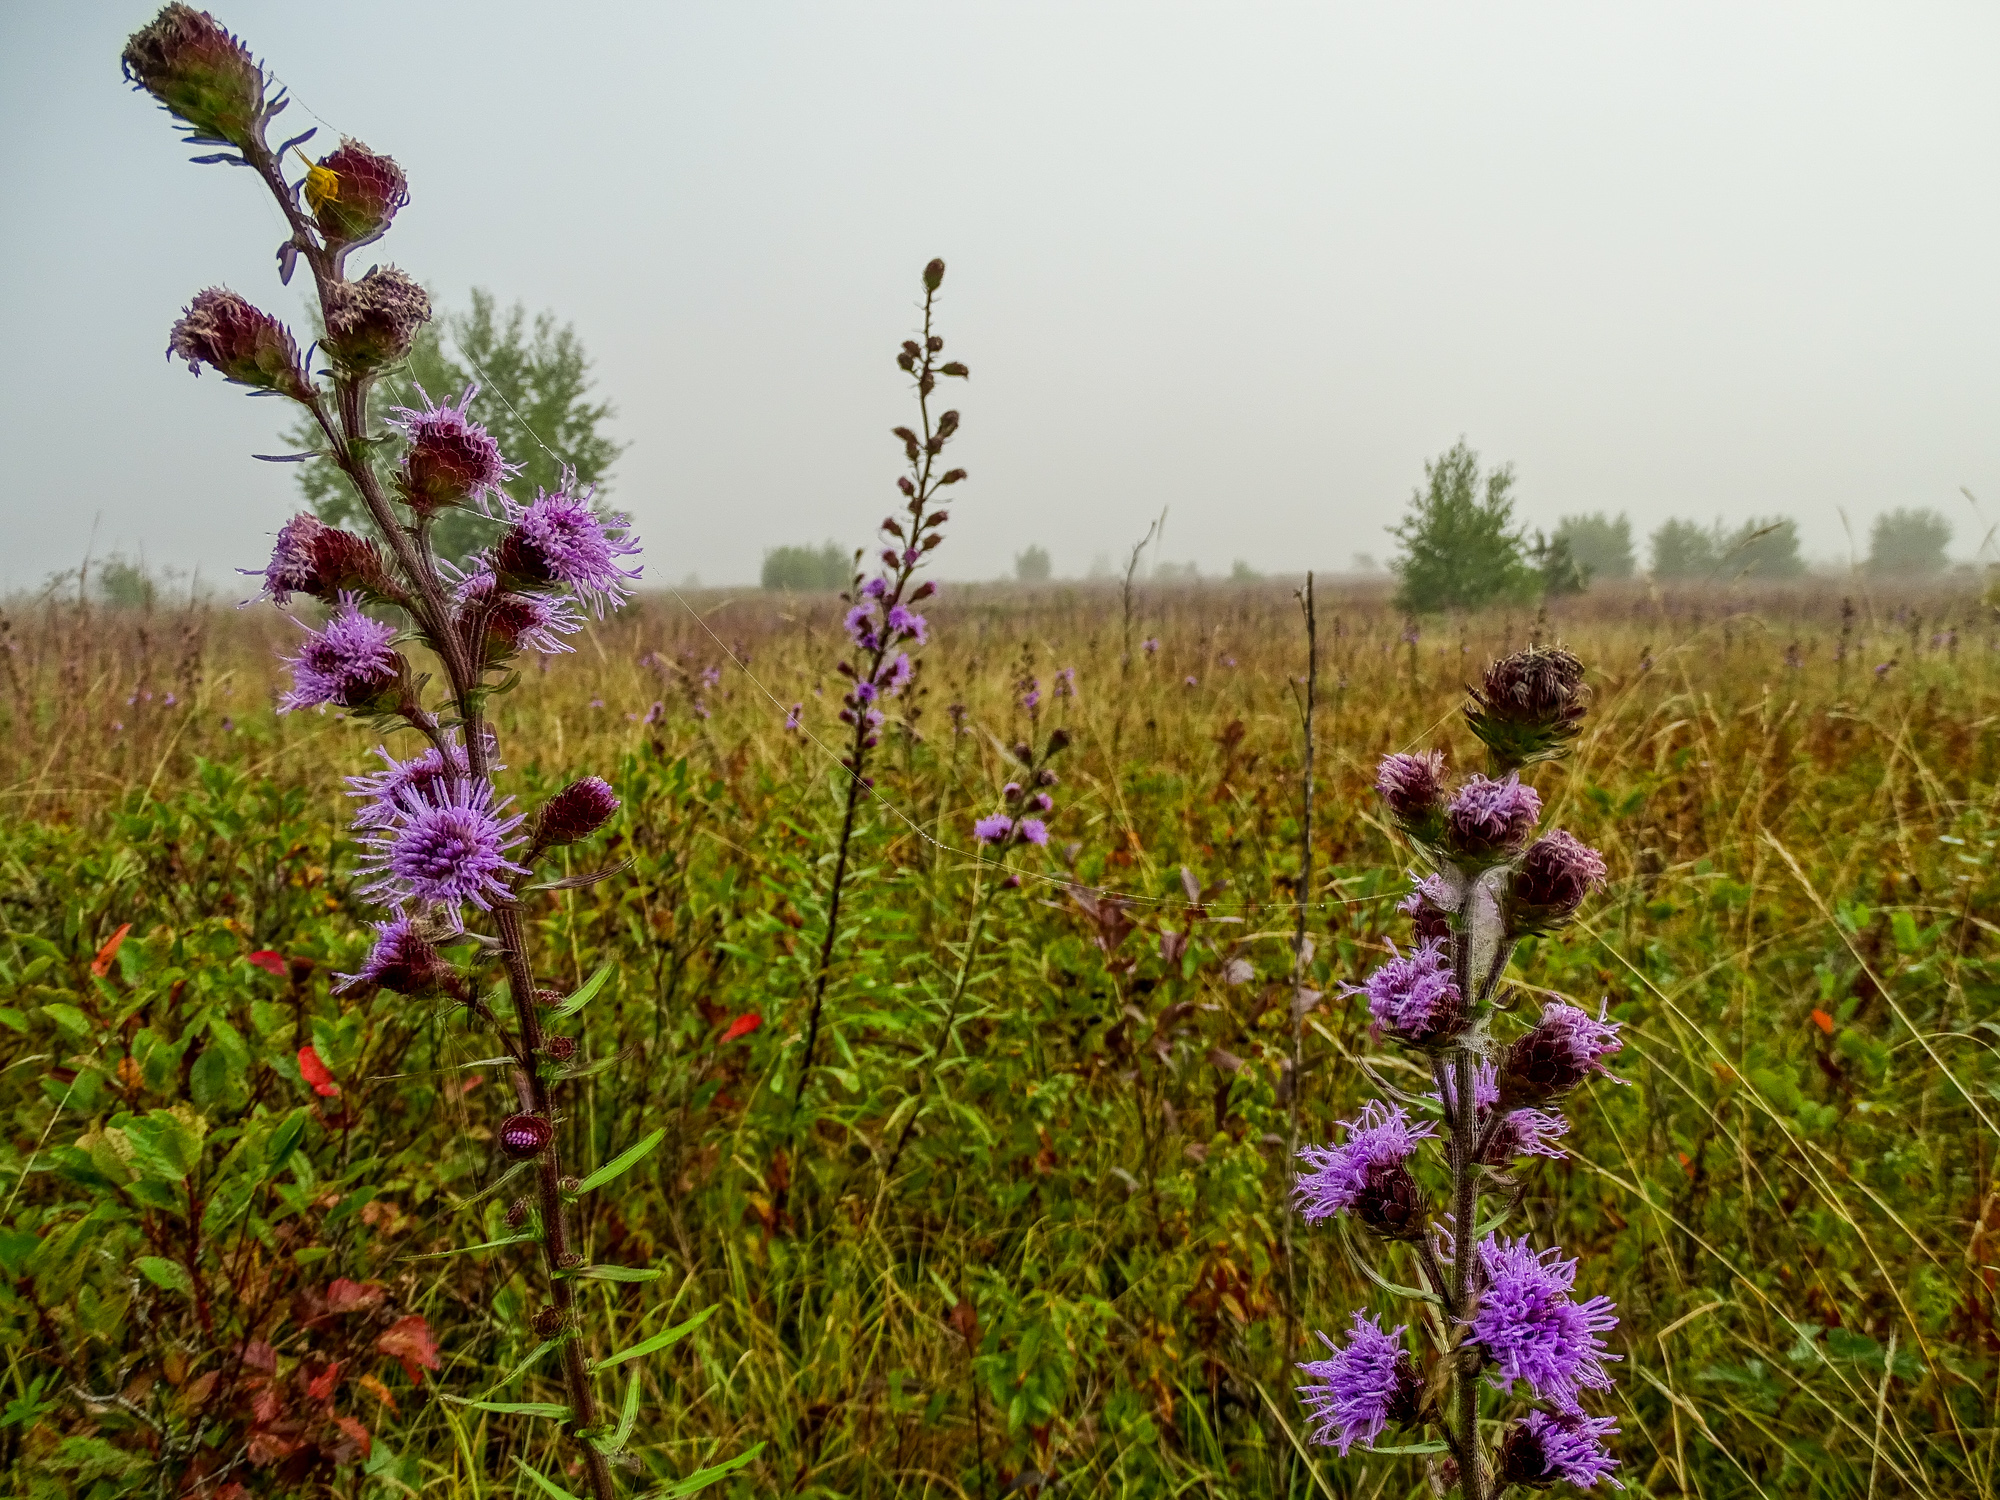
Rainbow over Alvares, Portugal. Sony RX10iv in-camera HDR. Processed in Polarr.
If you read my review of the Sony RX10iii, published about 20 months ago, you know that I really liked the camera, despite its hefty price and relatively short zoom. Since that review the RX10iii as been to Panama, Honduras twice, South Africa, Cuba, Peru (the Amazon River), Ecuador (the Galapagos), England, and Costa Rica…as well as Florida, New Mexico, California, Ohio, Pennsylvania, Massachusetts, and Maine. I have carried it so far and so much that the LCD is beginning to show signs of wear and the markings on a few buttons is beginning to wear off. It has been my constant photographic companion and more than gotten the job done wherever I have traveled. It has been a joy to use…a camera I am always happy to pick up…and one that I could be supremely confident of in the field in any situation. Even around home, its Anti-motion Blur mode made photographing family gatherings a joy. What a camera!
So when I say that the Sony RX10iv is everything that the iii was, and considerably more, you will get the idea. The engineers at Sony listened to the feedback over the 18 months of the iii’s run, and attacked every possible weakness, to produce what may well be the greatest compact fixed-zoom camera ever made. I can not imagine a better camera for travel, wildlife, general nature photography, and day to day family photography. It is nothing short of brilliant in any situation you might find yourself in. I thought the RX10iii had been designed specifically for me…and I never complained about any shortcomings, but it is really like the engineers at Sony read my mind, and offered a solution for almost all my niggling doubts about the iii. I am amazed!
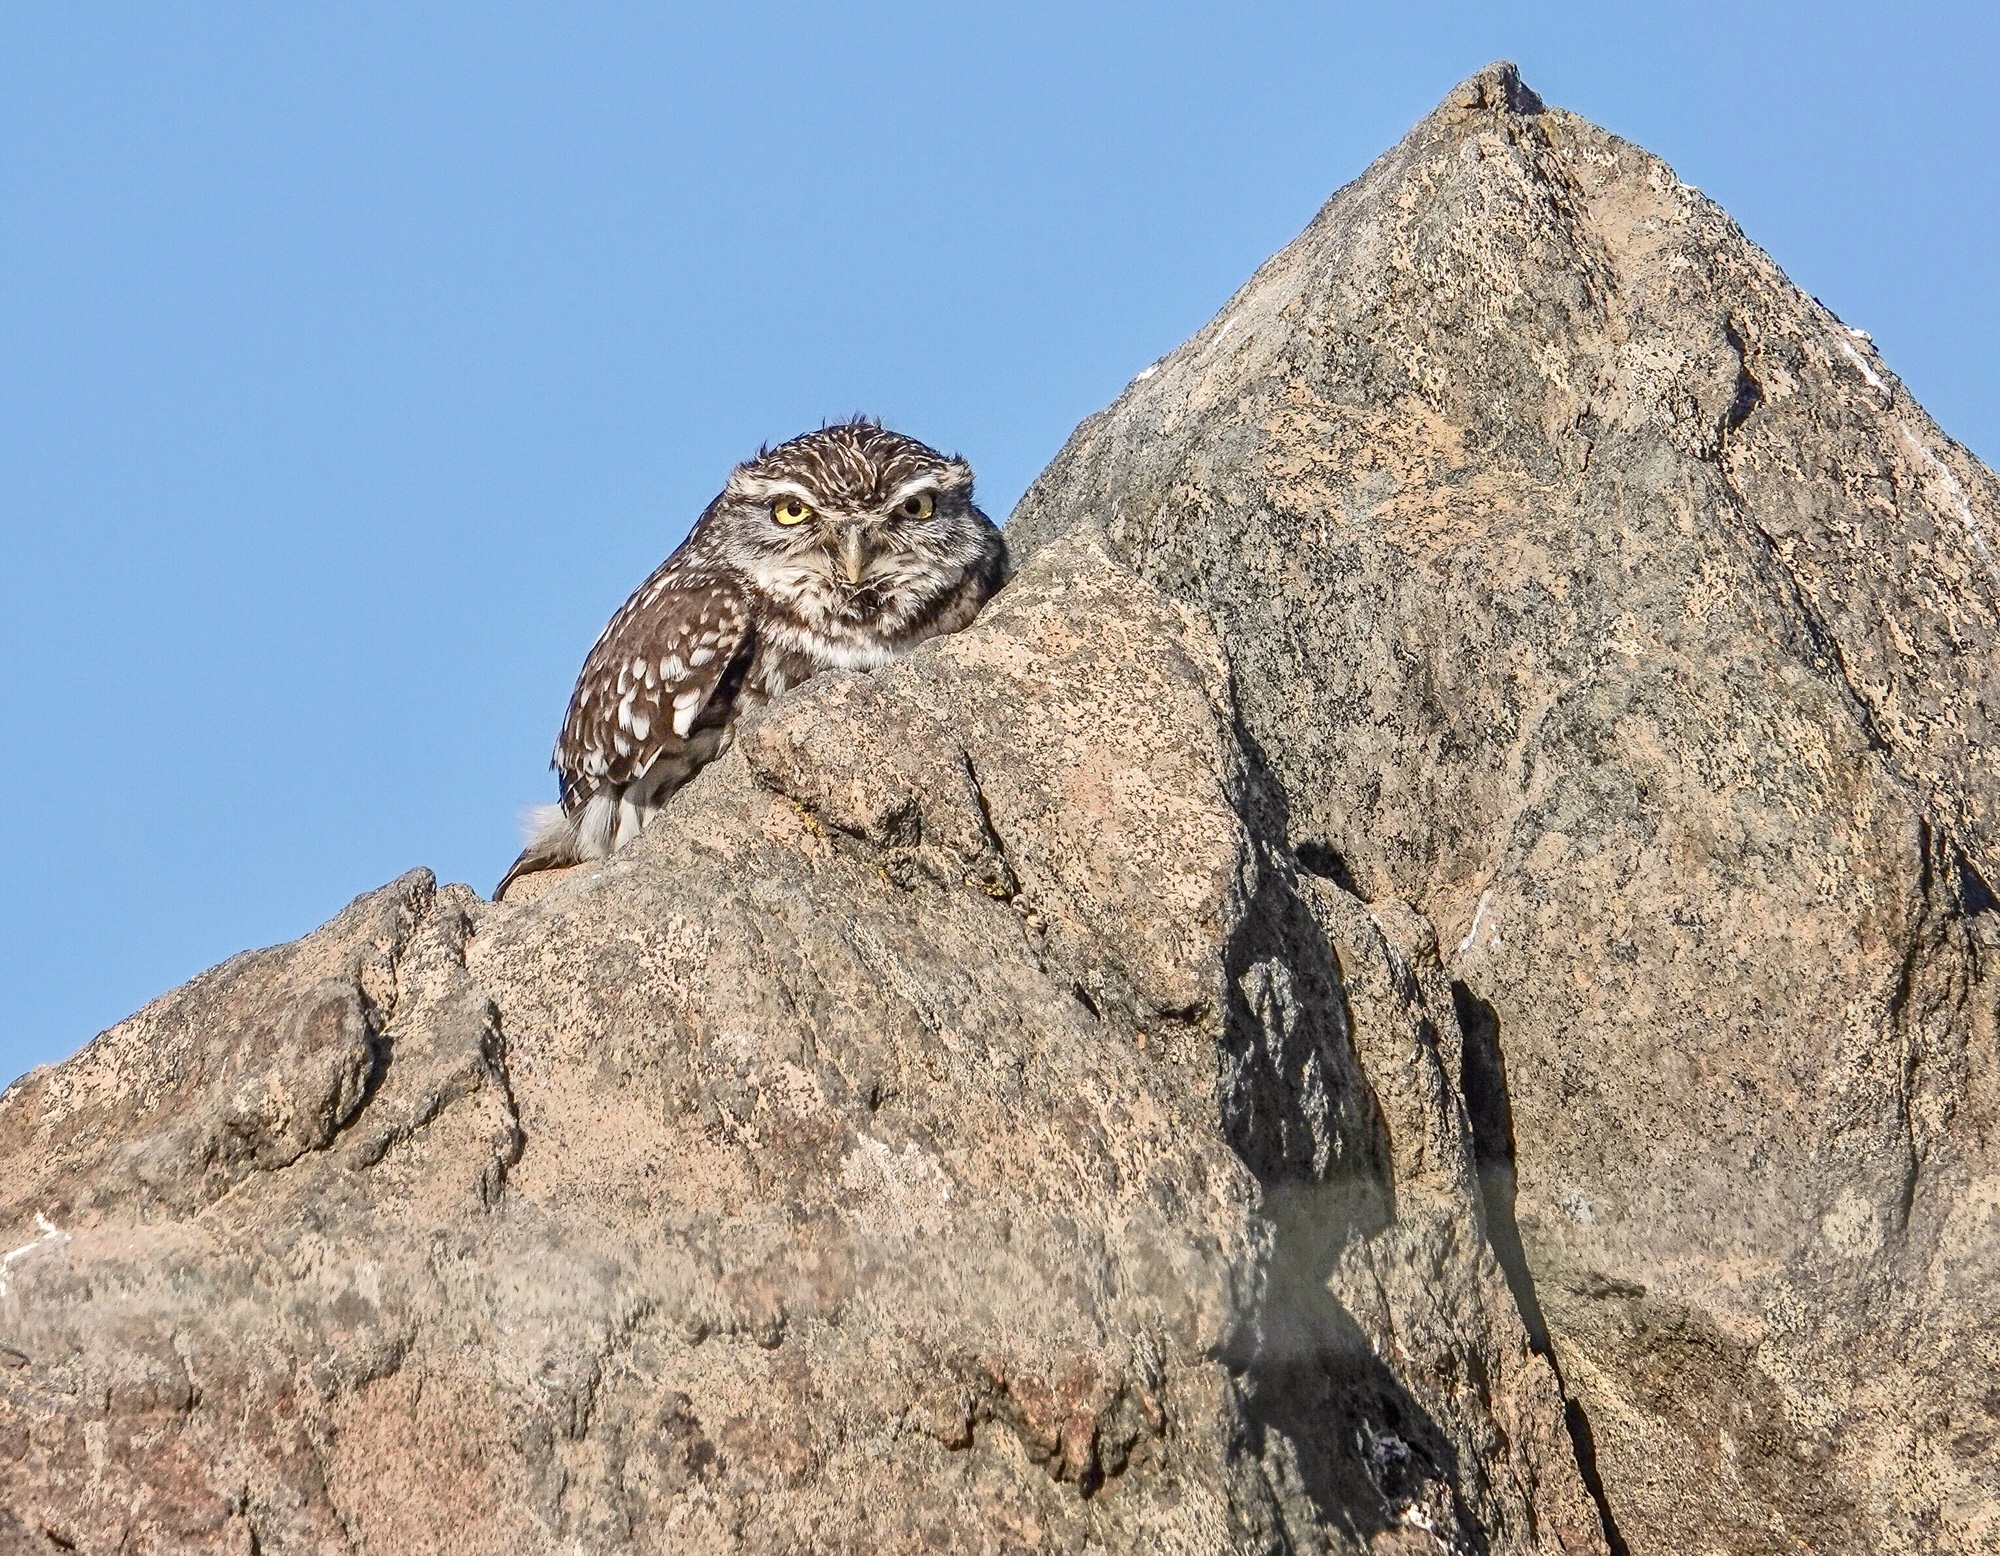
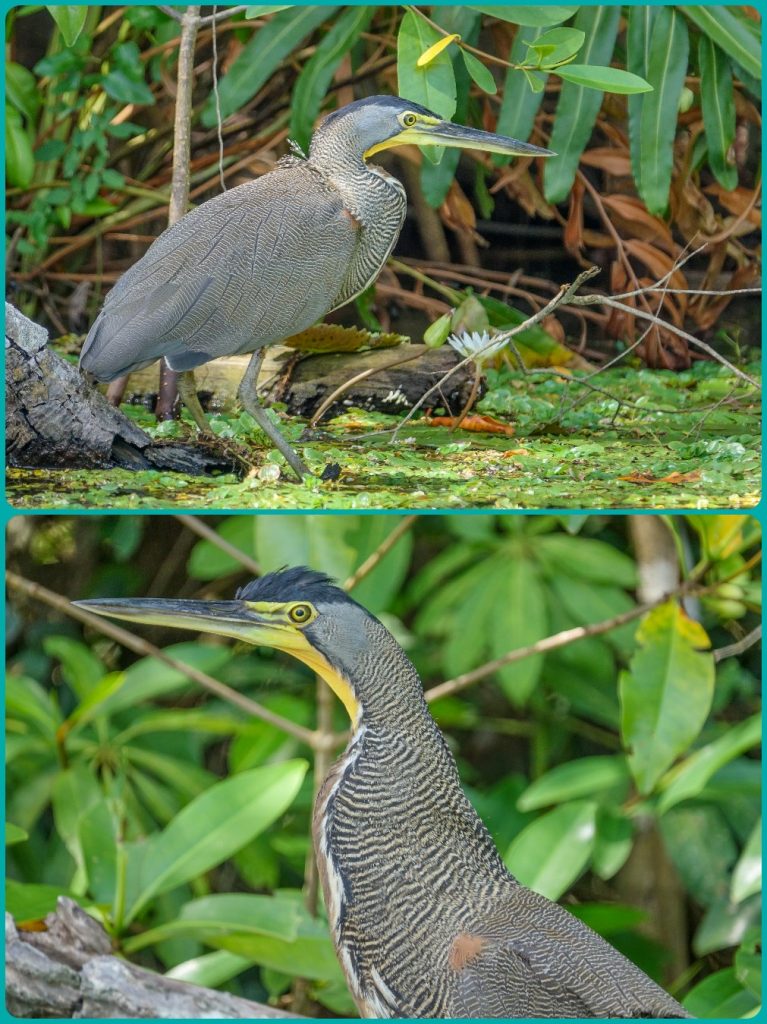
Little Owl, Portugal. Sony RX10iv at 600mm and f4. Razor sharp.
First, the body on the iv is identical to the iii, with all the same customizable buttons and the same amazingly sharp 24-600mm equivalent ZEISS Vario Sonnor zoom lens. The lens alone is worth the price of the camera. It is bright, f2.4-f4, and at its sharpest wide open at any zoom length. It really comes into its own in the rainforest or other lowlight situations where a lessor lens would simply not get the shot. Yes, I often wish for more than 600mm, but I am almost always able to crop to a satisfying frame and image, even when the birds and wildlife are distant. At 24mm it produces stunning landscapes and effective indoor shots. Really I would not trade it’s quality for more reach (unless somehow I could get the same quality at a longer focal length…something that just might defy the laws of physics, or push the camera to a size that would not be comfortable to carry in the field).
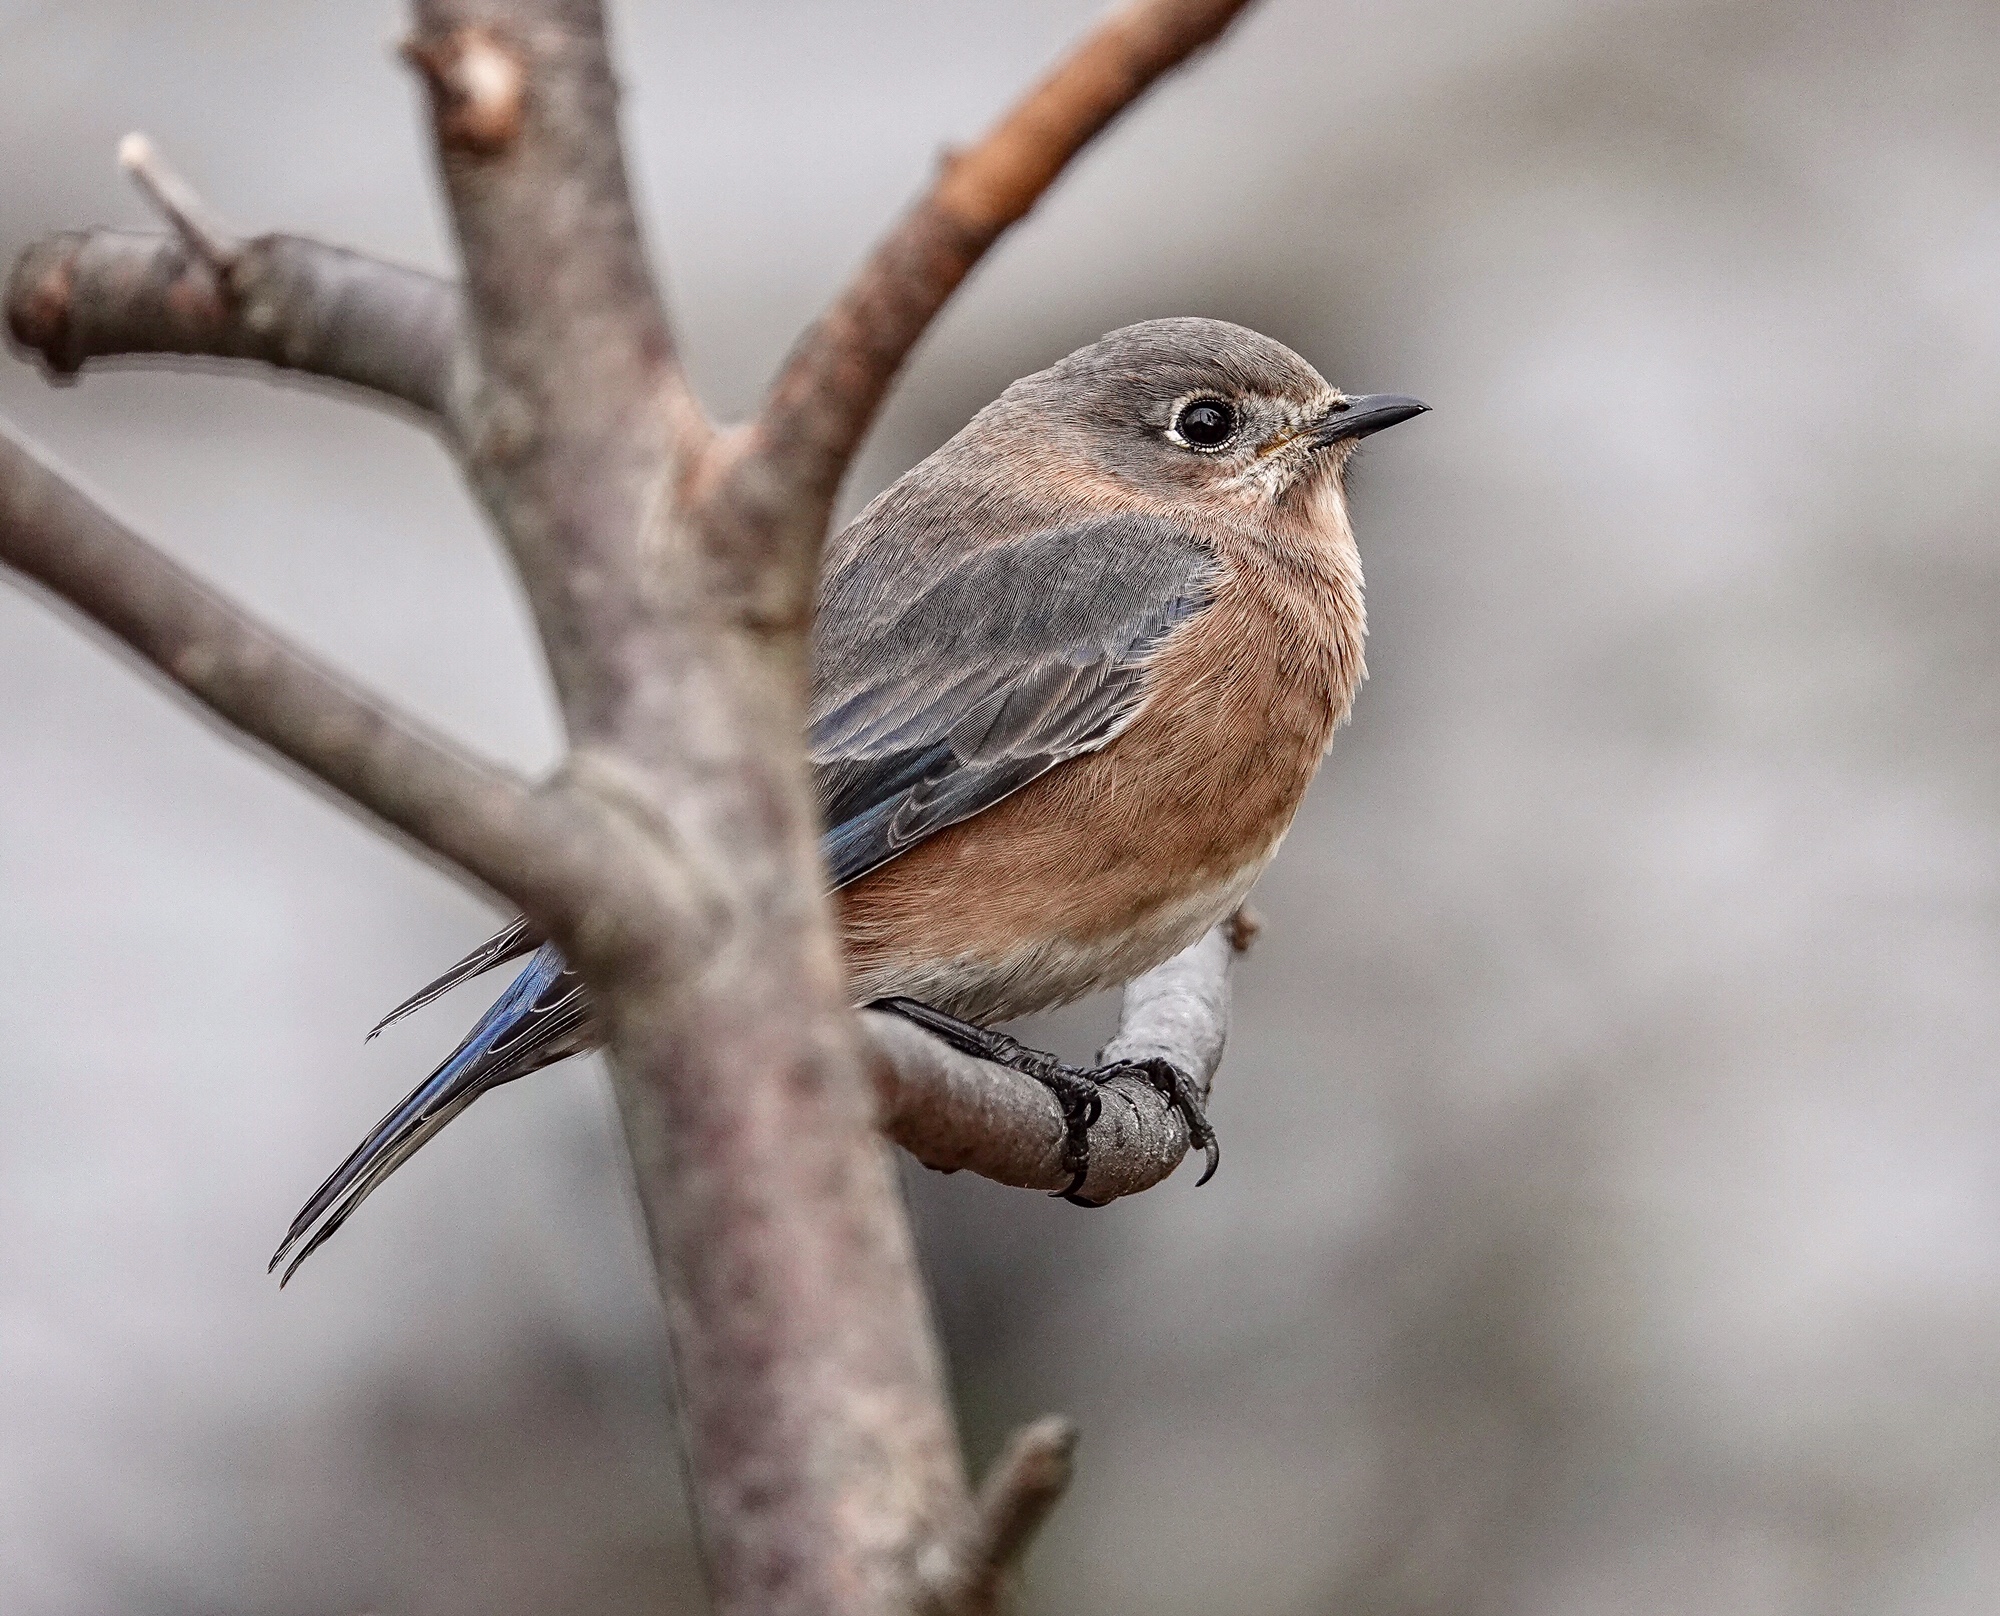
Eastern Bluebird at our back deck feeder. About 12 feet. 600mm. F4 @ ISO 320. Amazing feather detail.
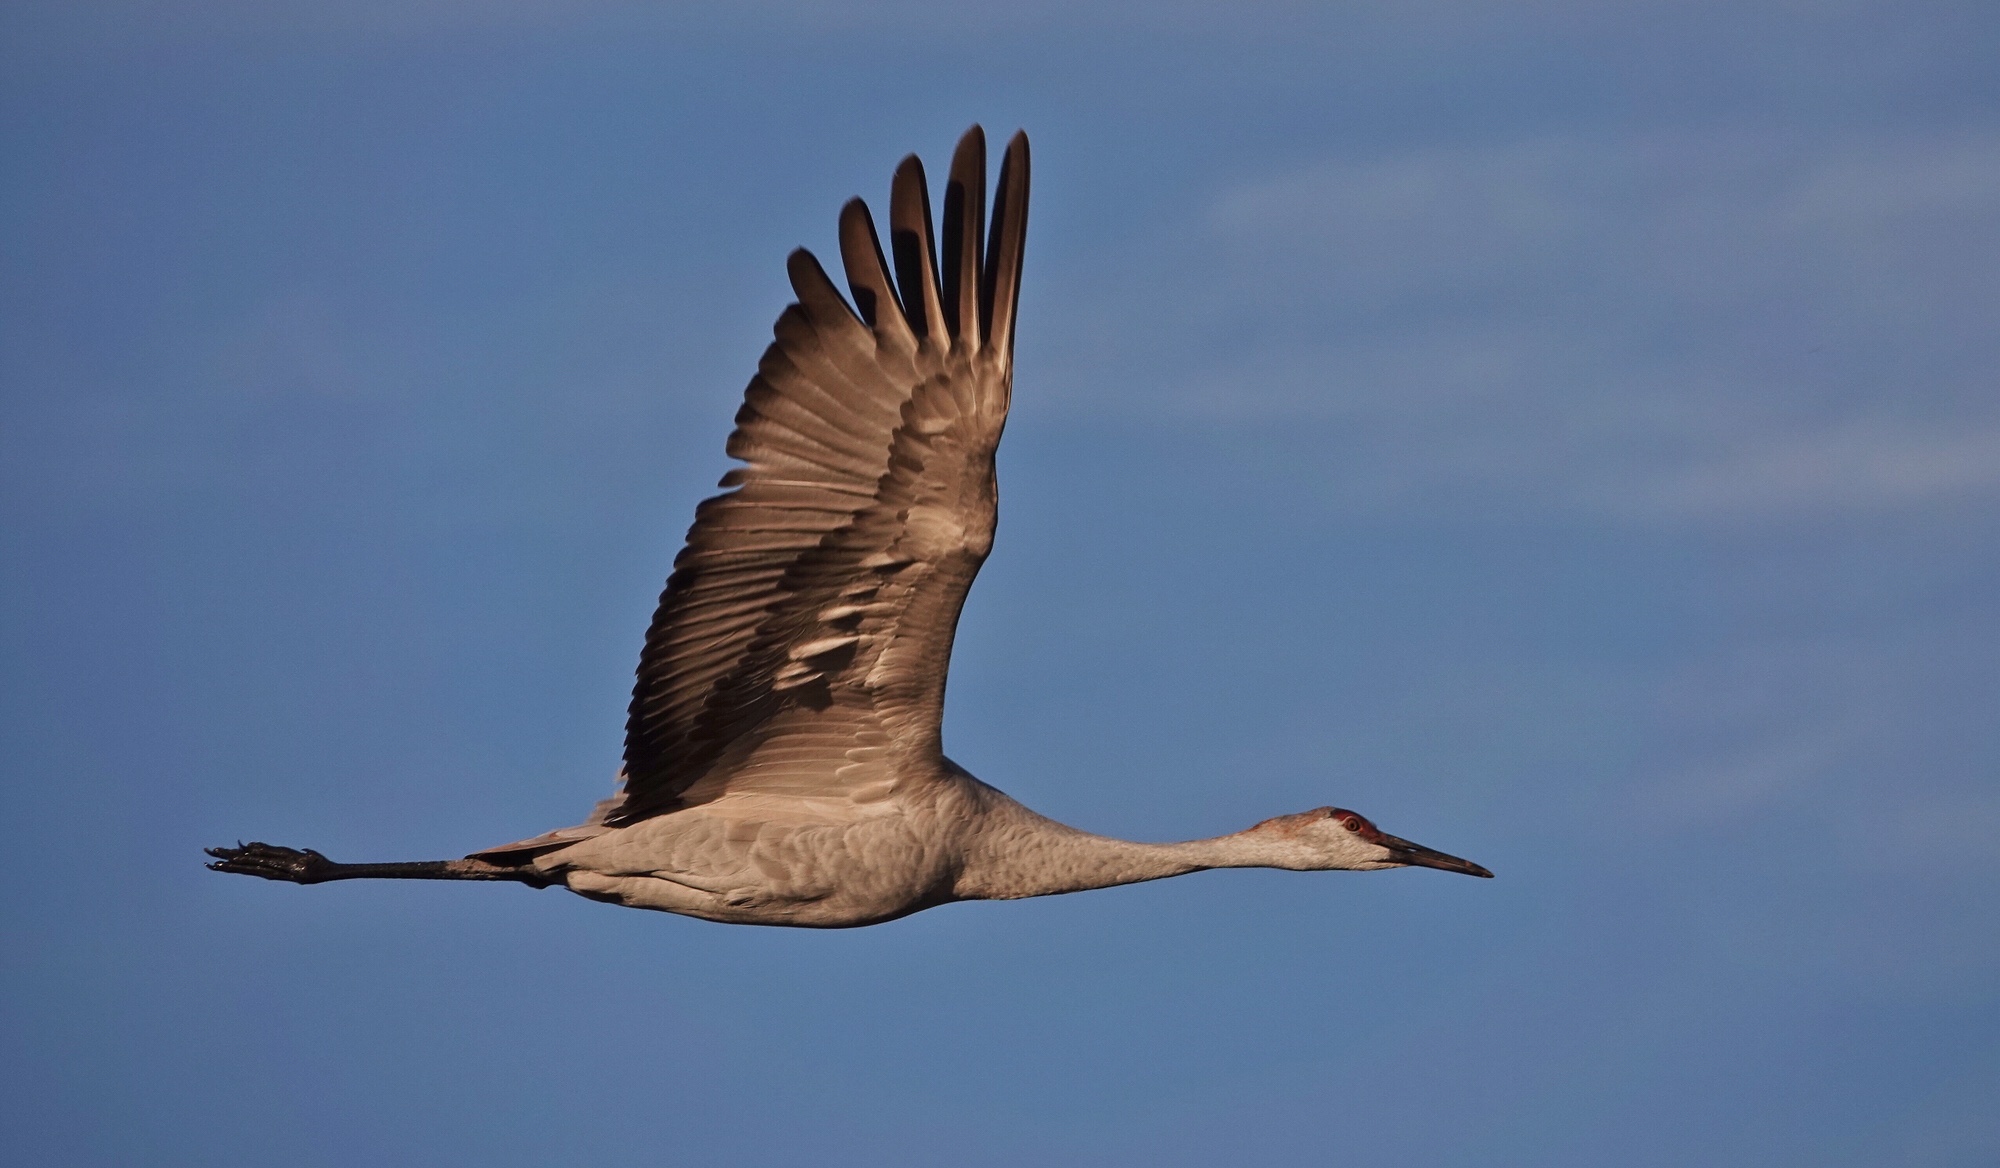
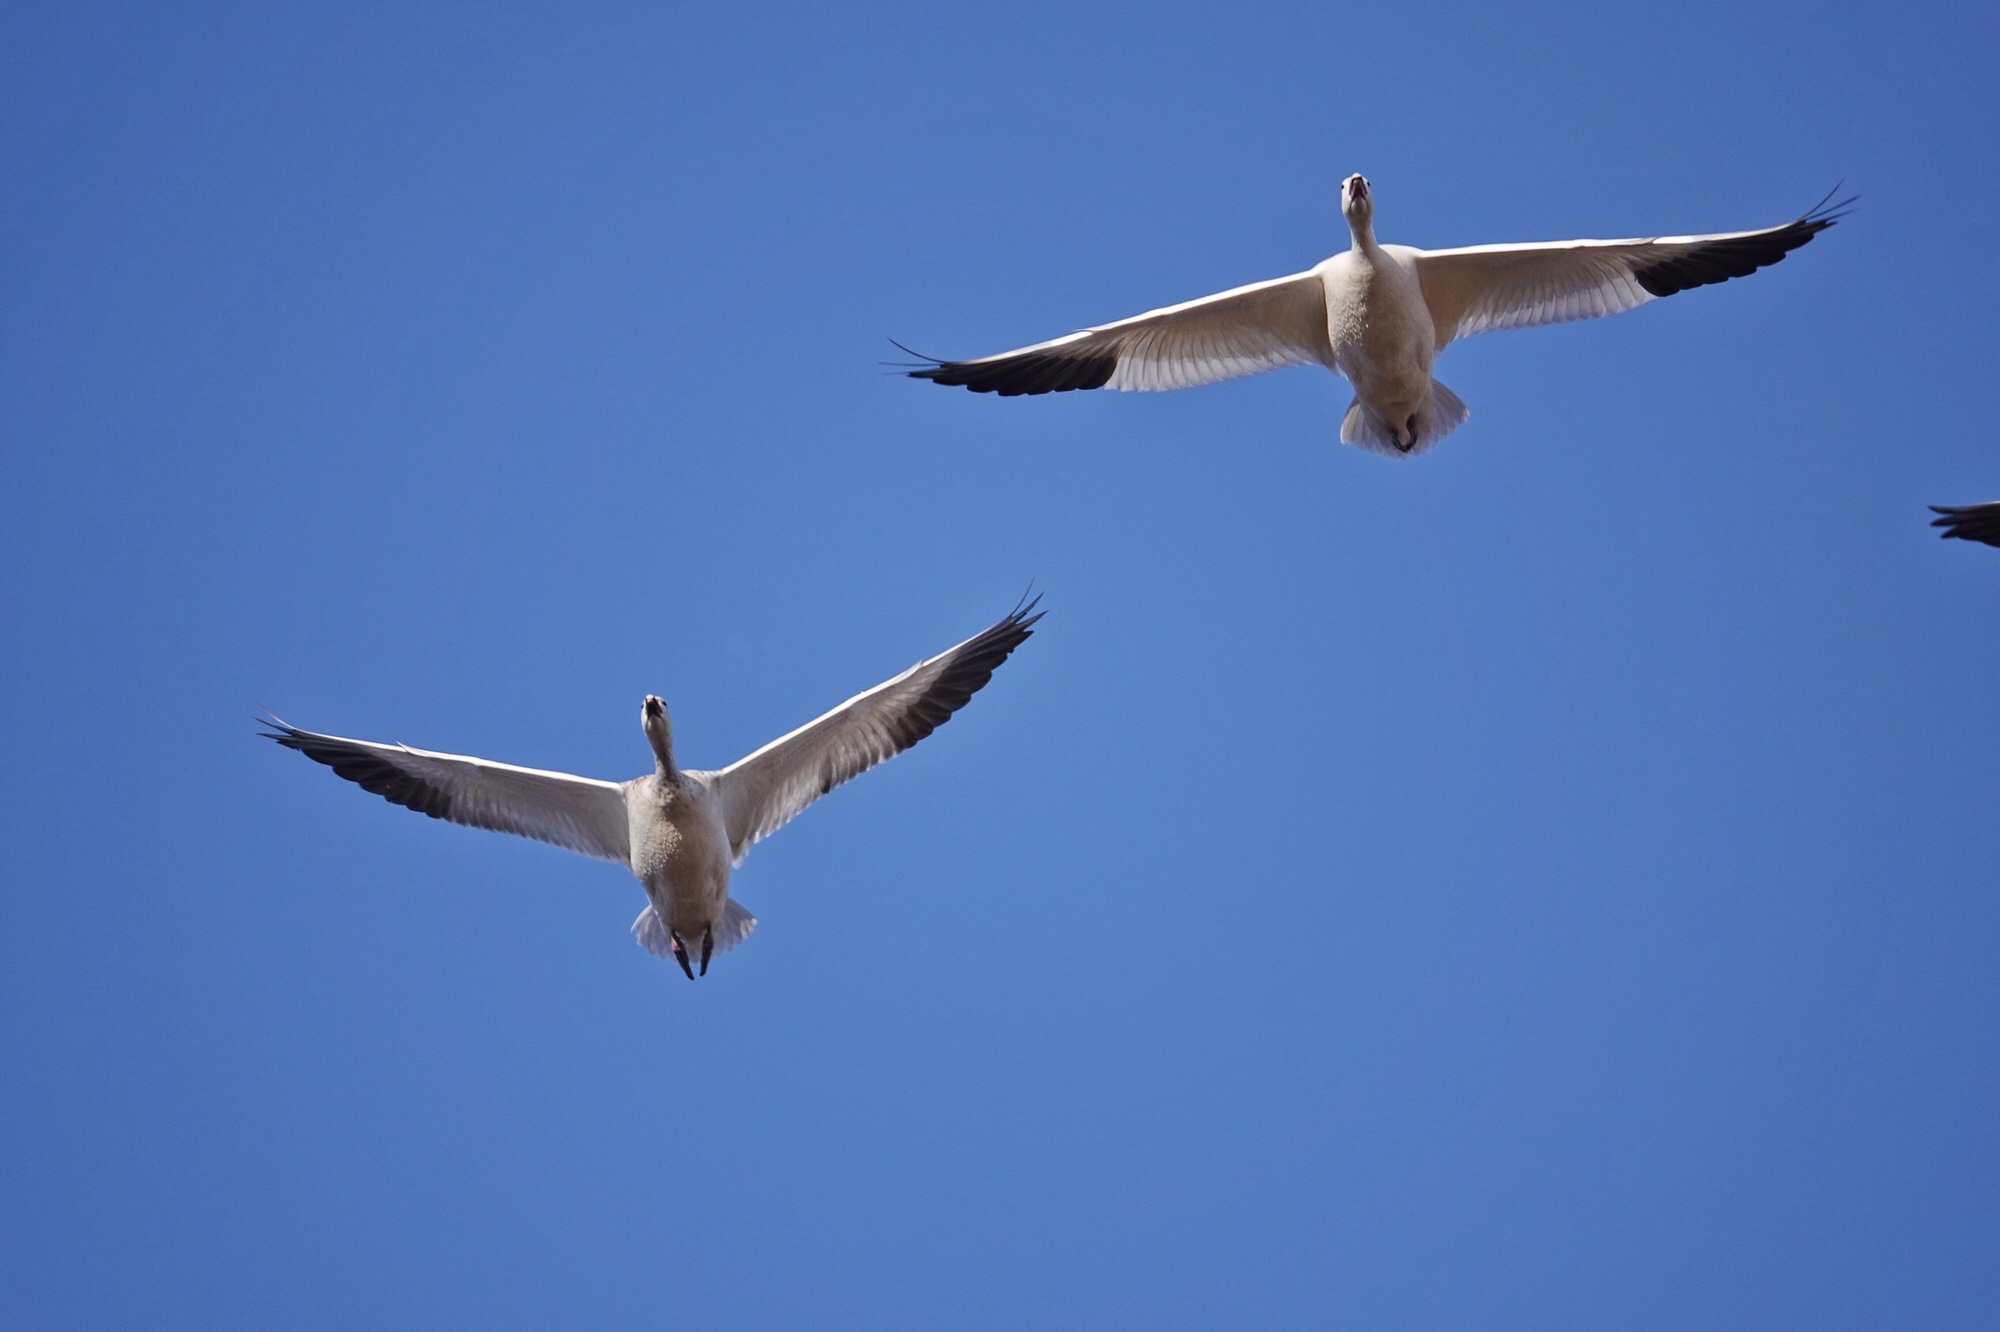
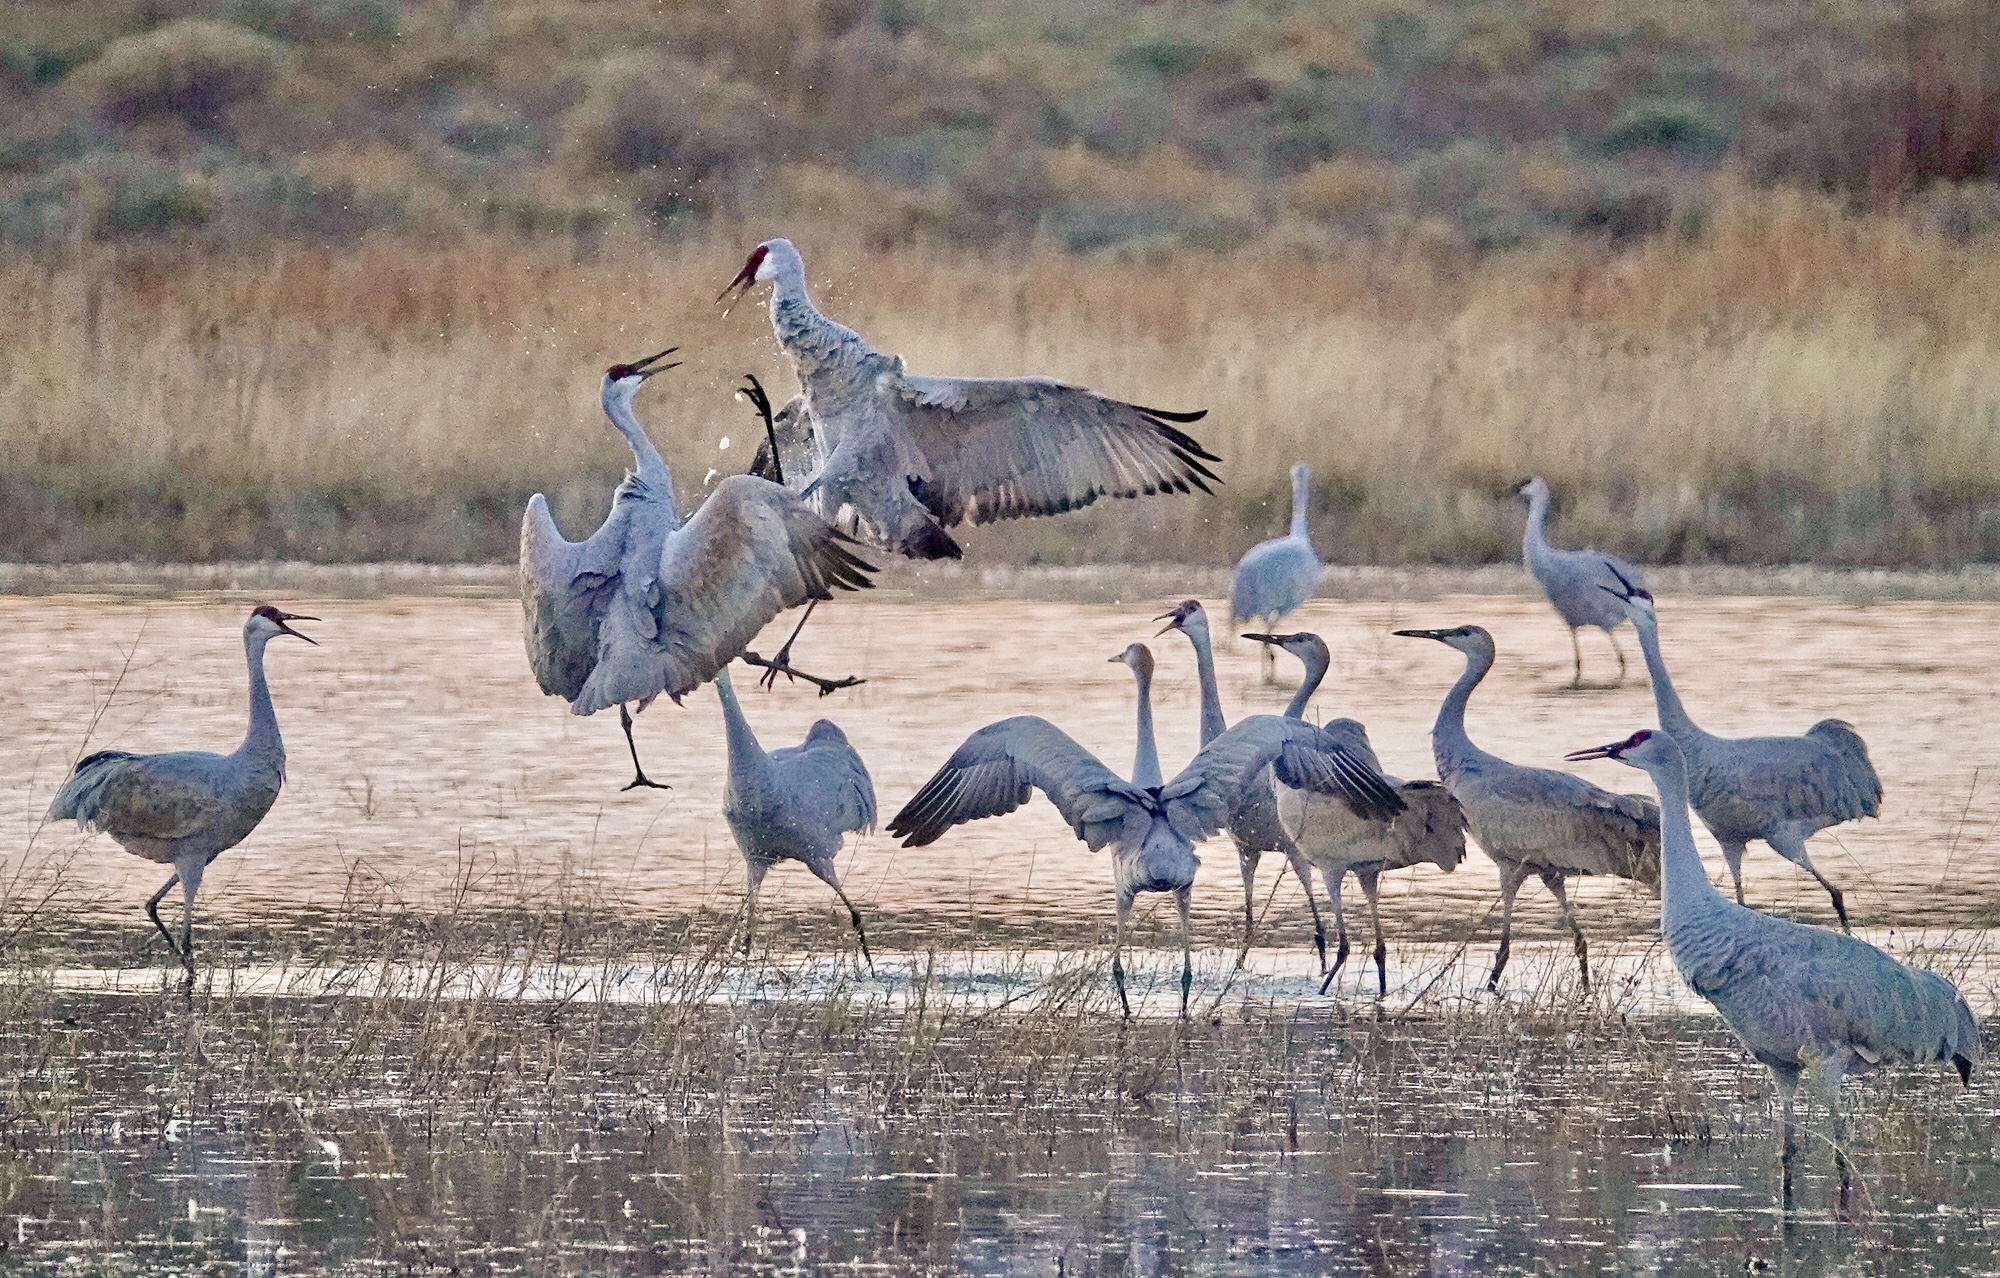
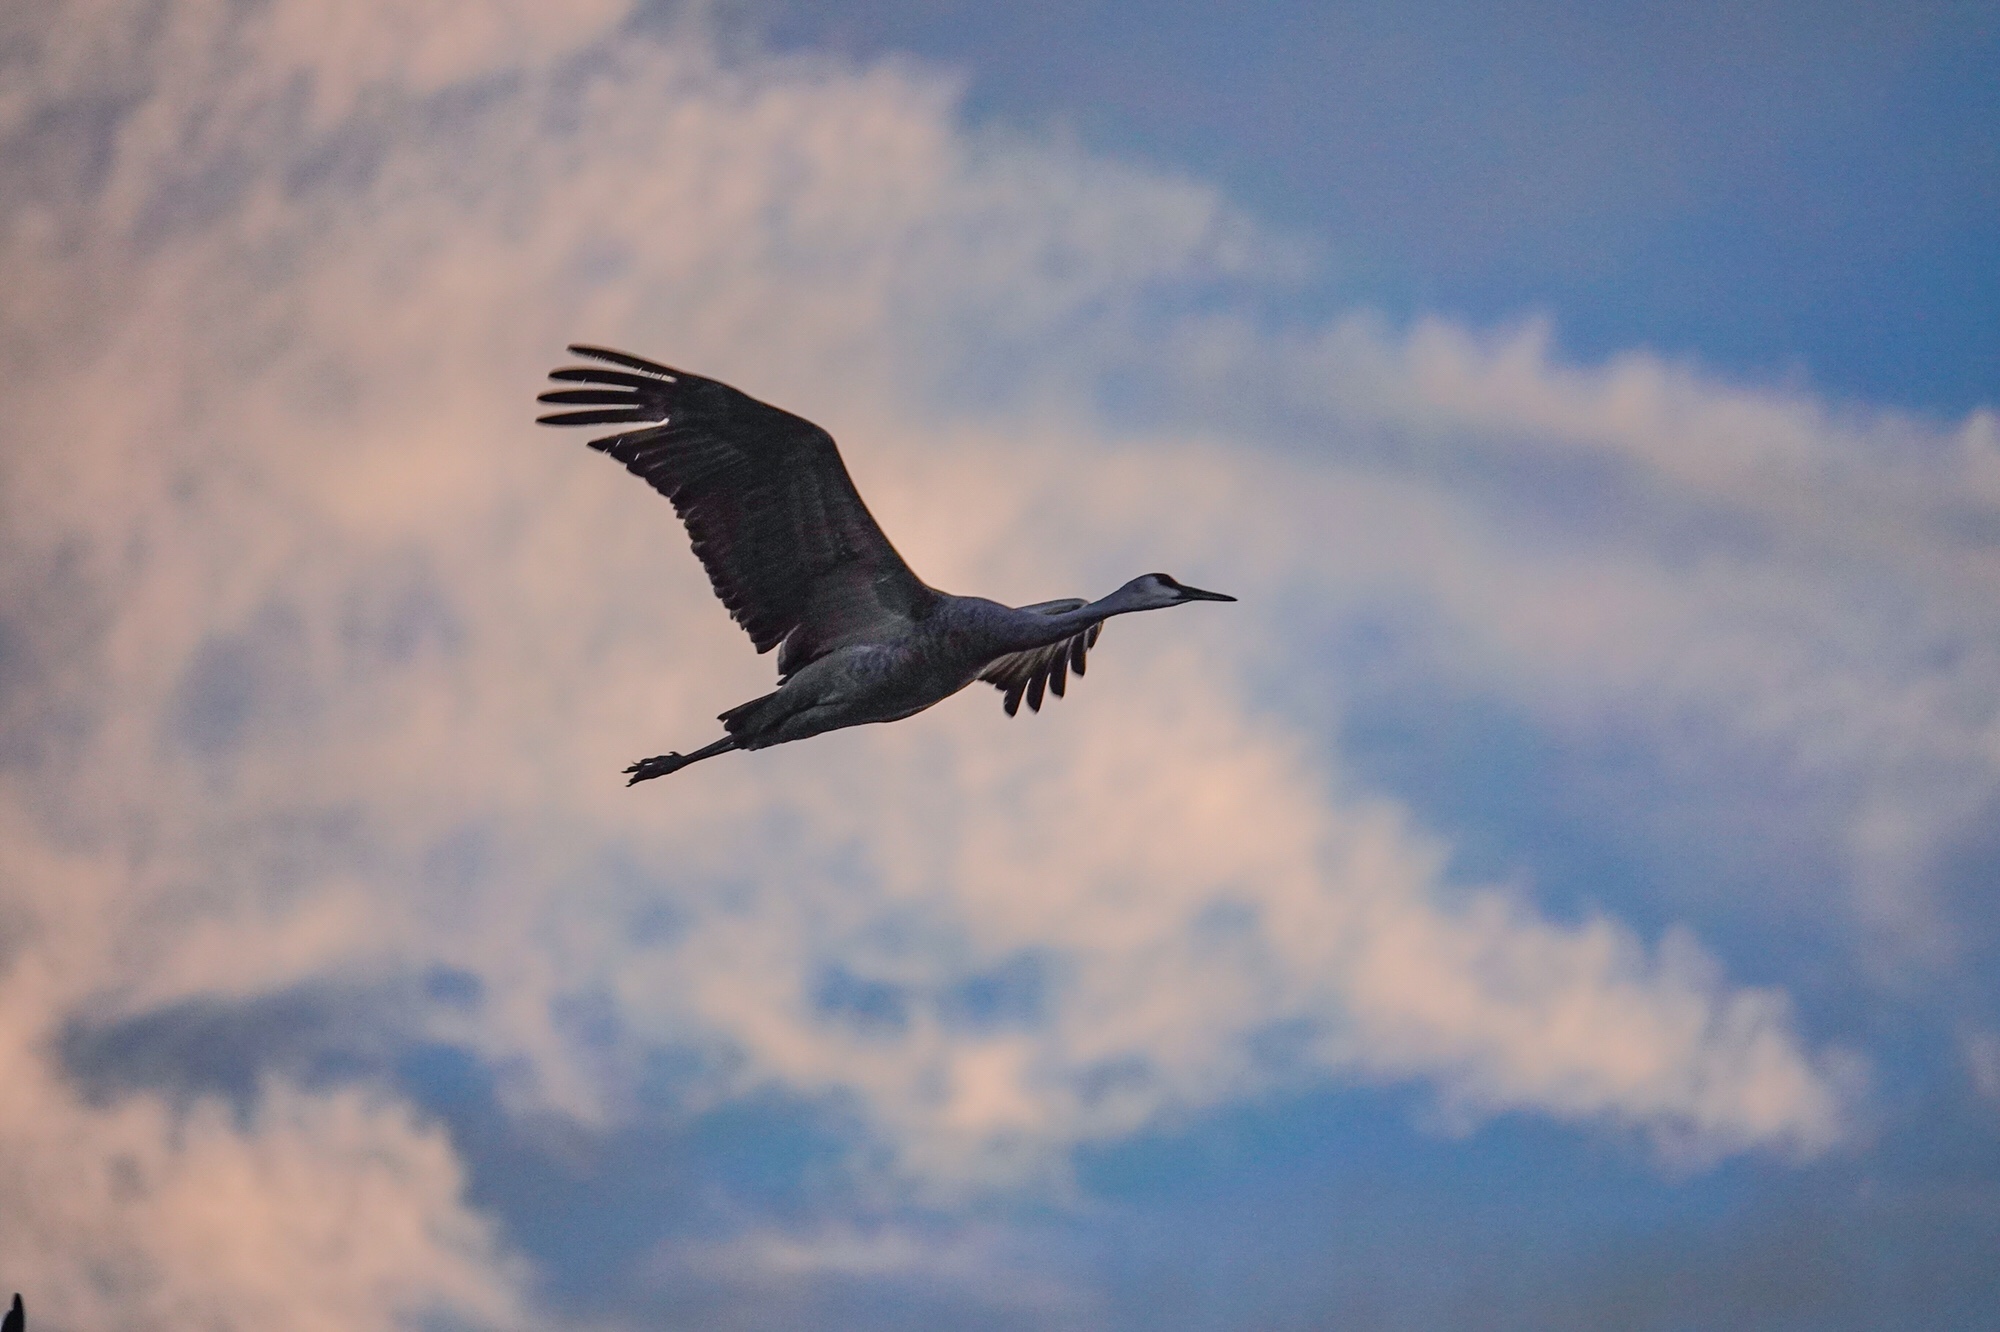
The real change is in the sensor and processing engine. This might be the same sensor, with hybrid focus and 325 phase detection focus points, as Sony used in the RX100V, but it is processing engine from the top of the line A9 full frame camera. Combine that processing engine with that sensor and you get totally amazing focus capability. Birds in flight are embarrassingly easy. Yes. Embarrassingly easy. It used to be a real challenge with a Point and Shoot superzoom, even the RX10iii, to get even the occasional bird in flight. With the iv, you literally just point and shoot. You can use a specific focus area in the center of the frame, which picks up birds in flight easily against most backgrounds, and the camera will focus between frames even at 24 frames per second (though I never use more than 10 frames per second). The iii locked focus on the first frame, which made following birds in flight much more difficult, often impossible. In fact, I use this center frame focus setting for general wildlife photography, so the camera is ready and able to pick up the unexpected flyover. For more dedicated birds in flight work, there is lock on tracking auto focus, which will pick up a bird anywhere near the center of the frame and lock on to follow the bird as you pan. Both work really well, depending on how large the bird is in the frame. Tracking works best with bigger birds and birds bigger in the frame. And, as far as wildlife action on the ground (or sports for that matter). the focus lock is amazingly fast and positive. I came back from Bosque del Apache this year with more satisfying Birds in Flight images, from just this year, than I have managed to get in all the years I have been going there with other cameras.
Sandhill Crane in flight. Bosque del Apache National Wildlife Refuge, Socorro, NM. 600mm. 1/1000th.Snow Geese coming head on and passing close overhead. The RX10iv tracked these geese in as they came and held focus through over 50 frames at 24 fps. Totally amazing.Sandhill Cranes in confrontation after sunset. 600mm, 1/1000th @ ISO 1600. An amazing shot with any camera.
In general wildlife shooting, occasionally the iii would hunt when trying to get a bird or beast in lower light, especially with a confusing background. Not the iv. I recommend keeping the camera set to “continuous focus”, which seems to turn on the Phase Detection Focus points for faster focus. The focus is so fast that you quickly forget to even think about it. Point and shoot!
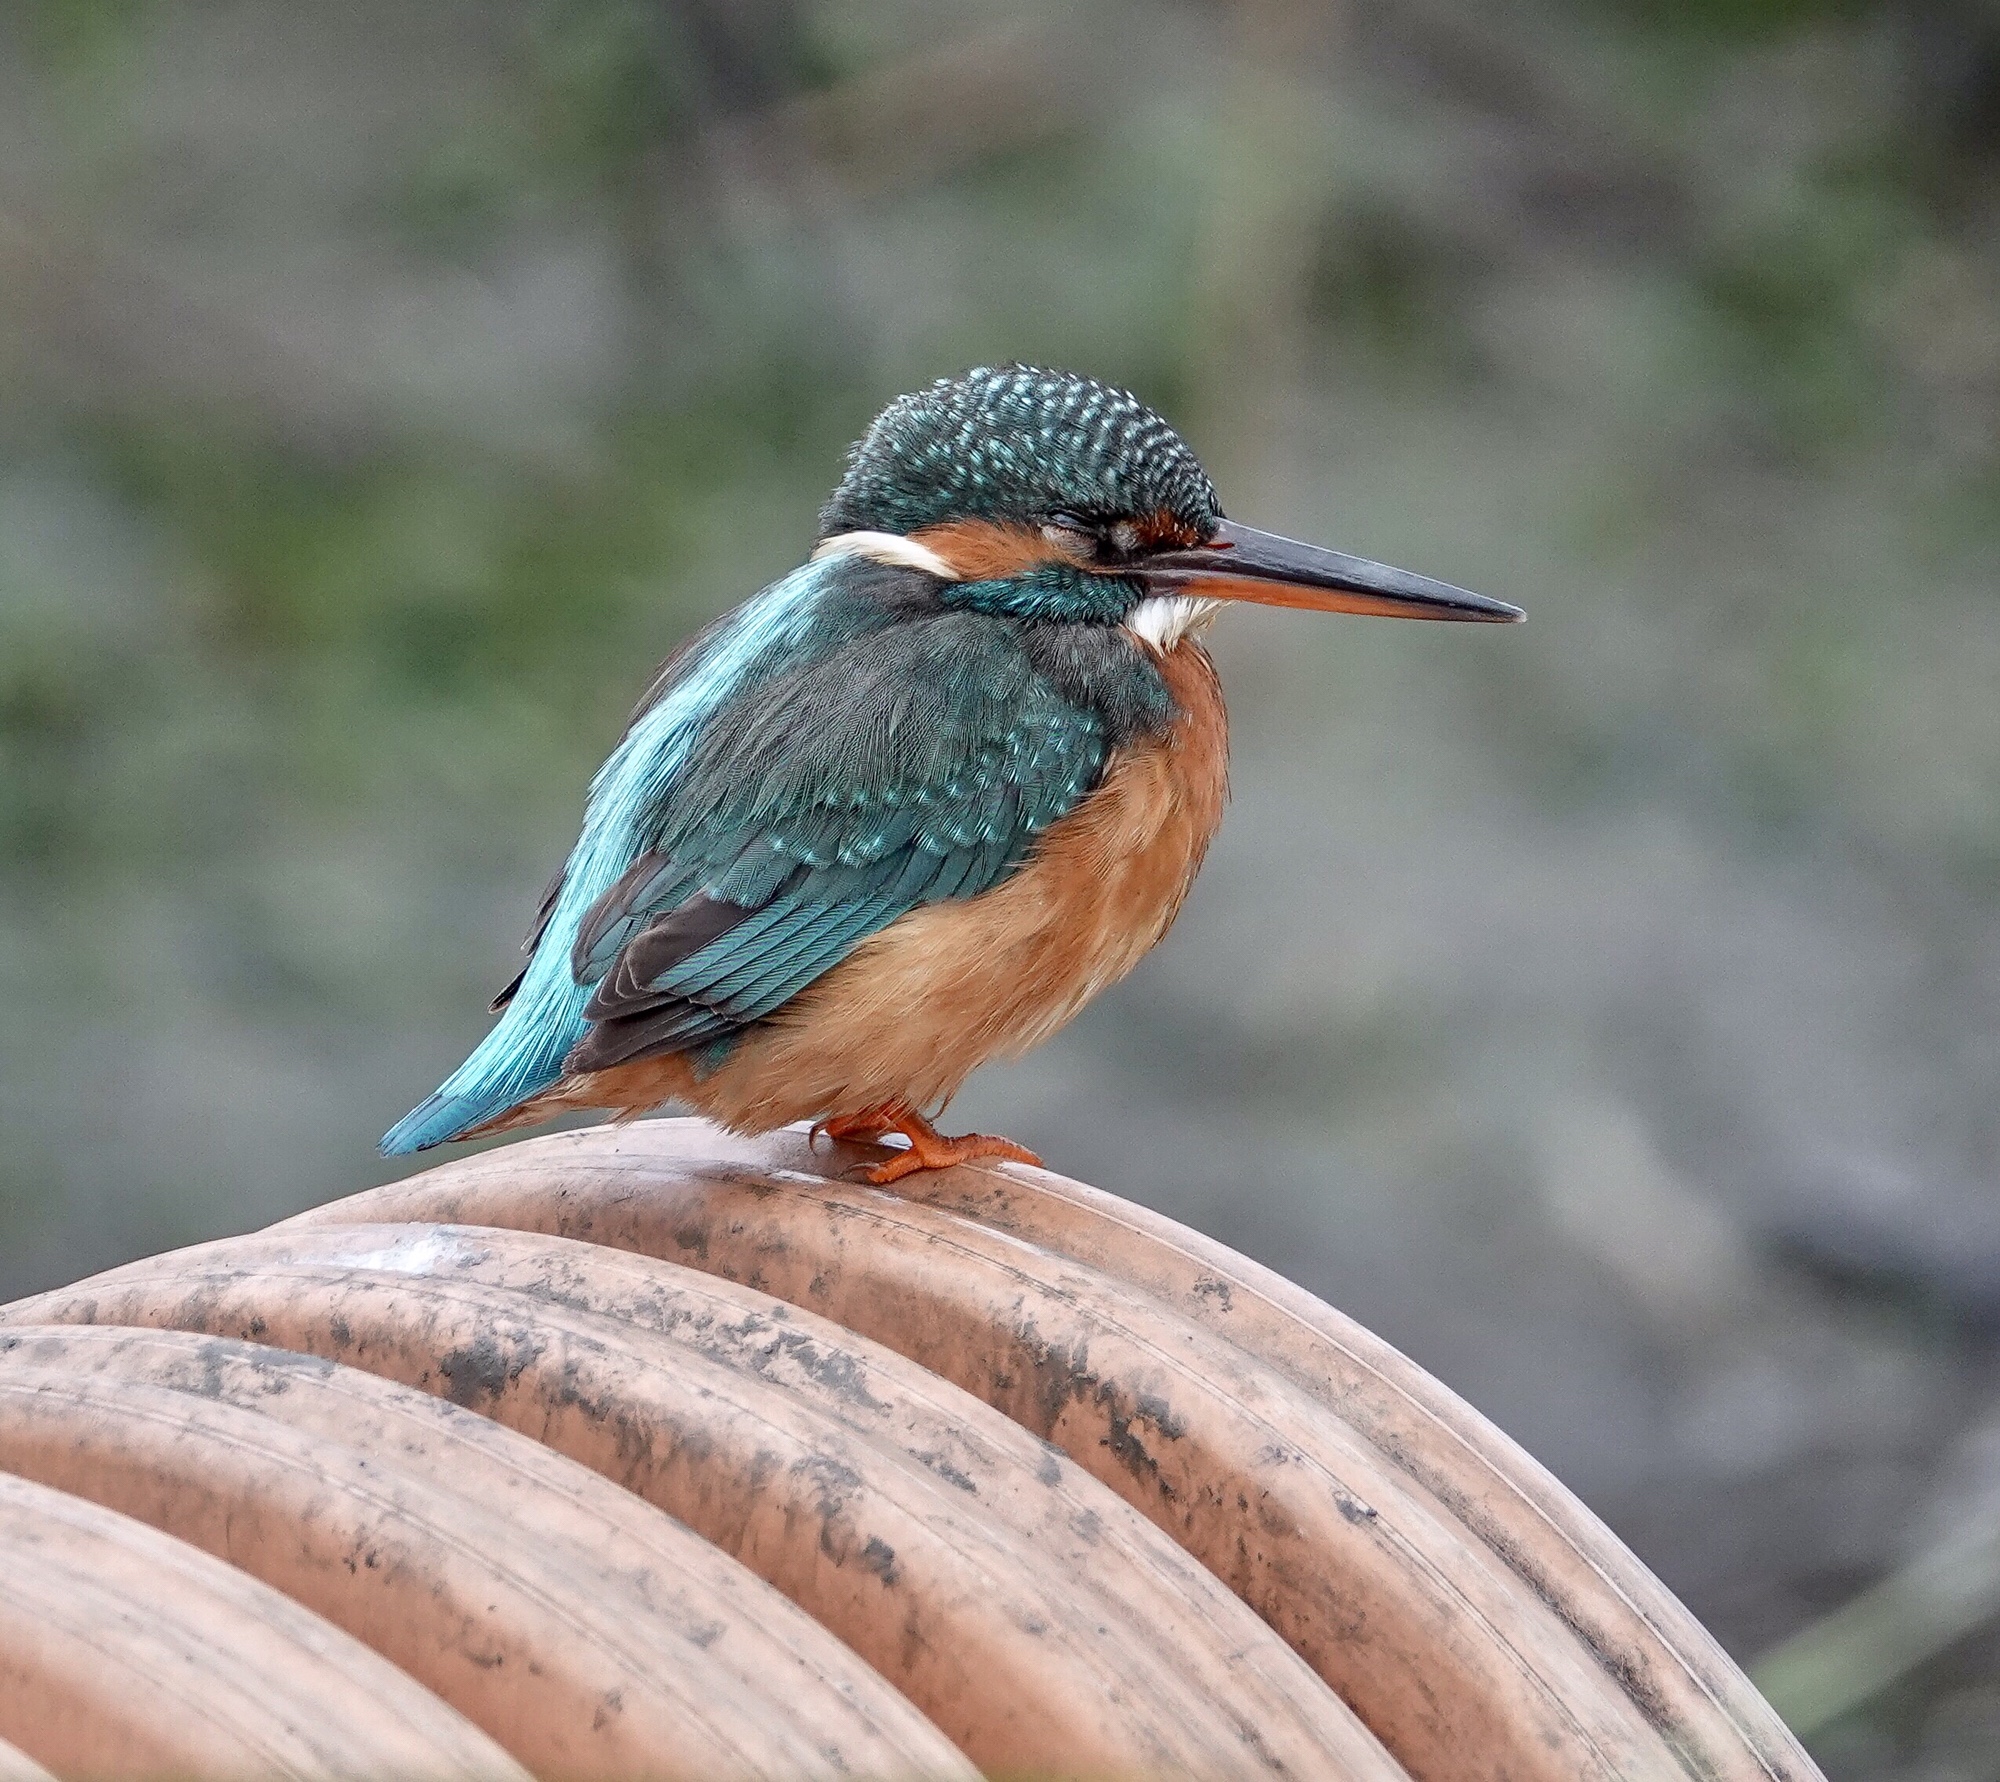
European Kingfisher, Tagus Estuary, Portugal. Early morning in low light.
The new processing engine has also enabled some refinements which I am only beginning to appreciate as I use the iv more. Auto HDR has been improved to the extent that I rarely use any of the other HDR settings (you can still set 1EV to 6EV differences) and, if you are careful, you can shoot an HDR right out to 600mm on the zoom. The iii could not assemble an HDR much beyond 100mm. Highlights in Auto HDR are now very well controlled. They were not in the iii. That does not sound like much, but since I use In-camera HDR a lot, it means that I do not have to think about adjusting my HDR settings as often. As a Point and Shoot photographer I am all for that!
600mm in-camera HDR. Not possible with most cameras.
Another more subtitle improvement is the menu system. There are still a bewildering number of options and menu screens, but menu items are now grouped in more logical manner on each menu screen, with each screen clearly labeled so you know where you are. I use the excellent function button and function menu almost exclusively when in the field, so I never minded the Sony menu system, but I know that some did. 🙂 The changes should make it easier for folks to find what they are looking for, but I still recommend using the function menu whenever possible.
Some folks are excited about the 24 frames per second (with focus between frames!) capability of the RX10iv. That is essentially movie frame rate, and you can capture action sequences in the equivalent of a 20 mega pixel per frame video. I have not yet found a use for it. Somehow even the 10 fps “medium” speed seems faster and smoother than the 10 fps top speed on the RX10iii did…and focus between frames is just a wonderful improvement. They have also added a 2 fps slow speed continuous. And the size of the image buffer is amazing. I think I read that you can take over 300 frames before the camera freezes up to clear the buffer. (While I have tested the limits, one thing I discovered is that, though you can continue shooting, the buffer is clearing in the background, and you can not make changes in the settings of the camera until the buffer completely clears.) I can tell you one thing…you can burn through an SD card really fast at 24 fps.
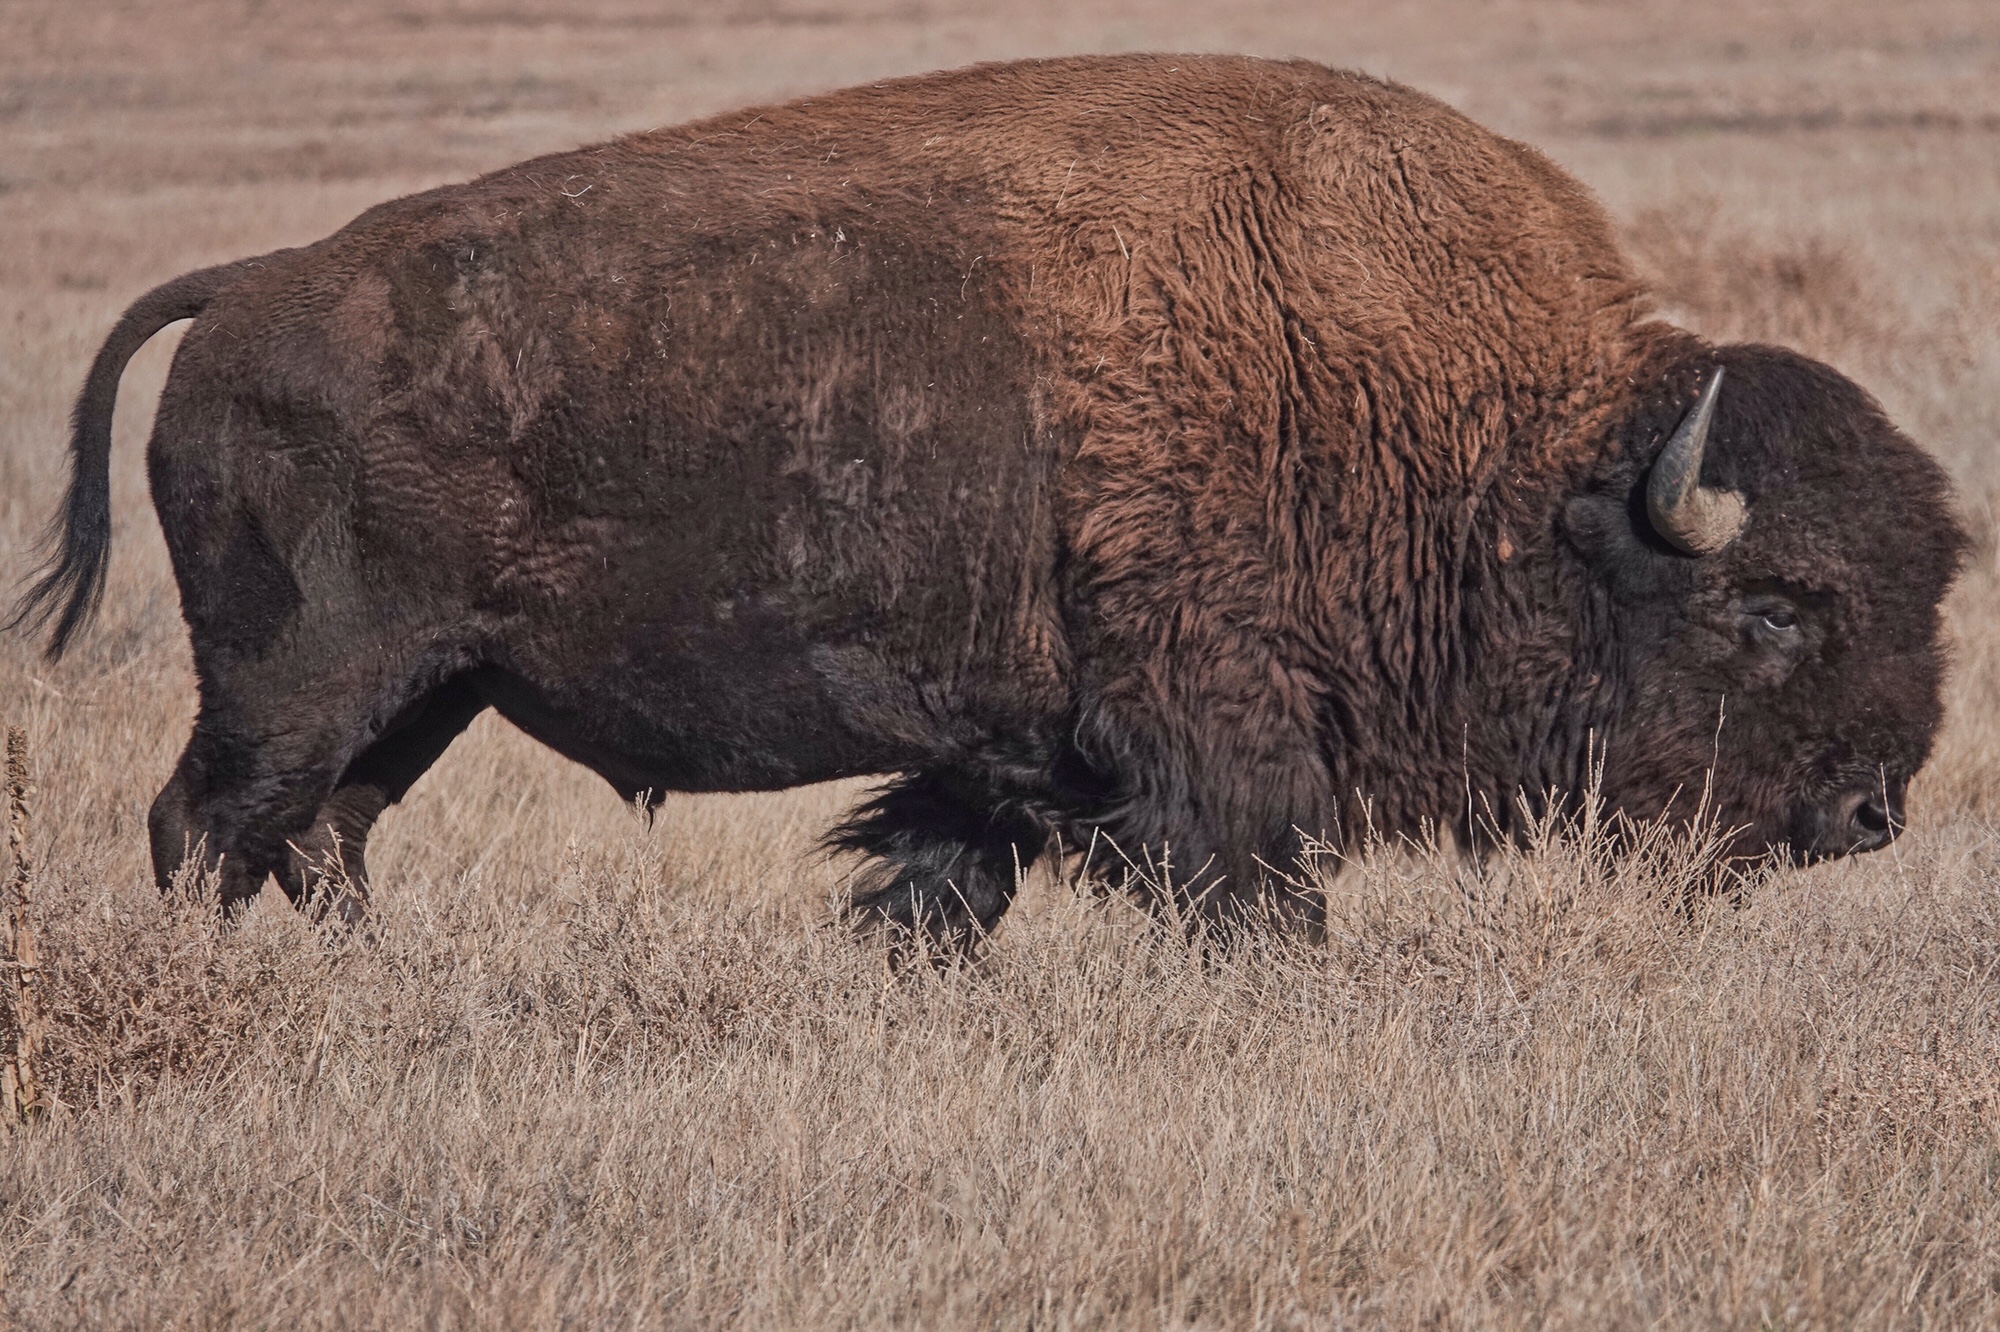
I used touch to focus to place the focus exactly over the Bison’s eye without reframing.
Another change is the addition of touch-to-focus on the new touch screen. It is actually more like touch-to-move-the-focus-area unless you have the camera in continuous focus mode…and it does not, like some implementations, actually take the image. You still have to use the shutter button for that. Many folks on the dpreview Sony Cybershot forum recommend turning touch to focus off, as you do sometimes accidentally move the focus point when handling the camera…however I find touch focus to be really useful. For instance, when shooting a American Bison at close range, I was able to touch the screen to instantly move the focus to the eye of the beast, where I wanted it. On close-ups of birds, I often just tap the screen, again to move the focus to the head or eye. When using Anti-motion-blur mode inside at parties, one of the things I disliked about the mode in the iii was that you lost control of the focus point. On the iv in the same mode, you just tap over the face you want in focus, and, presto, good to go.
My daughter Anna at graduation. Anti-motion blur mode for the low light, and touch to focus to make sure the camera focused on her face.
Actually touch to focus is one of the few things the new touch screen actually does. You can’t use it to set menu items or to navigate the menu system. You can, however, double tap an image in review mode to zoom it, and move the image around to view other parts with your finger. Strange choices on the part of the Sony engineers…but they tried. And, despite the occasional fumble when I get the camera up to my eye and find that the focus square is way off in the upper left hand corner, I do find touch to focus worth getting used to.
It is hard to say for sure, but my impression is that the new sensor and processing engine have also improved higher ISO performance slightly. It was already pretty good on the iii, but in similar situations the iv just seems to do a bit better. And if you are not familiar with the image quality of the Sony 1 inch sensors in the RX series, all I can say is, be prepared to be impressed. Between the exceptional ZEISS glass and the Sony sensors and processing engines, the RX series in general, and RX10iv in particular, produce images that hold up very well, at normal viewing sizes and distances, to anything on the market, including full frame cameras and lenses many sizes larger than the relatively compact RXs. Certainly if you are using the Sony RX10iv as your all around travel, wildlife, landscape, and party camera, you will have nothing to apologize for when displaying your images (and much to be proud of).
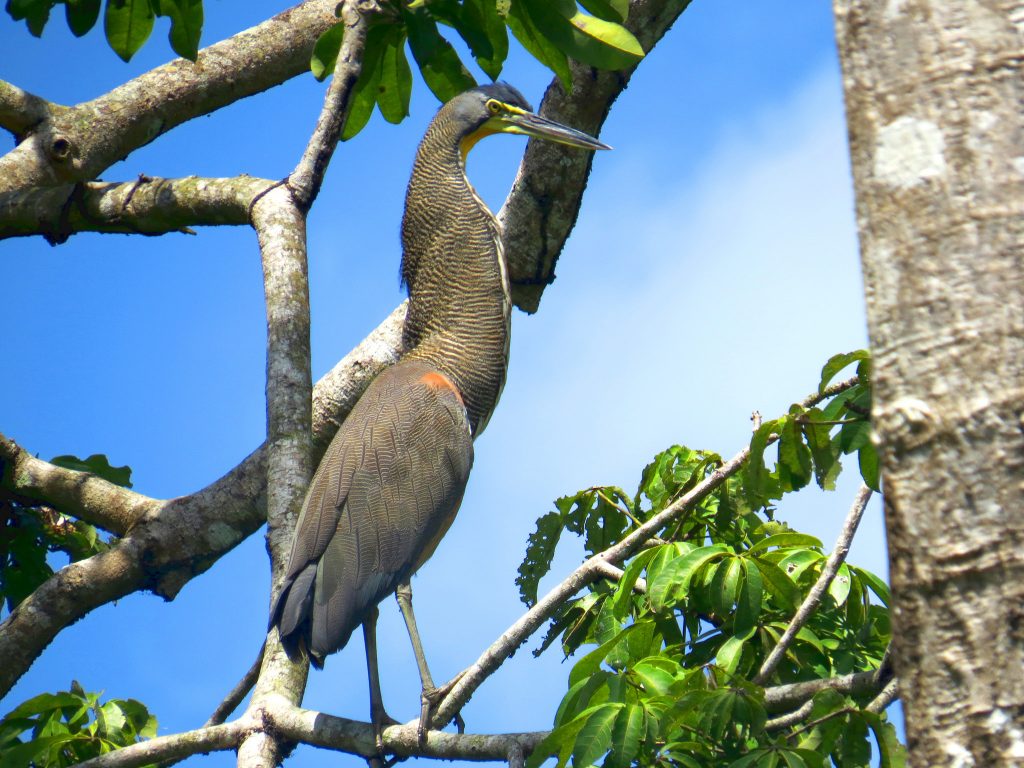
Crane against the sunset, Bosque del Apache, New Mexico. 600mm.
I already loved the RX10iii. It was the best camera I have ever had the pleasure of traveling with, and I owned it during 18 months when I visited so many wonderful places. I have only had the iv for a few months now (since a few days after it was released), but already I love it even more. It has not been as many places yet, but it will get there…and I know that when it does, it will bring back the images I want, day after day, time after time, amazing place after amazing place. I have no qualms about calling it the best fixed-zoom, superzoom, compact camera ever made. I plan on wearing it out before they come out with the RX10V (which will go to 800mm at f5.6 of course 🙂 This is my camera and I love it!
Barbara, Carol, Greg, Steve, Sally, and Ev waiting for breakfast on the porch of the restaurant on our last day in Honduras
Well it actually happened! The first Point and Shoot Nature Photography adventure in the tropics…at the Lodge at Pico Bonito, Honduras, was, imho, a solid success. My wife, Carol, came along, as well as my oldest daughter Sally (as my assistant), and we had three participating adventurers: Ev, Barbara, and Greg.
It was a Point and Shoot trip, and between us we had a Nikon P610, a Nikon P900, a Canon SX60HS, and a Canon SX50HS. I brought both the Nikon P900 and my new(er) Sony RX10iii, but I shot most of the time with the Sony.
The goal was to provide as many photo ops as possible over 5 full days. The Lodge at Pico Bonito is somewhat unique in providing first class accommodations and gourmet food, excellent guides, and a totally new adventure each day.
We only got to spend one full morning in and around the actual grounds of the Lodge, which is beautifully landscaped with native plants and surrounded on one side by an overgrown coco plantation, and on the other by untouched rainforest. We also had a few afternoon hours (when some of us processed pics and others explored) and we did a night hike in the coco plantation and the edge of the rainforest for nocturnal birds, reptiles, and frogs,
Greg’s image of the Crowned Wood Nympth at the Lodge at Pico Bonito, right off the porch. Canon SX50HS.
We could easily have never left the grounds and trails of the Lodge and still have had plenty to photograph. You can sit and watch and photograph several species of hummingbirds coming to the feeders all along the edge of the roof over the open porch, or veranda, of the Lodge and restaurant, and perching in the trees and bushes within a few feet. We saw mostly White-necked Jacobins, but there were also Crowned Wood Nymph, Brown Violet-ear, Violet Saberwing, and a few Long-billed Hermits and White-breasted Emeralds. There was a family of Black-cheeked Woodpeckers raising
Black-cheeked Wood Pecker chick, The Lodge at Pico Bonito. Ev’s image with the Nikon P900.
young in a dead palm only a dozed feet from the deck between the Lodge and Conference Center, and under bushes near the base of the palm an Agouti was raising young. On the trails around the lodge we had good views of Blue-crowned Motmot and Black-headed Trogon, and glimpses and quick photo ops of Red-legged Honeycreeper and Masked Tytira. Some of us had good photo ops with Collared Aracari. (Between our seeing it and writing this, the AOU has split Blue-crowned Motmot into several species. I am not sure which of the new splits the ones we saw fall under.)
Blue-crowned Motmot. The Lodge at Pico Binito. Sally. Nikon P610.Blue-crowned Motmot, the Lodge at Pico Bonito. Barbara with the Canon SX60HS.
Elmer (Elmer Escoto our expert guide) lead us off the trail to find a mother Great Pooto with a well grown chick sitting out in plain view. Perhaps the highlight of our day on the grounds was when Elmer tempted a Little Tinamou out into the open where we could all see it, and at least a few of us got shots. The Lodge maintains a butterfly garden and butterfly house, and between them we saw a dozen species of tropical butterflies: including the amazing Red Cracker (a blue butterfly despite its name…with a wing pattern that reminds me of a dutch dinner plate). There were at least 5 different Heliconians (Long-wings), and, in the butterfly house, several of the giant Blue Morphos that are pretty much the butterfly emblem of the tropics.
Little Tinamou, The Lodge at Pico Bonito, Steve with the Sony RX10iiiRed Cracker, The Lodge at Pico Bonito, Steve with the Sony RX10iiiAmazon Kingfisher, Rio Cangrejal, Honduras. Ev with the Nikon P900 at full reach.
I asked Elmer to find us a waterfall we could photograph and he suggested a run out to the Cangrejal river where they take adventuresome guests for white-water rafting. Though it was not on our schedule, we made time for it, and the lodge provided a van, on the afternoon of our day around the grounds. The waterfall turned out to be somewhat distant and shrouded in mist from intermittent rain, but the scenery going up the river and then across a
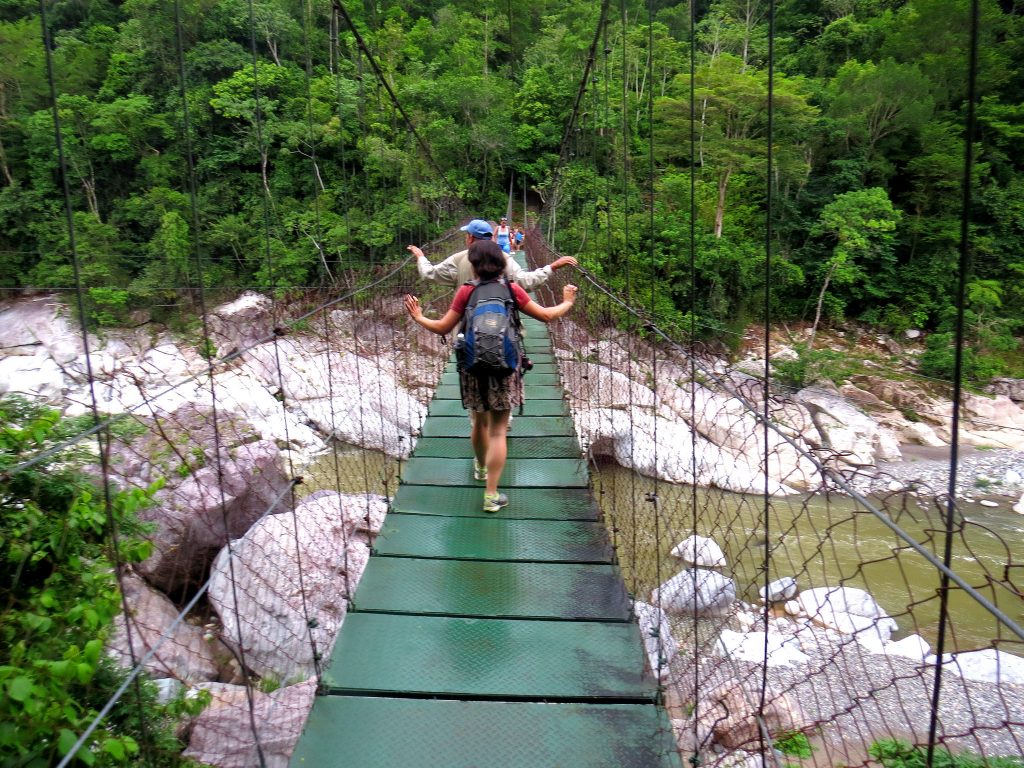
The suspension bridge over the Rio Cangrejal . Greg with the Canon SX50HS
suspension foot bridge high over rushing water and house-sized boulders, was spectacular. Along the way we had great views of Amazon Kingfisher…though at the limits for photography, and on the other side of the river we encountered the Helicopter Damselfly…the largest damselfly in the world, with a wingspan larger than even the largest dragonfly. We tracked it into the deep shade of the rainforest where we were able to get some decent flash shots. We got to see some unscheduled landscape, and a part of Pico Bonito National Park that most who go to the Lodge for birding and photography do not see.
Helicopter Damselfly, Rio Cangrejal, Steve with the Sony RX10iii and flashThe Banana train to Cuero y Salado Wildlife Refuge, Ev with the Nikon P900.
The next morning was our first real day in the field. We visited the mangrove channels of the Cuero y Salado estuary, riding a century old banana train into the refuge at the mouth of the rivers, and then taking a small motor boat up the channels into the mangroves as far as we could go.
on the Banana train on the way to Cuero y Salado. Steve, Sony RX10iii. Elmer, Sally, Greg and Ev.
My hopes for the boat adventure are always Pygmy Kingfisher (since I really like Kingfishers), Bare-throated Tiger-heron, Boat-billed Heron, and monkeys…both Howler and White-faced Capuchin. There is always a remote hope for Agami Heron and Sungrebe. On our day on the rivers, we had good looks at all but the last two, plus Long-nosed Bats, many Northern Jacana, Black-bellied Whistling Ducks, Black-headed Trogon, and more Green Herons than I could count. And I mean really good looks at everything but the Boat-billed Heron, which flew off before everyone could get pics, and the monkeys, which played hard to get in the dense foliage.
This is a gallery of images from the group of the same very cooperative Pygmy Kingfisher. We had some trouble finding it in the first place and had actually given up and were headed back out of the channel where it is known to nest, when Elmer’s sharp eye caught it. We were able to drift close in with the boat, but these are still shots are taken from a moving boat of a very small bird. Great results for everyone.
Steve, Sony RX10iii
Ev. Nikon P900
Greg, Canon SX50HS
Sally, Nikon P610
Barbara, Canon SX60HS
Deep in the mangroves on a channel off the Cuero.
We had a similar opportunity with the Bare-throated Tiger-heron. Sally spotted it as we motored down the open river toward another channel (earning her supper that day), and we were able to drift in within a dozen feet of it before it flew up to perch practically right over our heads.
Bare-throated Tiger-Heron, Steve, Sony RX10iiiGreg. Canon SX50HS
As I mentioned, the monkeys were elusive, and especially hard to photograph from a moving boat. I managed a quick shot of the Howler we spotted, and even more distant shots of the White-faced Capuchins. The Capuchins came just close enough to keep an eye on what we were doing…but not really close enough for photography.
Howler Monkey, Steve. Sony RX10iii
White-faced Capuchin, Steve. Sony RX10iii
Looking up the river back towards Pico Bonito. Sally rocking her Comics Workbook tee shirt and framing the view.Clash of cultures. Motorbike and hand crafted dough-out canoes.
Once back at the boat dock near the Visitor Center for Cuero y Salado, we enjoyed some chilled fruit and cookies, courtesy of the Lodge, and then hiked about 300 yards out to the beach at the mouth of the rivers. It was typical June Honduran day on the Caribbean coast…sunny with towering clouds over the mountains and a storm coming in off the sea.
Looking east from the mouth of the Cuero y Salado rivers.The group on the beach at Cuero y Salado. Ev, Sally, Carol, Barbara, Elmer, and Greg.
When we got back to the lodge, after lunch on the veranda, some went exploring around the grounds, while others rested until we met again at 3 pm to go to the first Tower in search of the signature bird of the Lodge at Pico Bonito…the Lovely Cotinga (and whatever else we could find). The Cotingas put in an appearance, though beyond the range of practical photography, but we had good views of a White Hawk out across the valley, some Keel-billed Toucans feeding on fruit, and our third primate of the day: Spider Monkeys (way over on the far side of the valley).
At the limits of what is practical, even with 1335mm reach. White Hawk. Barbara. Canon SX60HSSpider Monkey. Too far! Steve Sony RX10iiiKinkajou, flash shot, Steve Sony RX10iii
On our night hike, we went in search of Vermiculated Screech Owl in the Coco plantation. Though we were within a few feet of and heard it calling right above us, we never could find it in the dense overstory foliage. As compensation Elmer found us a Kinkajou within flash range, and the Great Pooto (which was hand-raised at the Lodge a few years ago before release) put in an appearance on its favorite corner of the first tower. The Red-eyed Tree Frogs were calling around the Frog Ponds beyond the tower, and Elmer found us two to photograph. Along the way we picked up both Rainforest and Marine Toads (Marine Toads have to be seen to be believed…they are huge!) and various Anoles and bugs. It was such a rewarding hike that a few of us headed out for an encore the next night.
Red-eyed Tree Frog. Steve, Sony RX10iii
We were up early the next morning for breakfast again, and on the bus for Rio Santiago Nature Resort, a justly famous destination for Honduran Hummingbirds. As a close neighbor to the Lodge at Pico Bonito, Rio Santiago is a favorite day trip. The lodge and brand new cabins are, it
Rio Santiago valley. Steve. Sony RX10iii
seems, half way up the slopes of the mountains surrounding Pico Bonito, at the end of a rough and sometimes steep, but passable, dirt track. (The elevation is actually only about 600 feet above sea-level.)
Along the road on the way up we got out and walked, exploring the fields on either side. We found Boat-billed Kingbirds, Blue-black Grassquits, Rose-breasted Bicards, Passerini’s and Blue-grey Tanager, Scrub Euphonia, Starry Cracker Butterfly, and a nesting Green-breasted Mango Hummingbird.
Starry Cracker Butterfly, Steve. Sony RX10iii
Green-breasted Mango, Ev, Nikon P900
Scrub Euphonia, Greg, Canon SX50HS
Blue-black Grassquit. Greg. Canon SX50HS
Rio Santiago Nature Resort maintains about 200 hand-crafted tube hummingbird feeders year round, which, along with the richly landscaped grounds, regularly attract over a dozen species of hummingbirds. And the hummers are close. You can sit on either of two covered verandas and have hummingbirds literally buzzing around your head. You can stand on the lawn and watch constant activity as the various species compete for space at the feeders less than 8 feet away. It is an experience not to be missed.
On the day we visited the Brown Violet-ear Hummingbirds were dominating the feeders in such numbers that it kept many of the regular visitors away, but it was still a great experience.
White-necked Jacobin, Steve. Sony RX10iii Sports Mode.
Brown Violet-ear Hummingbird, Steve. Sony RX10iii
Standing less then 3 feet away. Steve. Sony RX10iii
Brown Violet-ear. Ev. Nikon P900
Brown Violet-ear. Ev. Nikon P900
Greg worked hard to get this shot of the White-necked Jacobiin with its tail spread. Canon SX50HS
Hummingbirds are not the only attraction at Rio Santiago. It is also one of the most reliable places to see the Keel-billed Motmot. Gartered Trogons are regular there. They have snakes and lizards, dragonflies along the streams, interesting butterflies, a resident pair of Specticaled Owls, and, this year, an abandoned Margey kitten that they are attempting to raise for release. And if you enjoy scenery they have one of the most attractive small waterfalls in the foothills of Pico Bonito National Park, right there on the grounds.
Elmer worked hard to find us a Keel-billed Motmot, and it was there, calling above the waterfall, but it stayed high in the canopy. We got the shots we could under very difficult conditions.
Steve. Sony RX10iii
Ev. Nikon P900
Sally. Nikon P610
Greg. Canon SX50HS
Stop-light Butterfly. Greg. Canon SX50HS
Margay cub, Steve. Sony RX10iii
Elmer with a small brown racer that bit three of us. Not venomous! 🙂
Gartered Trogon, Steve. Sony RX10iii
Waterfall at Rio Santiago. In-camera HDR. Sony RX10iii
The Specticaled Owls were also playing hard to get during our visit, but several of us managed decent shots.
Ev. Nikon P900
Greg. Canon SX50HS
Sally. Nikon P610
Looking back from the boat toward Sambo Creek and the coastal mountains of Honduras.
Day four found us headed for a totally different experience. We took the van early to Sambo Creek east of La Ceiba on the coast, where we donned life preservers and boarded a twin engined, 14 foot powerboat to visit Cayo Cochino, islands 17 miles off-shore. Cayo Cochino encompasses 2 volcanic and coral islands and 13 small sand cays clustered in the clear waters of the Caribbean. White sand beaches, palm trees, water ranging in color from transparent aqua to translucent
One of the sand cays of Cayo Cochino over the shoulder of our boatman.
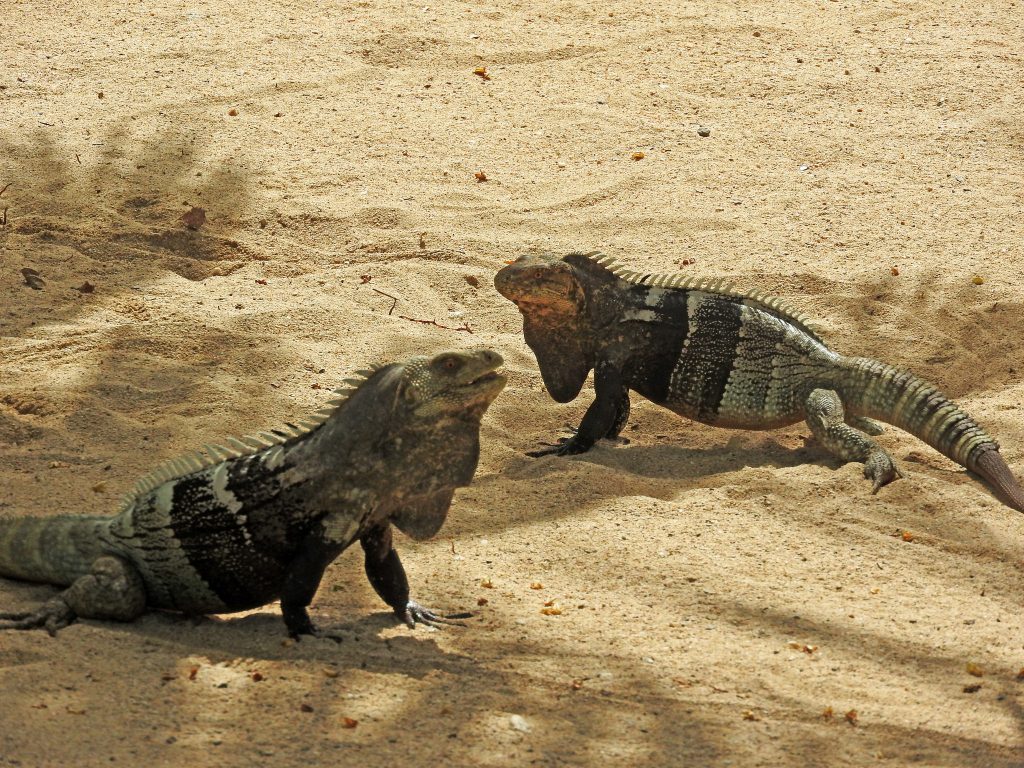
turquoise: The Caribbean at its best. Parts of Cayo Cochino are protected habitat, and our first stop was the Visitor Center on Cayo Cochino Minor, operated by the Smithsonian Institute. Around the Visitor Center we found Yucatan Vireos, Allison’s Anole, and lots of Spiny-tailed Iguanas (the native Iguana of Honduras). The Yucatan Vireos on the islands of Cayo Cochino are the only ones you will find in Honduras.
Coming into Cayo Cochino minor. Fuji XP85 waterproof cameraYucatan Viero. Elmer with Ev’s Nikon P900Again, with the Sony RX10iiiSpiny-tailed Iguana. Sally. Nikon P610Cayo Cochino major, Steve
From Cayo Cochino Minor (or Turtle Island as the locals call it), we crossed the straight to Cayo Cochino Major, where we landed on a private beach to explore inland for the Rosey (or Island Hog-nosed) Boa. These snakes are sometimes abundant, draped in trees, back a few hundred yards from the beach. Though it was a hot day and the snakes were mostly higher in the canopy, Elmer located one for us, curled up on a branch just above eye-level. We eventually found our way back to the beach for morning snacks, water, and wading (this beach is near the spot were we would have gone snorkeling if any of us had wanted to.) The beach sloped gently out into Turtle Bay, and it was a real treat to wade out into the crystal clear waters of the Caribbean.
Steve. Sony RX10iii
Greg. Canon SX50HS
Ev. Nikon P900
Carol and Sally in Turtle BayCayo Chachahaute #2
We were back in the boat again then, for a short run to Cayo Chachahaute #2 (or Twin Island #2 if you translate from the native dialect). The two Chachahaute Islands are only separated by a shallow straight and sand bar…often exposed in the winter months. Both islands are home to a population of Caribbean fishermen, and Cayo Chacahhaute #2 specializes in serving a daily lunch and dinner of fresh caught, wood grilled Yellow-
Lunch, Fuji XP85
tailed Snapper, rice and beans, and fried plantains. That is the whole menu, and all meals are served on paper plates right on the beach under a thatched shelter at rough picnic style tables, but it just might be the best fish you will ever eat. While you eat you can watch the Frigatebirds and Pelicans soaring in the updraft at the head of the island. Except for the open beach on one side, the whole island, which is maybe the size of half a football field, is covered with the shanty homes of the fishermen. Their meals are so famous that boats come daily at noon and in late afternoon and early evening from the mainland and from the bay islands 25 miles away. (And of course fire-wood, rice, beans, plantains, and ice…lots of ice…have to be brought out to the island in dugout canoes daily.) After lunch, we spent about 45 minutes, mostly trying flight shots of the soaring Frigatebirds and Pelicans. There are only a few places I can think of that are this good for practicing flight shots.
Steve. Sony RX10iii Sports Mode
Steve. Sony RX10iii Sports Mode
Steve. Sony RX10iii Sports Mode
Ev. Nikon P900
Shooting the Back and White Owl
On the way back through La Ceiba on our way to the Lodge, we stopped at a small park where Black and White Owls are known to nest and roost. Again, Elmer managed the impossible and located one of the young B&W Owls on branch high in the canopy of one of the huge Mangostein trees. While we were photographing the young owl, Elmer’s friend, who used to work at the park, located one of the adults, and we moved the group over. Both owls were in the deep shade of the foliage, high in the trees, and, though they were in plain sight, they were not easy photographic targets. We were looking almost straight up at the them in the shadows. The situation was really at the limits of what any camera can do…the light was not good, and focus was difficult…and we were at the limits of what our bodies could do as well, as we tried for awkward vertical shots at slower than optimum shutter speeds. The situation called for a tripod, but for the kind of 8 foot tall tripod no one would ever carry into the field anyway. Still, everyone in the group came away with at least one satisfying shot of the Black and White Owls.
Steve. Sony RX10iii
Ev. Nikon P900
Sally. Nikon P610
Greg. Canon SX50HS
Barbara. Canon SX60HS
Our last full day in Honduras found us on the bus early again for the drive to Lancetilla Botanical Gardens, the turn of the century Botanical Research Station founded by the United Fruit Company to experiment with tropical hardwoods and fruit trees for growing in their Honduran holdings. Lancetilla has the longest bird list of any single location in Honduras. It is also a great place for butterflies and dragonflies, and the occasional mammal.
A day at Lancetilla begins with a walk along the entrance road and one side road in search of mostly understory birds. We had not progressed far long the road when Greg spotted a Mexican Hairy Dwarf Porcupine on the branch of a tree just at the edge of the rainforest. (Also, apparently, known as a Prehensile-tailed Porcupine or Tree Porcupine.) Like most Porcupines its body is covered in spines, but in the Hairy Dwarf, its fur is long enough to completely cover the spines on much of its body, leaving spines exposed mostly on the face, lower legs, and spine. We had as much time with it as we wanted…since it was not at all disturbed by our presence on the road. Our pictures are remarkably similar as it did not move much beyond an occasional scratch for fleas.
Steve. Sony RX10iii
Ev. Nikon P900
Sally. Nikon P610
Barbara. Canon SX60HS
Greg. Canon SX50HS
Early on we also encountered Groove-billed Ani, Blue-black Grassquit, Thick-billed Seed-finch, Olivacious Piculet (the smallest woodpecker of the tropics), Passerini’s Tanager, many dragonflies and few butterflies.
Olivatious Piculette. Ev. Nikon P900
The second stop on the way in is a giant hardwood tree that hosts upwards of 100 active Montazuma’s Oropendola nests. The Oropendolas are the largest of the oriole family, and construct huge hanging woven basket nests.
Steve. Sony RX10iii
Just beyond the Oropendola tree there is a trail down to the river, which is always worth checking for Jacamars and Ruddy Crake. Neither turned up, but I photographed some interesting butterflies, the first of many that day, while we were waiting. Several of these are from later in the day, around the Visitor Center, which was our next stop.
Giant and ? Swallowtails
Green Malacite Butterfly
Looks like a Crecent.
butterfly?
Crimson Patch
Skipper?
Though Elmer set up and played his recording for the Ruddy Crake we heard calling in the tall reeds along the trail, it did not make an appearance. Ruddy Crake is not uncommon, especially at Lancetilla, but it is very difficult to see.
At the Visitor Center we spent some time with the natural history displays on the second floor, and then retired to the deep shade of the bamboo grove. Many different varieties of bamboo from around the tropics grow along a little stream that runs through a hollow. There is an amphitheater with a small stage there for presentations, but the main attraction is still the massive clusters of the largest grass in the world. I generally get the group together in the grove for a photo.
Greg, Ev, Sally, Barbara, Carol, and Elmer
While in the bamboo grove we came across a toad, and the whole group gathered to try toad shots.
shooting the toad
Before getting on the bus to head to Tela, a beach resort town near the gardens, for lunch, we made one last try of the Ruddy Crake. There are a series of small lily ponds along one side of the Visitor Center, and a Crake responded to Elmer’s recording almost at once. The rest of the group went around to the far side of the ponds where the Crakes were calling (there were at least two) but I got distracted by some shade and butterflies along the other side and headed that way. Consequently I was in exactly the right spot to see both Crakes cross a small open patch in the dense growth covering the pond. Most of the group got glimpses of the Crakes, but I got photos!
Of course I could not resist the dragonflies around the ponds either. I do not know enough about Central American Odonata to id these.
Roseate Skimmer, The Lodge at Pico Bonito, Honduras
Damselfly, Lancetilla Botanical Gardens, Tela Honduras
dragonfly, Lancetilla Botanical Gardens, Tela Honduras
Mexican Amberwing, Lancetilla Botanical Gardens, Tela Honduras
dragonfly, Lancetilla Botanical Gardens, Tela Honduras
dragonfly, Lancetilla Botanical Gardens, Tela Honduras
After the Crakes and Odonata we were back in the van for the short drive to Tela, where had a delicious lunch at a sea-side hotel. Tela was the resort town back in the days of the United Fruit Company, and still maintains its charm for Honduras today.
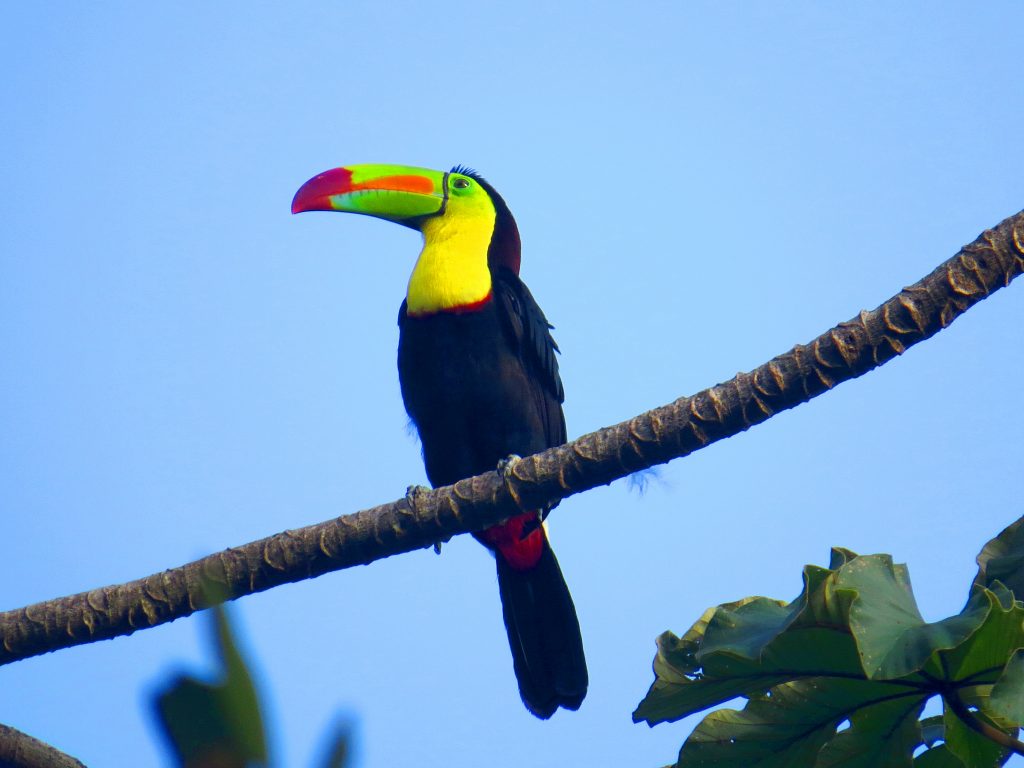
That left only the morning of our departure at the Lodge. Just as we finished eating breakfast a Keel-billed Toucan flew in over the Conference Center. Greg had the persistence to wait it out until it posed on an open branch.
Greg. Canon SX50HS
It was an amazing satisfying trip. We had time (mostly in the van on the way to shooting sites) for some discussion and photographic instruction. We had abundant opportunities for tropical photography. We had great times around the tables at the restaurant on the veranda at the Lodge (not to mention great food). And we had great weather. Though it rained every day, it never rained on us in the field. For the most part we had sunny skies and good photographic light when it mattered. The tropics are always a challenge for any photographer, but our group proved that today’s advanced superzoom Point and Shoot cameras are up to the task.
I am already planning another trip to the Lodge at Pico Bonito for next June (the 16th to the 22nd) …and I have a trip to Tranquilo Bay, Panama (another great destination) in the works for 2017. I am thinking of South Africa for 2018. Watch the tours and workshops page on this site for details.
Sony HX90V. Notice finger grip, and control ring around lens next to the body.
I really like the Nikon P900, which I am using for the majority of my bird and wildlife photography these days, and which does a good job on nature photography of all kinds (it is hard to argue with the excellent 83x zoom and amazing image stabilization), but since I switched to it from the Sony HX400V, there are several things the Sony did well that I find myself missing. The main ones are: fully adjustable in-camera HDR and more robust Dynamic Range Optimization options, reliable macro, and Anti-motion Blur mode for inside shots. The Nikon does all these things, after a fashion, but it does not do them as well as the Sony HX or RX series.
Then too, I have now passed both the Sony HX400V and the Canon SX50HS, my previous “back up cameras”, on to others. That left me with just one camera for trips, and it is never safe to travel for more than a few days with only one camera. What if something bad happens? Imagine it: stuck in Panama for a week without a working camera. Never!
Which is why the Sony HX90V, when it was first announced, appealed to me. It has the pop-up electronic view finder from the RX 100 iii and iv; the control ring around the lens from the whole RX series (see above); the finger grip from the RX 100 iv (also in the pic above); a flip up 180 degree, selfie ready, LCD like the Alpha 5000 and 6000; and the world’s smallest 30x zoom …24 to 720mm equivalent field of view (and a ZEISS Sonnar at that). Given past experience with Sony’s souped up digital Clear Image Zoom, that means possible pics out to 1440mm in a pinch.
And it is small enough to carry along with the Nikon P900 without even thinking about it.
Sony HX90V at 720mm and Nikon P900 at 2000mm.Viewing options. Pop-up, pull out EVF, flip up LCD.
It also has the truly inspired Function button and menu I had loved on the HX400V…which gives you easy access to anything you are likely to want to set…and three fully programmable memory locations for settings you use often. And, of course, the traditional Sony Creative Styles options, which allow you to fine tune how the jpeg images are processed and encoded in the camera before they are written to the card. (Sony’s answer to RAW.) All in all, the level of control possible with the Sony simply puts the Nikon in the shade…it is a good thing the Nikon lens and IS are so good!
Of course, no amount of control matters if the images are unsatisfying. Like all Sony cameras, especially the P&Ss, the images from the HX90V will not stand a lot of pixel peeping…they are not as clean at the pixel level as Nikon or Canon images. However, at normal viewing and printing sizes, they are simply excellent…sharp, vibrant, and lively.
Since it is a primary interest of mine, we will begin with a few in-camera HDRs: you can set in-camera HDR for anything from 1 EV differences in exposure, for a very subtle effect, to 6 EV differences, to capture deepest shade and boldest highlights. There is also an Auto setting which does an excellent job in all but the most extreme conditions.
Then you have macro effects down to 5 cm (2 inches). I find that about 35-40mm equivalent works really well, along with DRO level 5 or Auto. You actually get an excellent macro effect.
The long end of the zoom is useful, with or without some Clear Image zoom, for close-ups of bugs, and the occasional grab shot of a cooperative bird. This (along with super-bright sunny days) is where the pop-up EVF comes into play! It is much easier to hold the camera still when it is up to your eye.
The flip up selfie mode on the LCD panel does a good job.
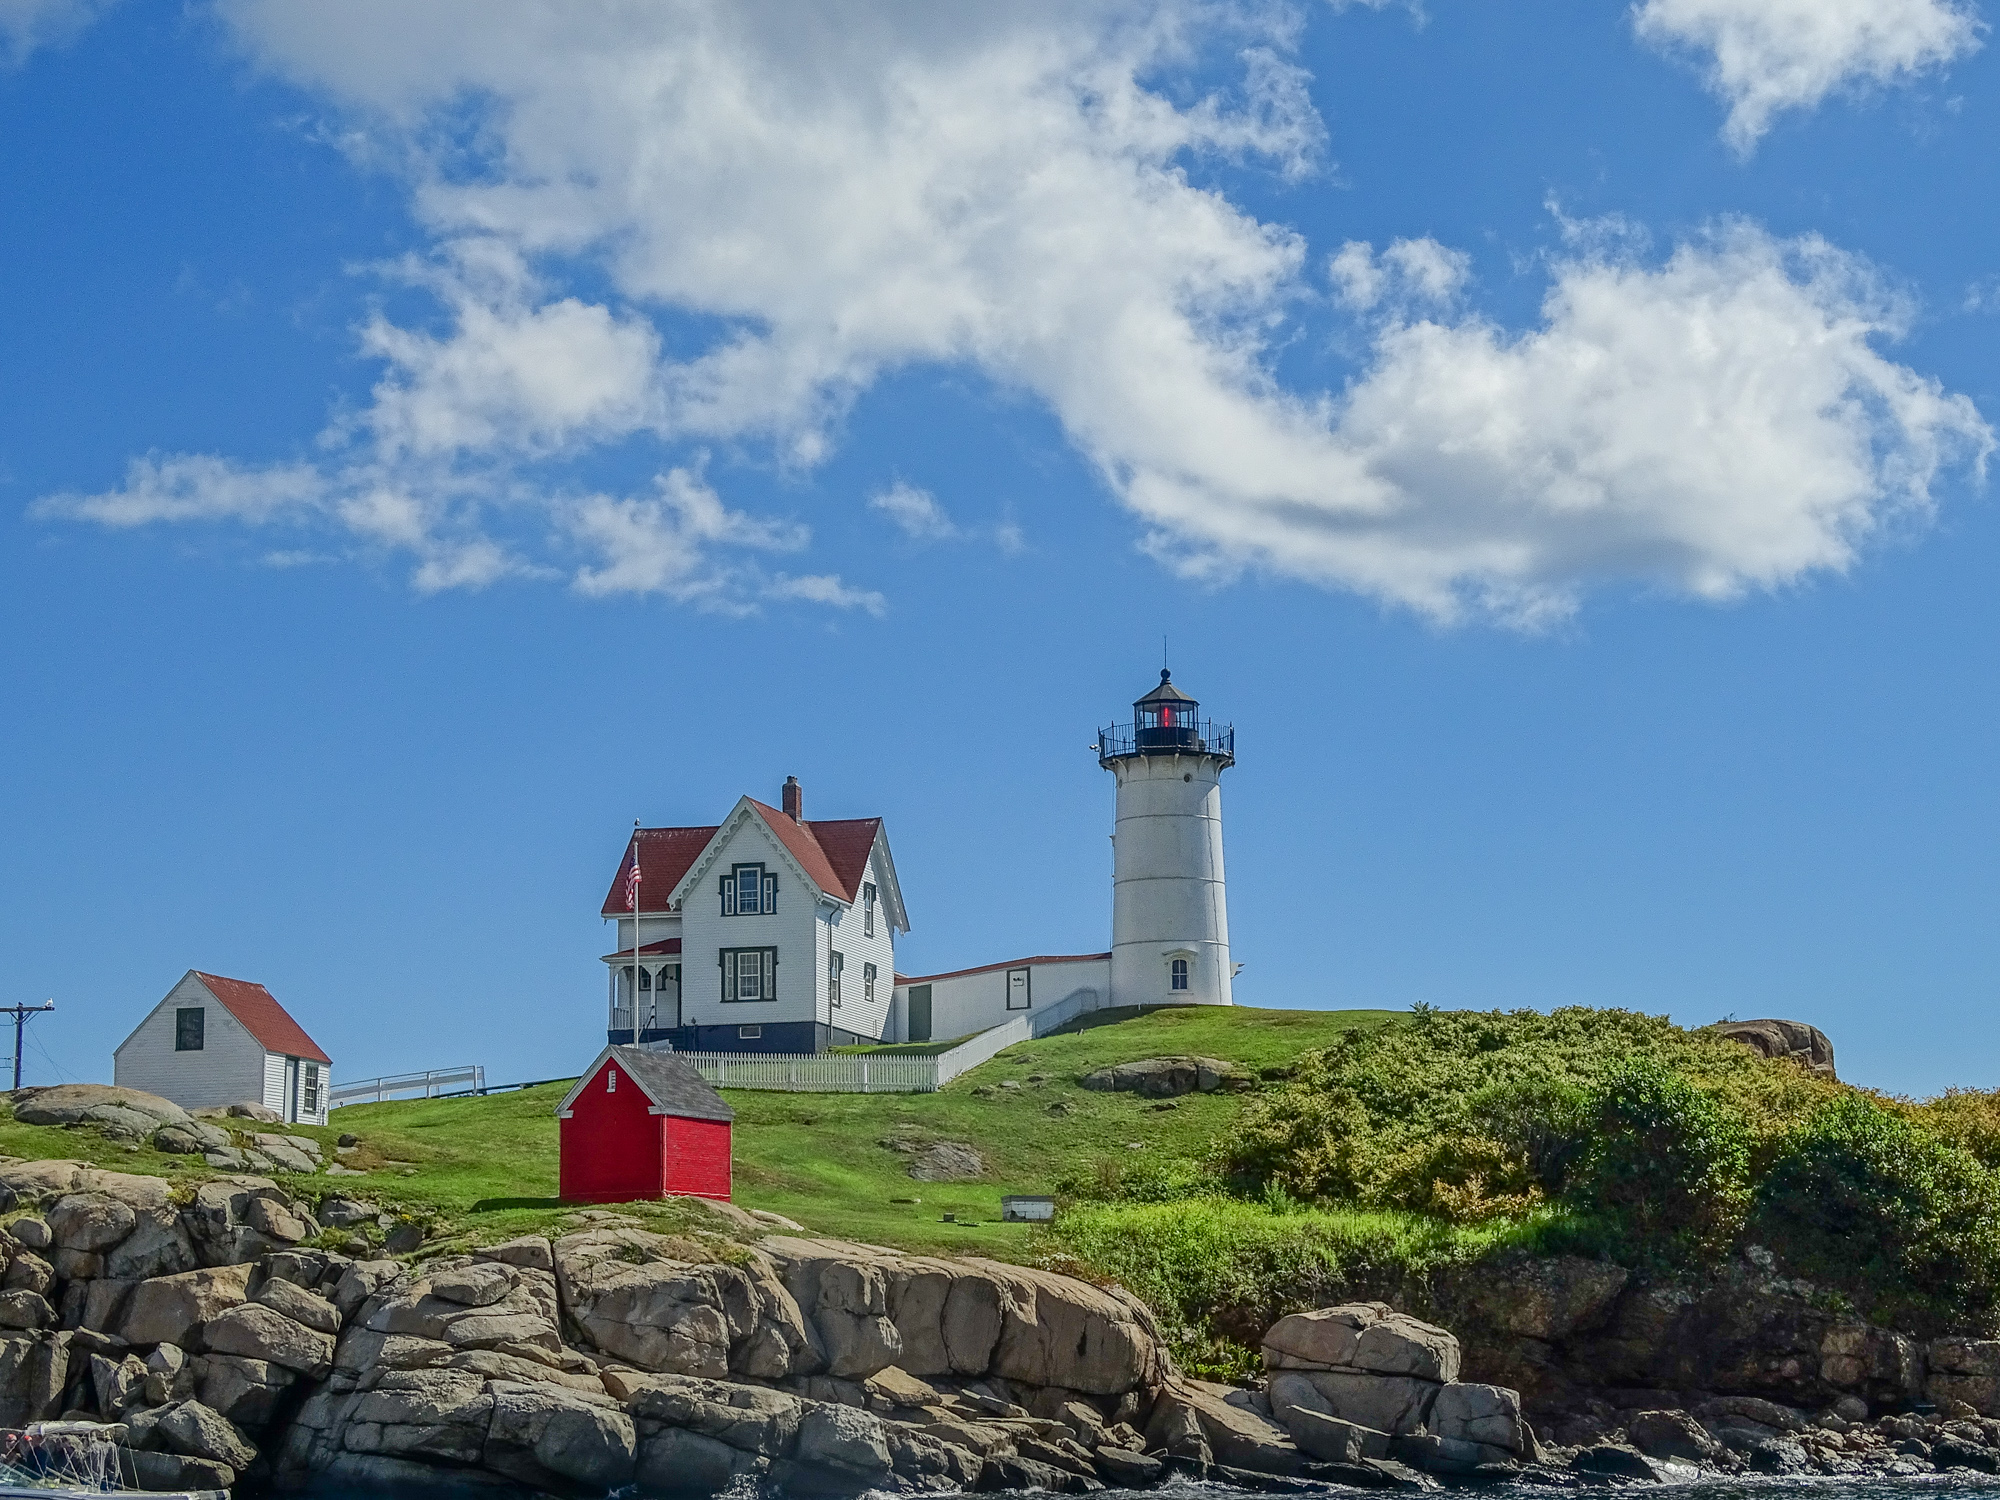
Me at Nubble Light, in Maine
Panorama shots are as easy as they are with any Sony. You have your choice of “standard”, “wide”, or “360 degree.”
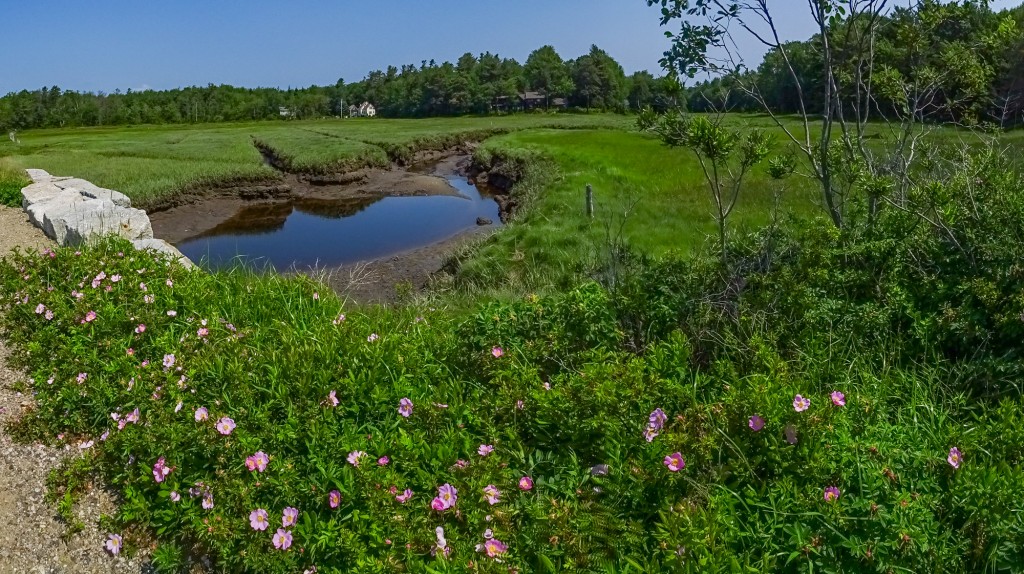
Wild Roses along the Bridle Path
Big Beach, Kennebunk ME. Wide format pano.
Some of the Picture Effects are also interesting. I have enjoyed playing with HDR Painting, which can be adusted to one of three levels, and produces a nice “slightly over the top”, tone-mapped HDR look.
In-camera, HDR Painting Picture Effect. This is on the “low” setting.[/caption
Sunsets are always a good test of a Point and Shoot. I tried both the Multiple Frame Noise Reduction Mode and in-camera HDR. I like the results from HDR better. Pleasing rendition of colors, and very little noise in the image.
Sunset over Back Creek, with fisherman 🙂
I went to Strawberry Banke, a local historical district in Portsmouth NH, today, and had a chance to try out several modes for indoor use. I tried straight in-camera HDR, Anti-Motion-Blur Mode, and Multi Frame Noise Reduction (with is actually an auto ISO setting). All three worked well, and provided higher ISO equivalent images in low light that showed much less noise than you would expect. Anti-Motion Blur tended to have the most noise, as it consistently selected higher ISOs suitable for moving subjects. In-camera HDR was relatively clean, and, as expected had the most extended range…usable highlights and open shadows. Multi Frame Noise Reduction ISO mode produced the cleanest looking images, amazing clean for hand-held indoor shots in very dim natural lighting, but would not be suitable for indoor action. This is a hand-held Multi Frame NR shot in a historical kitchen with only window and fire light. I think it is pretty amazing.
Strawberry Banke hearth cooking demo. Portsmouth NH. Multi Frame NR
So…all in all the Sony HX90V is a great second camera. It does everything I had hoped, and almost everything the Nikon P900 does not do well. It is even a great first camera. The degree of control offered, the viewing options, the excellent long zoom, the advanced multi-frame features, etc. put it right there in the top choices for a P&S superzoom for nature and creative photography…as long as you don’t need more than 720mm of reach (1440mm with Clear Image zoom).
And finally, of course, the Sony HX90V was conceived as a travel zoom…and as that I can not imagine a better choice! It does it all and it does it all well…fits in a large pocket…and is the ideal camera to carry absolutely everywhere you travel. Good job Sony!
I had a wonderful few days in Cape May NJ, covering the Cape May Autumn Bird Festival for ZEISS Sports Optics, and teaching my P&S for Wildlife workshop. Lots of photo ops. Lots of great birds, relatively close. The light was not always the best, and it often stretched the limits of the Sony HX400V camera, but I am more than pleased with the results. I also, of course, did some macro work, and a bunch of in-camera HDR. I also practiced using Sports Mode for flight shots.
You can explore the results to your heart’s content by visiting my gallery at Wide Eyed In Wonder. Cape May 2014.
Perhaps the most difficult exposure problem is a scene with a high dynamic range like this. You need detail in the shadows, and yet you do not want the highlights of sun on water to burn out. In-camera HDR to the rescue.
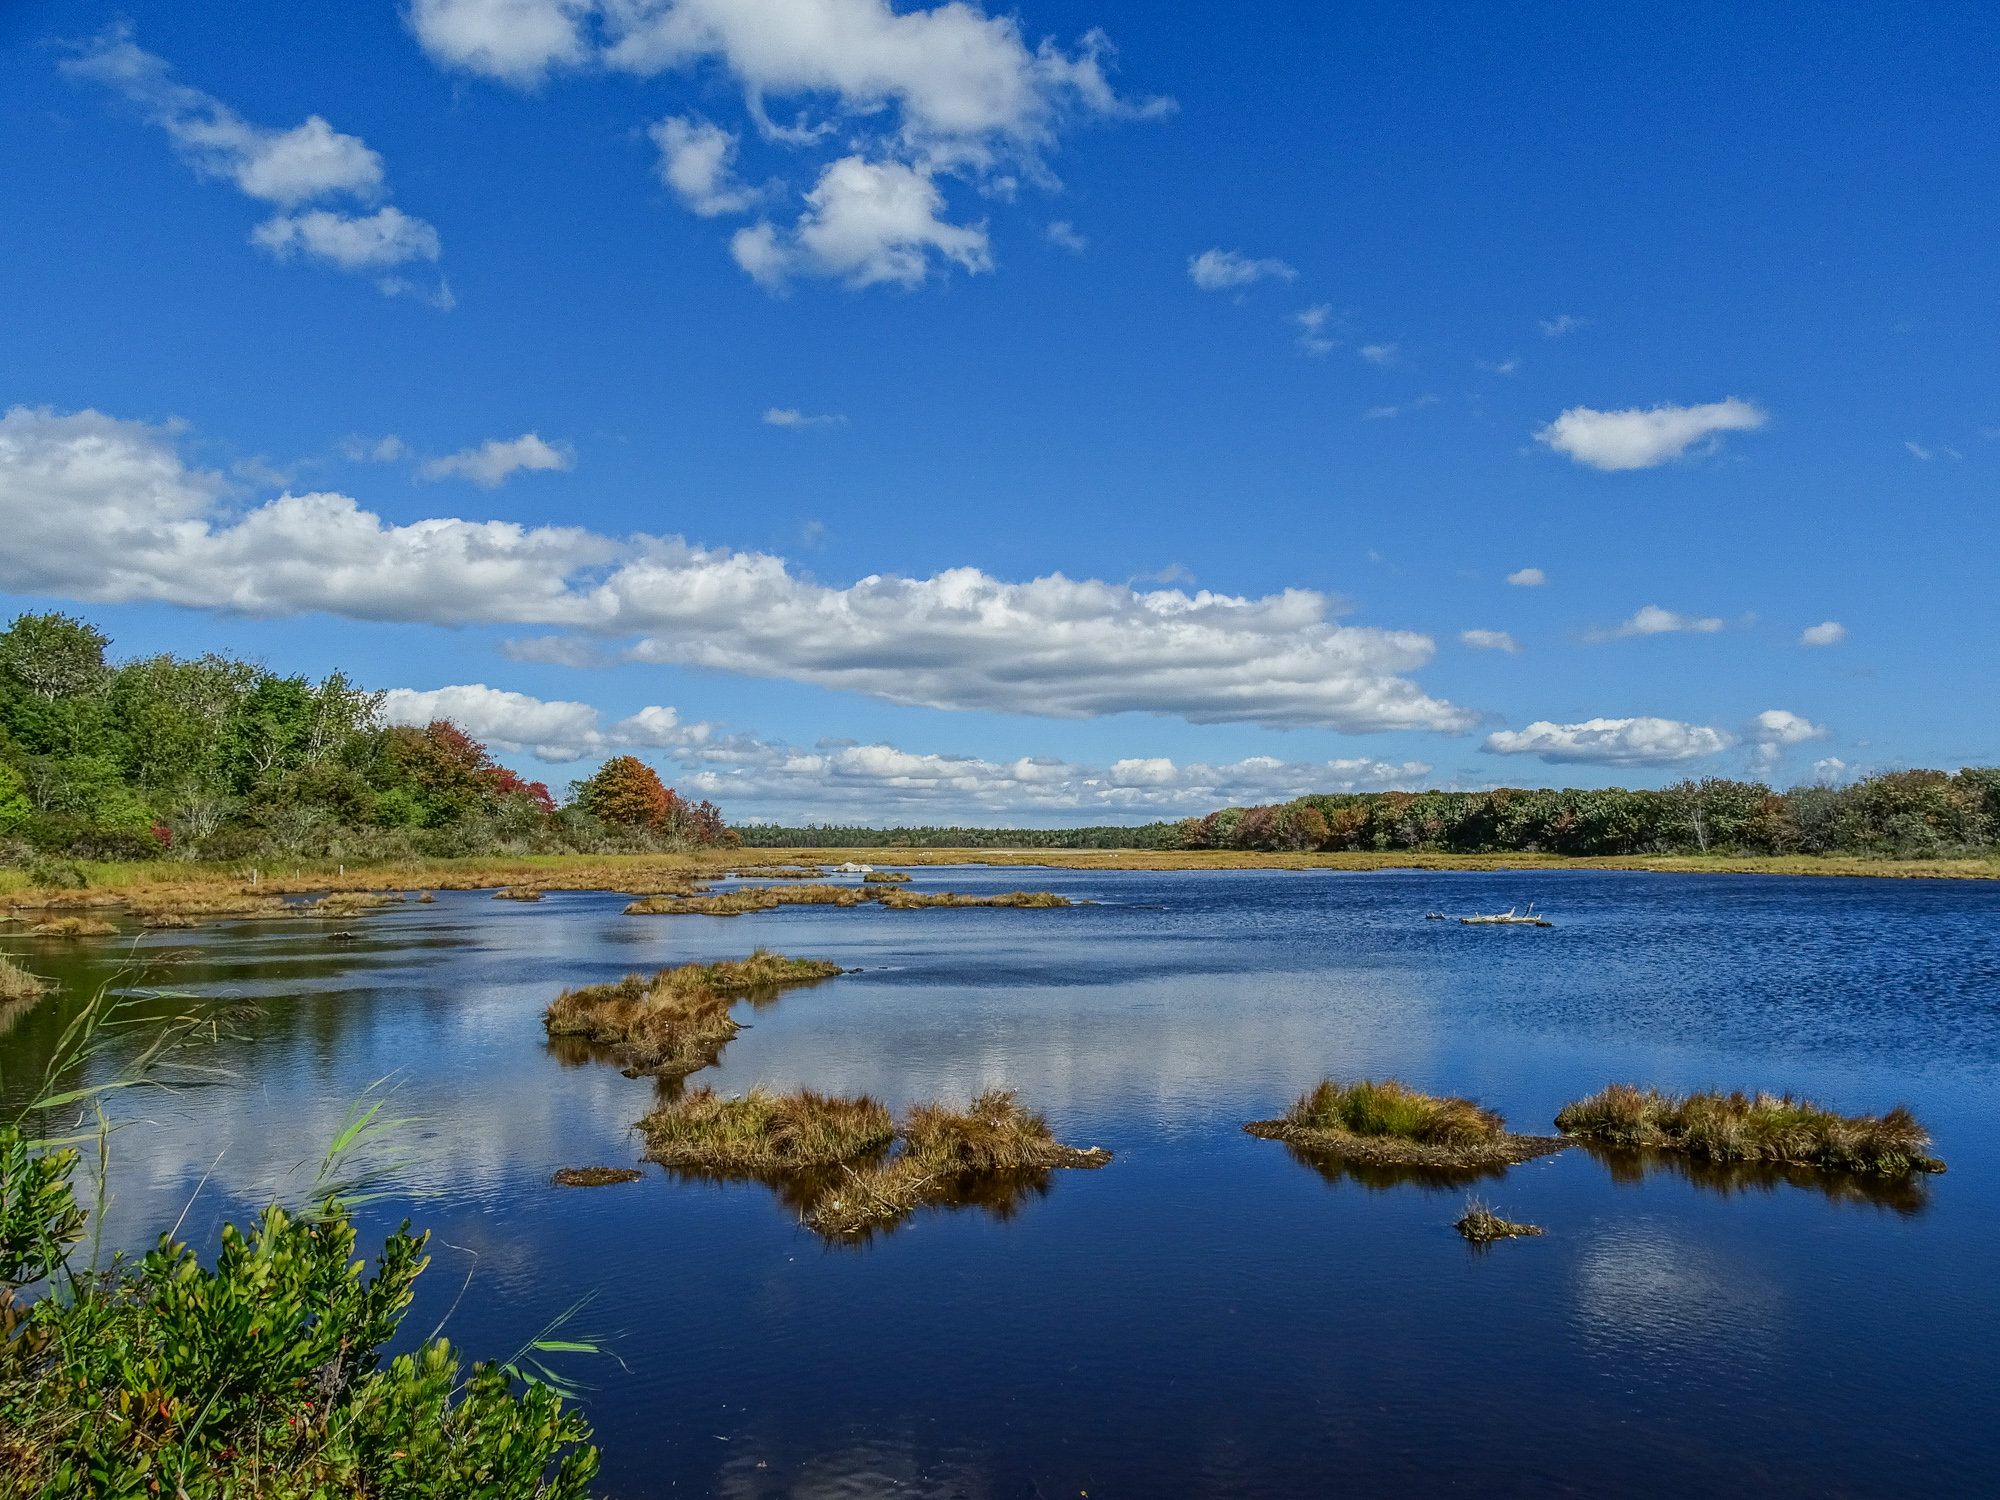
It is hard to resist a colorful landscape with big white clouds against a bright blue sky. Might be, those clouds are casting a pattern of moving shadows on the land that only adds interest. Or maybe your eye is caught by the tumbling water of a stream in deep forest, with sun breaking through, bringing out the peat brown highlights in the water. Or are you in a ferny glade under the tall canopy of maples or redwoods, reaching for that cathedral quiet and calm. Or you are out at sunset, confronted by the wonder of red and orange over the darkening (but not yet dark) landscape.
Too bad! Each of these represents one of the primary challenges that has faced the photographer since the beginning of the craft: the inability of any photo-sensitive material to capture the full range of light and dark…all the subtle shades of color…that the human eye can see.
Drama in the sky and in the foreground. Again, in-camera HDR, with further processing in Lightroom.
If your landscapes have a sky that is way too pale and clouds that are simply white blobs without detail; or they have wonderful skies, full of drama, but the land and foreground are full of unnatural inky black shadows and dark dull colors…if your stream in the forest has blinding white highlights where the sun struck it, and little detail in the shadow and that lovely peaty water is simply dirty dishrag brown…if the cathedral forest is a dark den haunted by bright specters where a sun shaft came through…if your sunset hangs above a landscape from a horror movie, all dark threatening shapes; or the reds and oranges are not the living flame you remember, but a dull wash across a grey sky…
…well then you have experienced first hand just how bad even the most modern senors are at catching what the eye sees…just how much trouble photo-sensitive materials have with the wide range of light and dark.
Yes, but we have all seen photographs, other people’s photographs, that do capture what we remember we saw, that scene that caught our eye in the first place. Like a painting. Like these images here. You have to wonder how it is done.
The cathedral forest effect. Another candidate for HDR.
The only way to do it is to somehow compress the full range of light and shadow…the full range of color…so that it fits in the limited range of the photo-sensitive material, or rather, to be accurate, in the limited range of whatever material is used to display the image…print paper, ink in the page of a magazine, the monitor on your computer or LCD screen on your laptop or tablet…but to do it so effectively that the eye is fooled into thinking it really sees that full range in the resulting image. It is a trick. It is always a trick, no matter how it is done.
Once upon a time, in the bad old days of film and wet processing, photographers put graduated filters in front of their landscape lenses that artificially darkened the sky so that landscape could be properly exposed. They would then, during processing, doge and burn sections of the print to bring up detail in the dark areas and subdue highlights in the bright areas. (I can remember putting my bare hands into the developer tray to hand rub shadows to bring them up.) If shooting slide film, where post-processing options were limited. they would intentionally underexpose the film and then push-process it in the darkroom, using a combination of higher temperatures and non-standard time to bring up the shadows. It was an art. It was a trick.
The first digital sensors where even worse at capturing the range of light and color than film. If you could go back and look at images from the digital cameras of 10 years ago, especially the P&Ss, you would immediately see how cartoony they look…how poster-like. It was one of the factors that convinced many dedicated film photographers that digital would never displace film.
In-camera HDR is not only for scenes that scream High Dynamic Range…it can bring out subtle detail in fog shots and on dull days.
Of course, with each new generation of digital sensors, and each new generation of on-board (in-camera) image processing software and hardware, the tonal range of digital images increased. We call that range, the range of light and dark and color that a sensor can capture: Dynamic Range. The Dynamic Range of digital sensors, especially the most modern back-illuminated CMOS sensors, surpassed the Dynamic Range of conventional film several years ago.
In addition, with the advent of digital post-processing, and the ever increasing sophistication of digital editing software, it has become possible to enhance the dynamic range of images. Photographers can take the RAW file that the sensor captures, and digitally manipulate shadows and highlights to produce the illusion of an extended range. Or they can take 3-6 separate exposures, each exposed for a different shadow/highlight balance, and them combine them in software so that something resembling the full range of light and shadow are displayed in the final image. Deep trickery! If done well, these techniques can produce a very natural looking dramatic landscape. (If done, in my opinion, badly, they can produce the kind of surreal, over-baked, hard images that give HDR a bad name among many landscape and nature photographers)
Three exposure HDR is about the only way to get a sunset with a natural looking foreground.
Unless you have access to those kinds of post-processing tricks, you probably continue to be disappointed in your attempts to capture the most dramatic scenes that confront you.
Or not.
If you are a Point and Shoot photographer and using Smart Auto (or Intelligent Auto, or Superior Auto, or whatever your camera maker calls it), then you are seeing just how good the modern on-board digital image processing software and hardware are at maximizing the Dynamic Range of today’s back-illuminated CMOS sensors. During jpeg conversion, today’s P&S superzooms apply the same trickery that photographers developed to deal with Dynamic Range in post-processing…automatically, before you ever see the image. Almost all recent P&Ss have some kind of Dynamic Range Compensation, or Dynamic Range Enhancement, built in, and Auto is the default mode in any of the Auto/Smart Auto programs. Some of the most recent P&Ss even allow you to control the degree of DRC when you use the Program Mode.
Sweep panorama mode uses Auto Dynamic Range Optimization on the Sony HX400V. Further processing in Lightroom yields a very natural looking image.
My experiments with DRC on superzooms has shown that the best implementations are very good indeed…providing a noticeable and useful increase in apparent Dynamic Range without producing an unnatural looking image. They keep the drama in dramatic landscapes without overdoing, or over-cooking, it. For general photography, keeping DRC on Auto works very well. And on those cameras that give you control of the feature, you can produce good results in even the most challenging situations (as in the stream in deep forest, or the cathedral in the pines).
What is more, camera makes started to build in on-board automated three exposure HDR a generation of cameras back. The first attempts were not very successful. Sensors and processing engines were not fast enough. The three exposures took a few seconds so a tripod was required, and they were separated in time by long enough so that any motion in the scene destroyed the illusion…and often the camera failed to get the three images lined up perfectly, leaving ghosts around even stationary objects. Or, worse in my opinion, the resulting image was overly flat, with so little variation in tone that it looked like an etching on metal. Not very satisfying at all.
Then came, as I mentioned, the back-illuminated CMOS sensors and truly fast image processing engines. The best of today’s P&S superzooms will do automatic in-camera, three exposure, HDR without a tripod. Some will let you control the exposure steps between the exposures to fine tune for different scenes. Almost all will produce a fairly natural looking image…an image that with just a little bit of work in any editing program, can make a very satisfying dramatic landscape, even in the most difficult situations.
Auto Dynamic Range Optimization in a macro shot, plus tweaking in Lighrtoom is quite successful here.
It is impossible for me to tell you exactly how to use these features on you particular camera, since every maker implements them differently. It is safe to say though, that if your camera is less than a year old, it has both Dynamic Range Compensation (whatever your maker calls it) and in-camera automatic three exposure HDR built in. Dig into the manual and the menus. Once you find it, experiment.
I keep 3 exposure HDR set up as one of my Custom Modes, so I can shift to it by simply turning the Mode Dial. I use it a lot…because I love dramatic landscape, and because it really does produce files that are easy to manipulate into very satisfying images.
In lieu of detailed instructions, I will simply outline how I use the features on my Sony HX400V superzoom.
I keep Dynamic Range Compensation (which Sony calls Dynamic Range Optimization) on Auto for Program mode, which covers my wildlife telephoto shots and macros. It is the default mode in Sweep Panorama and Sports mode, so I am covered for panos and flight shots.
High drama landscape! In-camera HDR is set on one of my Custom modes.
I have a Custom mode set to Auto HDR with exposures separated by a total of 6EV, and Exposure Compensation set to -7EV (to protect those white clouds in dramatic skies and the bright highlights in the forest). Because the exposures are so fast and so close together I do not use a tripod, but I am careful to steady the camera as much as is possible. I know better (from experience) than to to try HDR with close foreground elements in motion, as in a high wind…or sea shots with heavy surf where the water detail matters. On the other hand, the three exposures produce a satisfying blur, similar to the silky long exposure blur that is the current fashion in water shots, in rapidly moving water of streams.
Finally, all my HDR work (all my work for that matter) receives post-processing in Lightoom (or, when using an Android tablet, in Snapseed). My processing for 3 exposure HDR shots is essentially the same as it is for normal shots, but I find that shots taken with Auto Dynamic Range Optimization require a bit of extra work…some extra shadow and highlight control, etc…to produce the best results.
So there it is. Dynamic Range Compensation and auto HDR are powerful tools in today’s P&S superzooms. Give them a try. You will not regret it.
Natural without being over-cooked. That is my personal goal.


, Cayo Cochino, Honduras")


