The Sony RX10iv is, in my opinion, of the finest cameras for birds and wildlife ever made. The excellent 600mm equivalent ZEISS zoom, and the equally as excellent 1 inch sensor combine to produce exceptional images of both birds and wildlife. In the past year I have traveled to Portugal, Honduras, Kenya, and Costa Rica…as well as to Florida, Califronia, New Mexico, Colorado, Yellowstone, and Ohio in the US. The RX10iv has gotten a workout and never let me down. Here is a collection of some of my favorite photos of birds and wildlife.
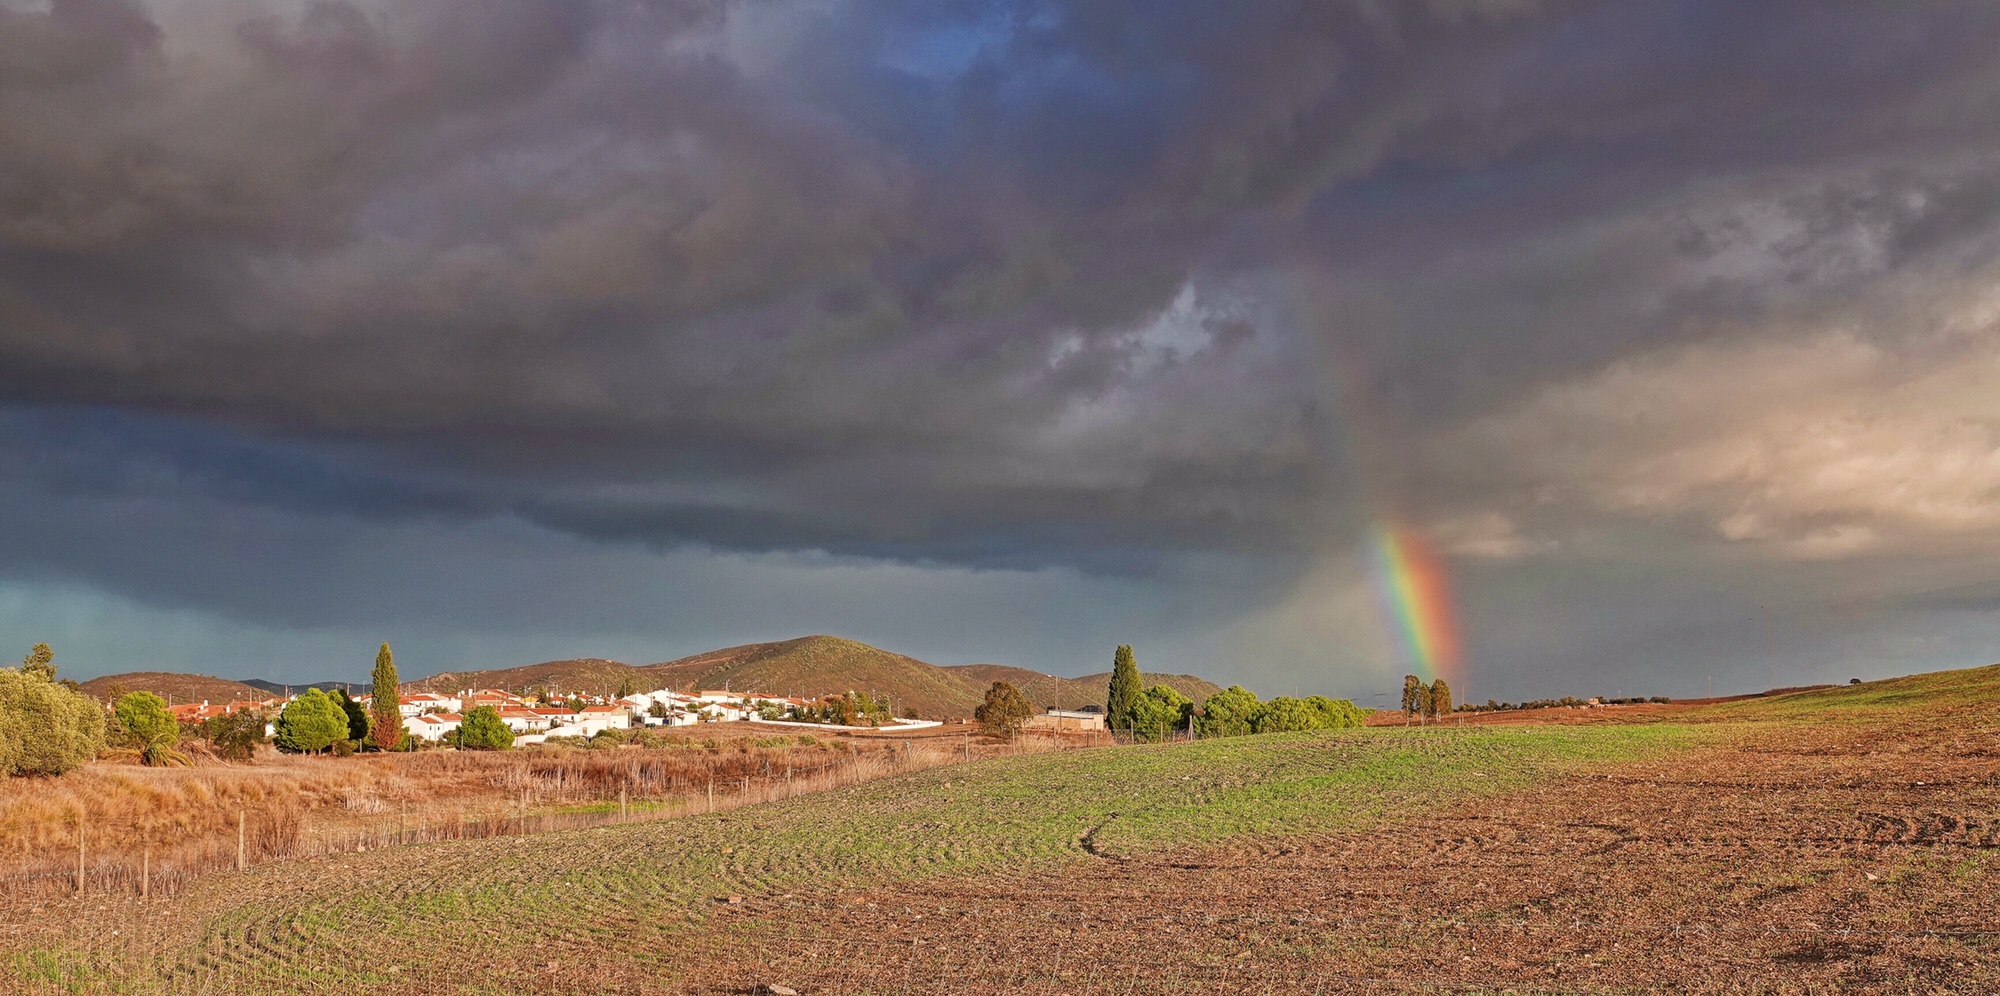
Rainbow over Alvares, Portugal. Sony RX10iv in-camera HDR. Processed in Polarr.
If you read my review of the Sony RX10iii, published about 20 months ago, you know that I really liked the camera, despite its hefty price and relatively short zoom. Since that review the RX10iii as been to Panama, Honduras twice, South Africa, Cuba, Peru (the Amazon River), Ecuador (the Galapagos), England, and Costa Rica…as well as Florida, New Mexico, California, Ohio, Pennsylvania, Massachusetts, and Maine. I have carried it so far and so much that the LCD is beginning to show signs of wear and the markings on a few buttons is beginning to wear off. It has been my constant photographic companion and more than gotten the job done wherever I have traveled. It has been a joy to use…a camera I am always happy to pick up…and one that I could be supremely confident of in the field in any situation. Even around home, its Anti-motion Blur mode made photographing family gatherings a joy. What a camera!
So when I say that the Sony RX10iv is everything that the iii was, and considerably more, you will get the idea. The engineers at Sony listened to the feedback over the 18 months of the iii’s run, and attacked every possible weakness, to produce what may well be the greatest compact fixed-zoom camera ever made. I can not imagine a better camera for travel, wildlife, general nature photography, and day to day family photography. It is nothing short of brilliant in any situation you might find yourself in. I thought the RX10iii had been designed specifically for me…and I never complained about any shortcomings, but it is really like the engineers at Sony read my mind, and offered a solution for almost all my niggling doubts about the iii. I am amazed!
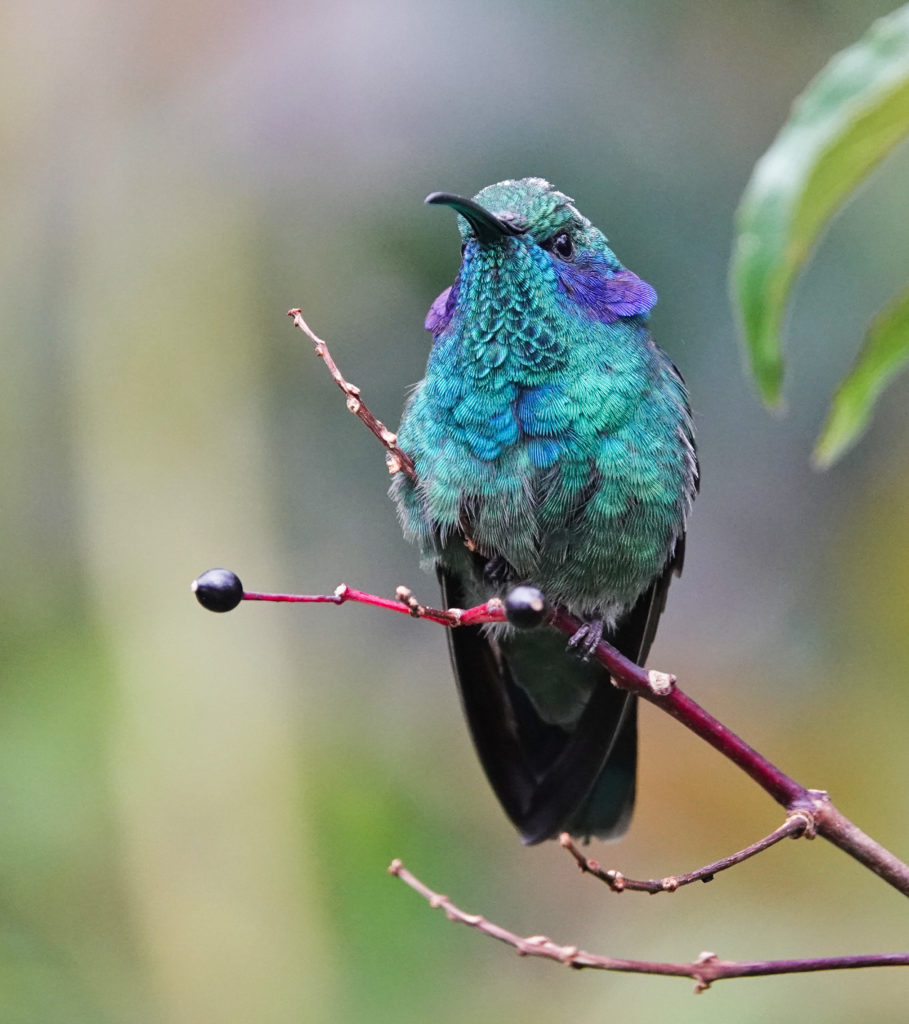
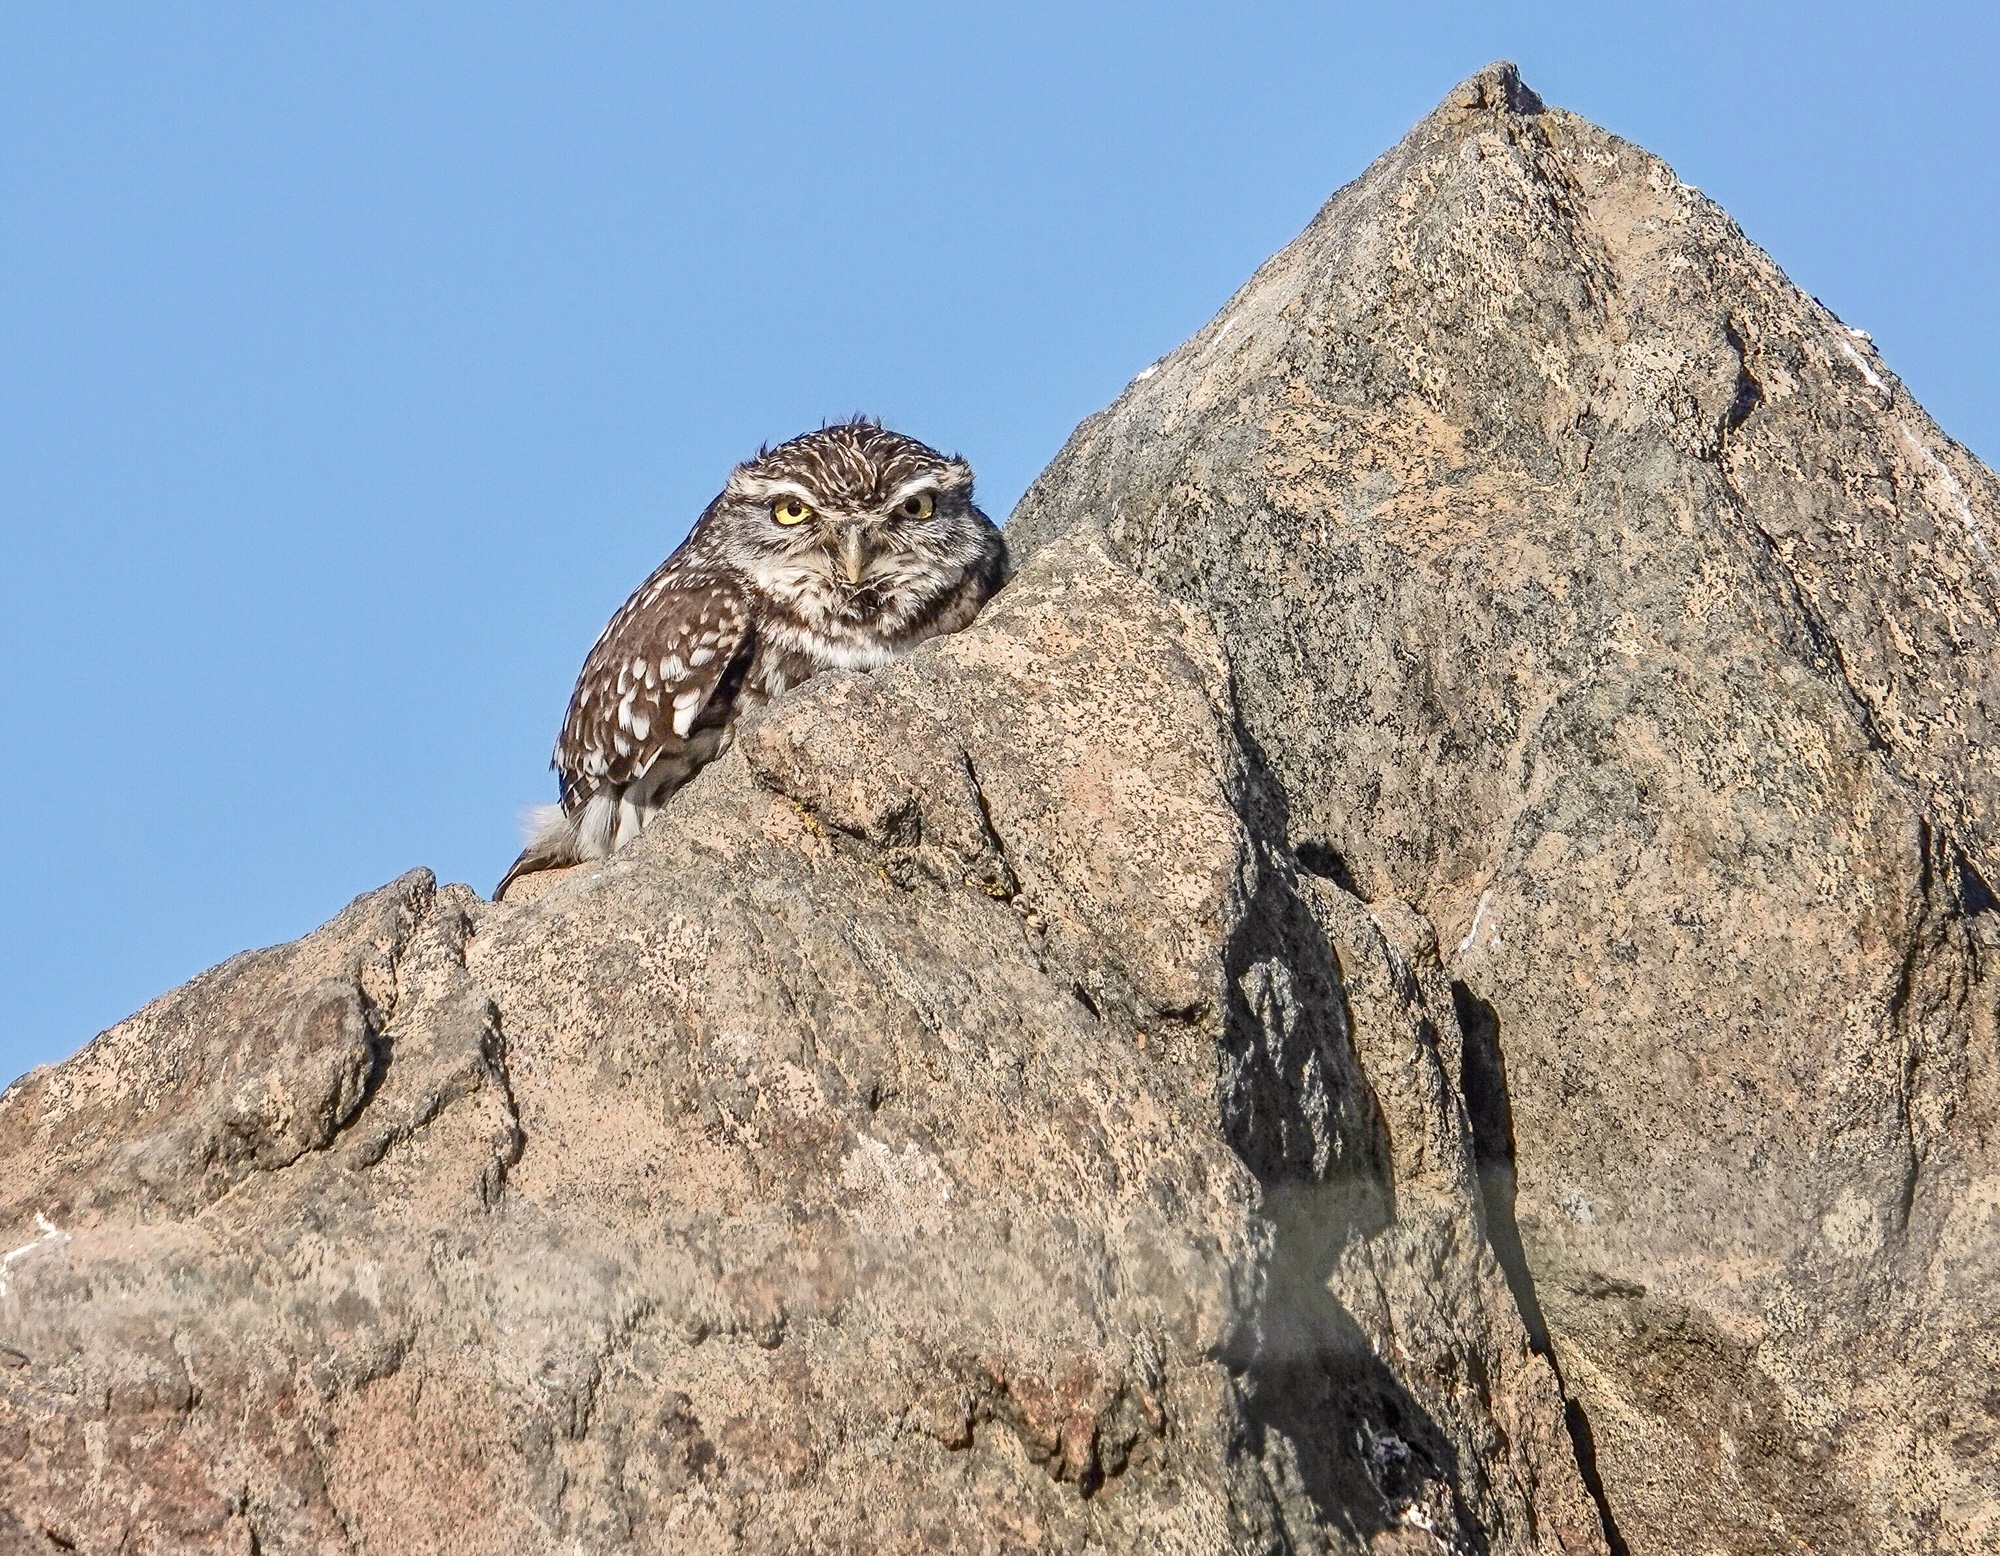
Little Owl, Portugal. Sony RX10iv at 600mm and f4. Razor sharp.
First, the body on the iv is identical to the iii, with all the same customizable buttons and the same amazingly sharp 24-600mm equivalent ZEISS Vario Sonnor zoom lens. The lens alone is worth the price of the camera. It is bright, f2.4-f4, and at its sharpest wide open at any zoom length. It really comes into its own in the rainforest or other lowlight situations where a lessor lens would simply not get the shot. Yes, I often wish for more than 600mm, but I am almost always able to crop to a satisfying frame and image, even when the birds and wildlife are distant. At 24mm it produces stunning landscapes and effective indoor shots. Really I would not trade it’s quality for more reach (unless somehow I could get the same quality at a longer focal length…something that just might defy the laws of physics, or push the camera to a size that would not be comfortable to carry in the field).
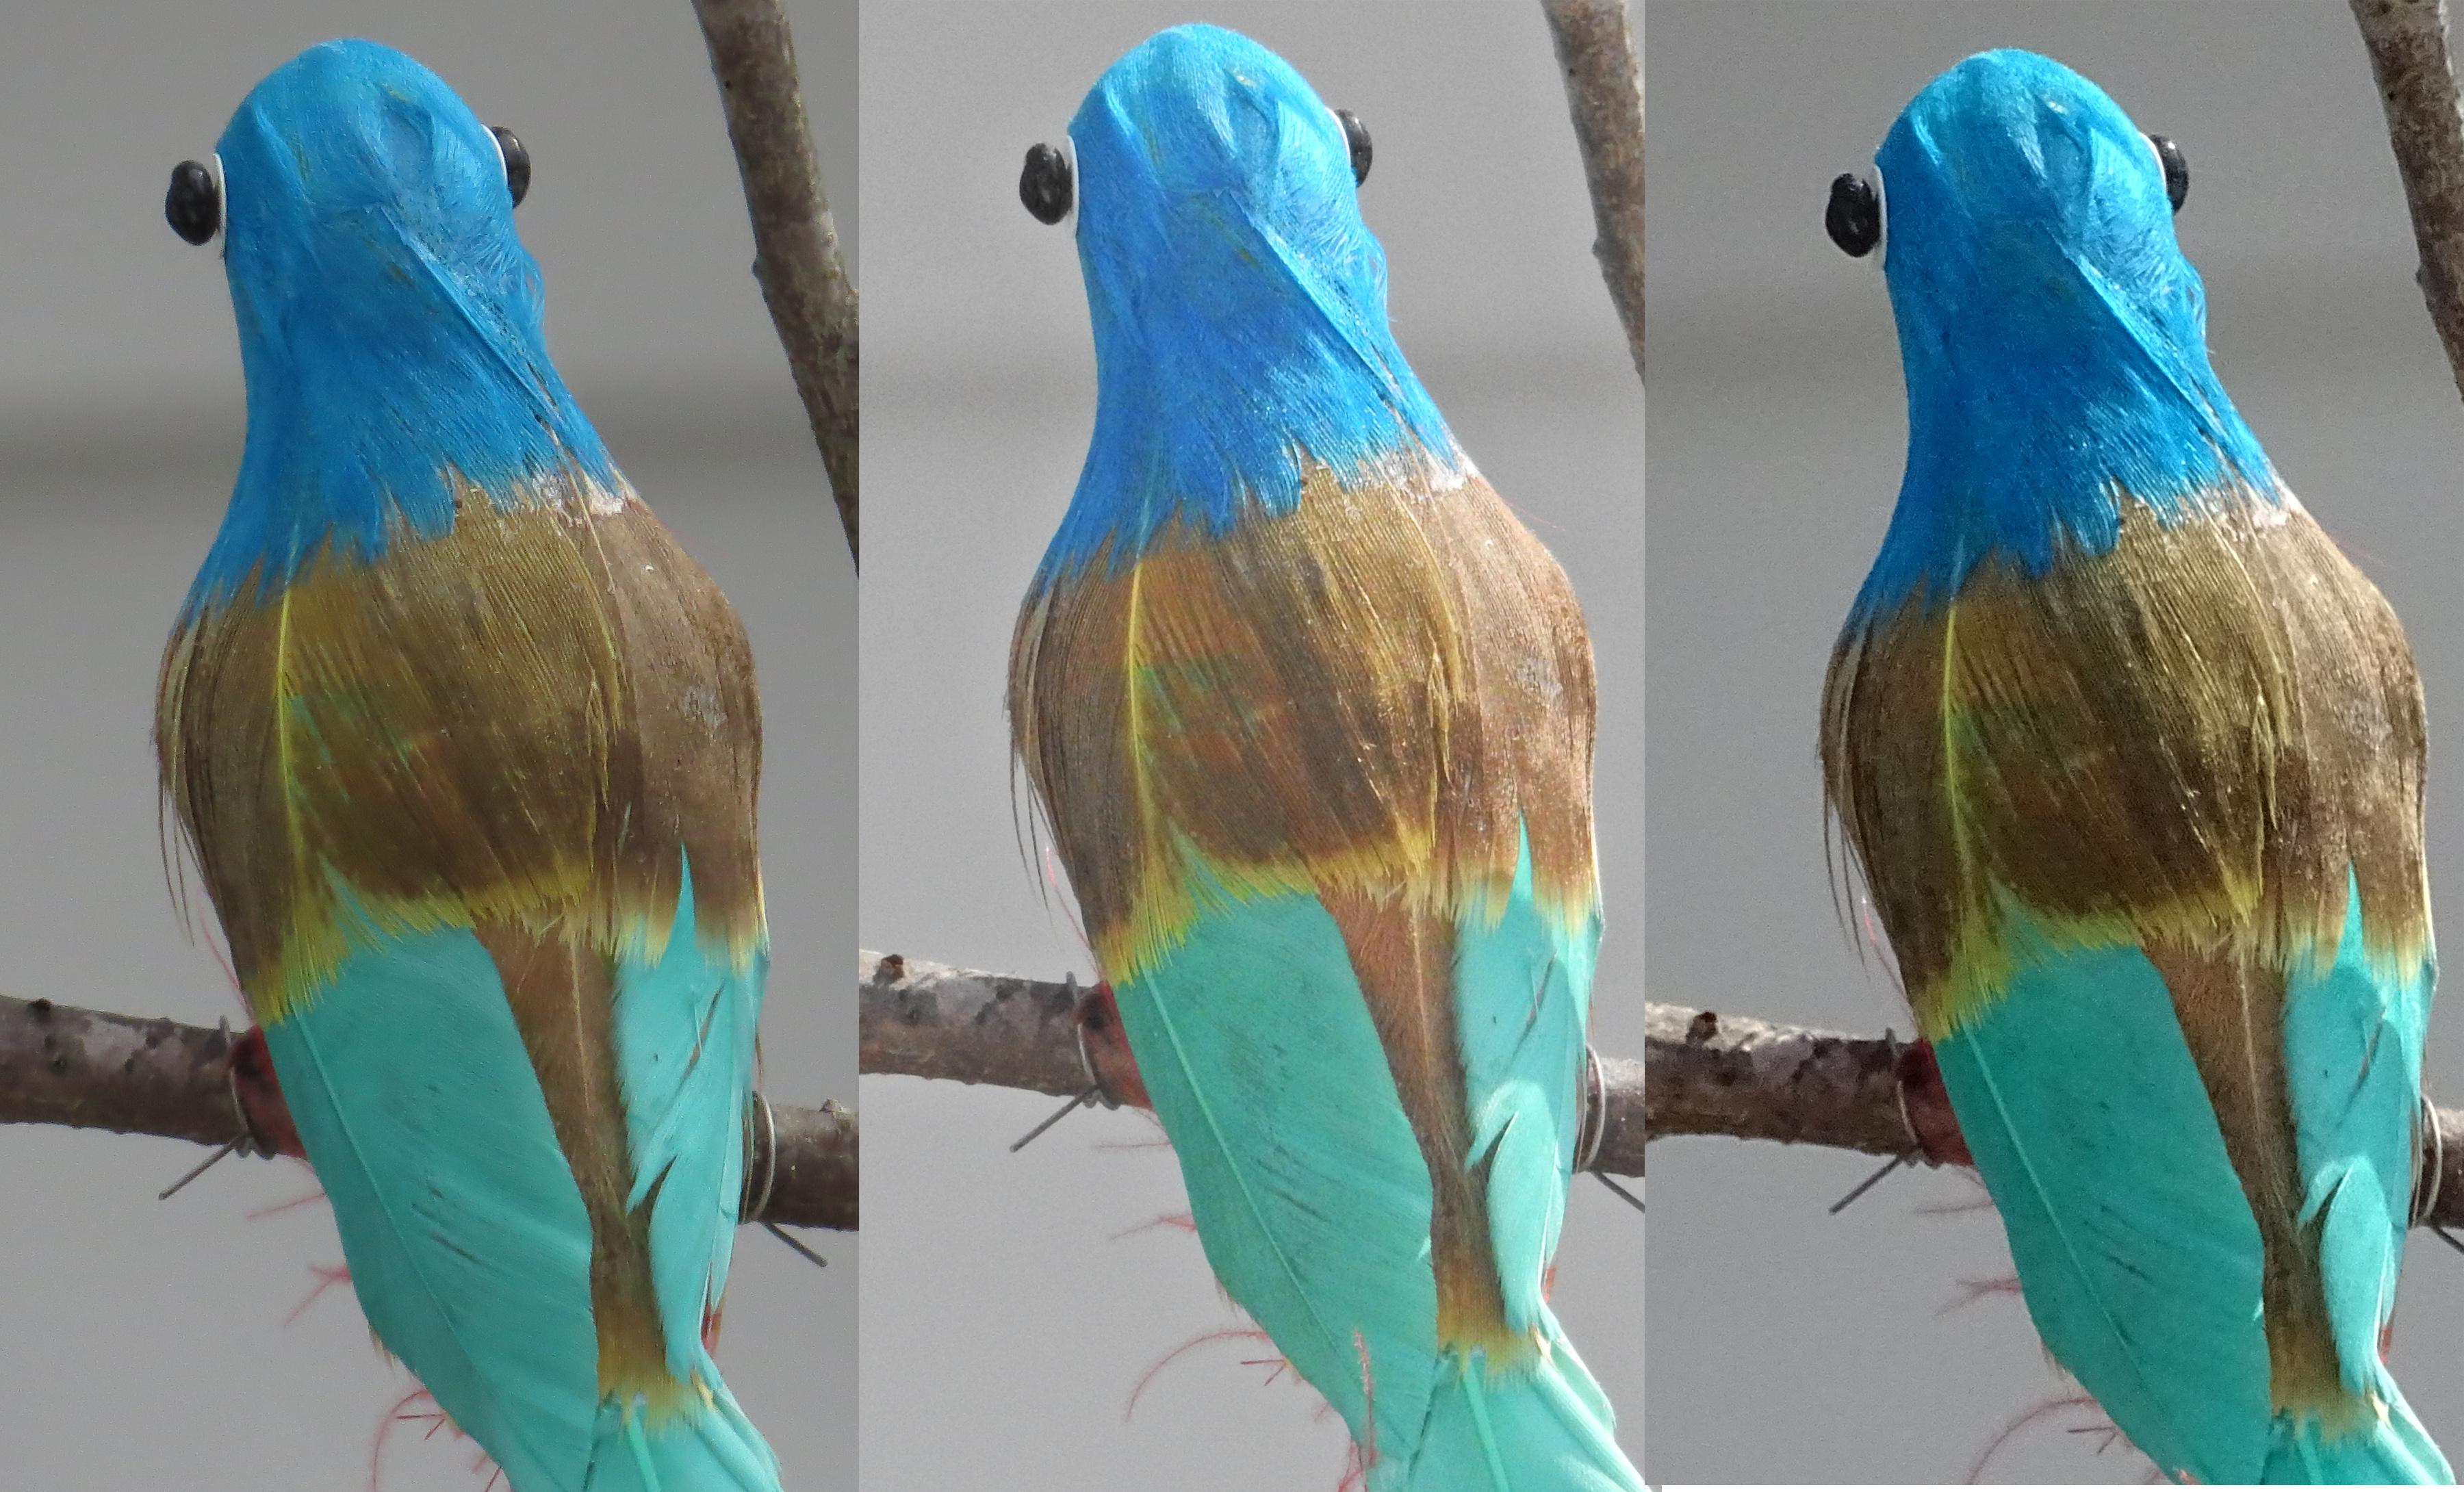
Eastern Bluebird at our back deck feeder. About 12 feet. 600mm. F4 @ ISO 320. Amazing feather detail.
The real change is in the sensor and processing engine. This might be the same sensor, with hybrid focus and 325 phase detection focus points, as Sony used in the RX100V, but it is processing engine from the top of the line A9 full frame camera. Combine that processing engine with that sensor and you get totally amazing focus capability. Birds in flight are embarrassingly easy. Yes. Embarrassingly easy. It used to be a real challenge with a Point and Shoot superzoom, even the RX10iii, to get even the occasional bird in flight. With the iv, you literally just point and shoot. You can use a specific focus area in the center of the frame, which picks up birds in flight easily against most backgrounds, and the camera will focus between frames even at 24 frames per second (though I never use more than 10 frames per second). The iii locked focus on the first frame, which made following birds in flight much more difficult, often impossible. In fact, I use this center frame focus setting for general wildlife photography, so the camera is ready and able to pick up the unexpected flyover. For more dedicated birds in flight work, there is lock on tracking auto focus, which will pick up a bird anywhere near the center of the frame and lock on to follow the bird as you pan. Both work really well, depending on how large the bird is in the frame. Tracking works best with bigger birds and birds bigger in the frame. And, as far as wildlife action on the ground (or sports for that matter). the focus lock is amazingly fast and positive. I came back from Bosque del Apache this year with more satisfying Birds in Flight images, from just this year, than I have managed to get in all the years I have been going there with other cameras.
Sandhill Crane in flight. Bosque del Apache National Wildlife Refuge, Socorro, NM. 600mm. 1/1000th.
Snow Geese coming head on and passing close overhead. The RX10iv tracked these geese in as they came and held focus through over 50 frames at 24 fps. Totally amazing.
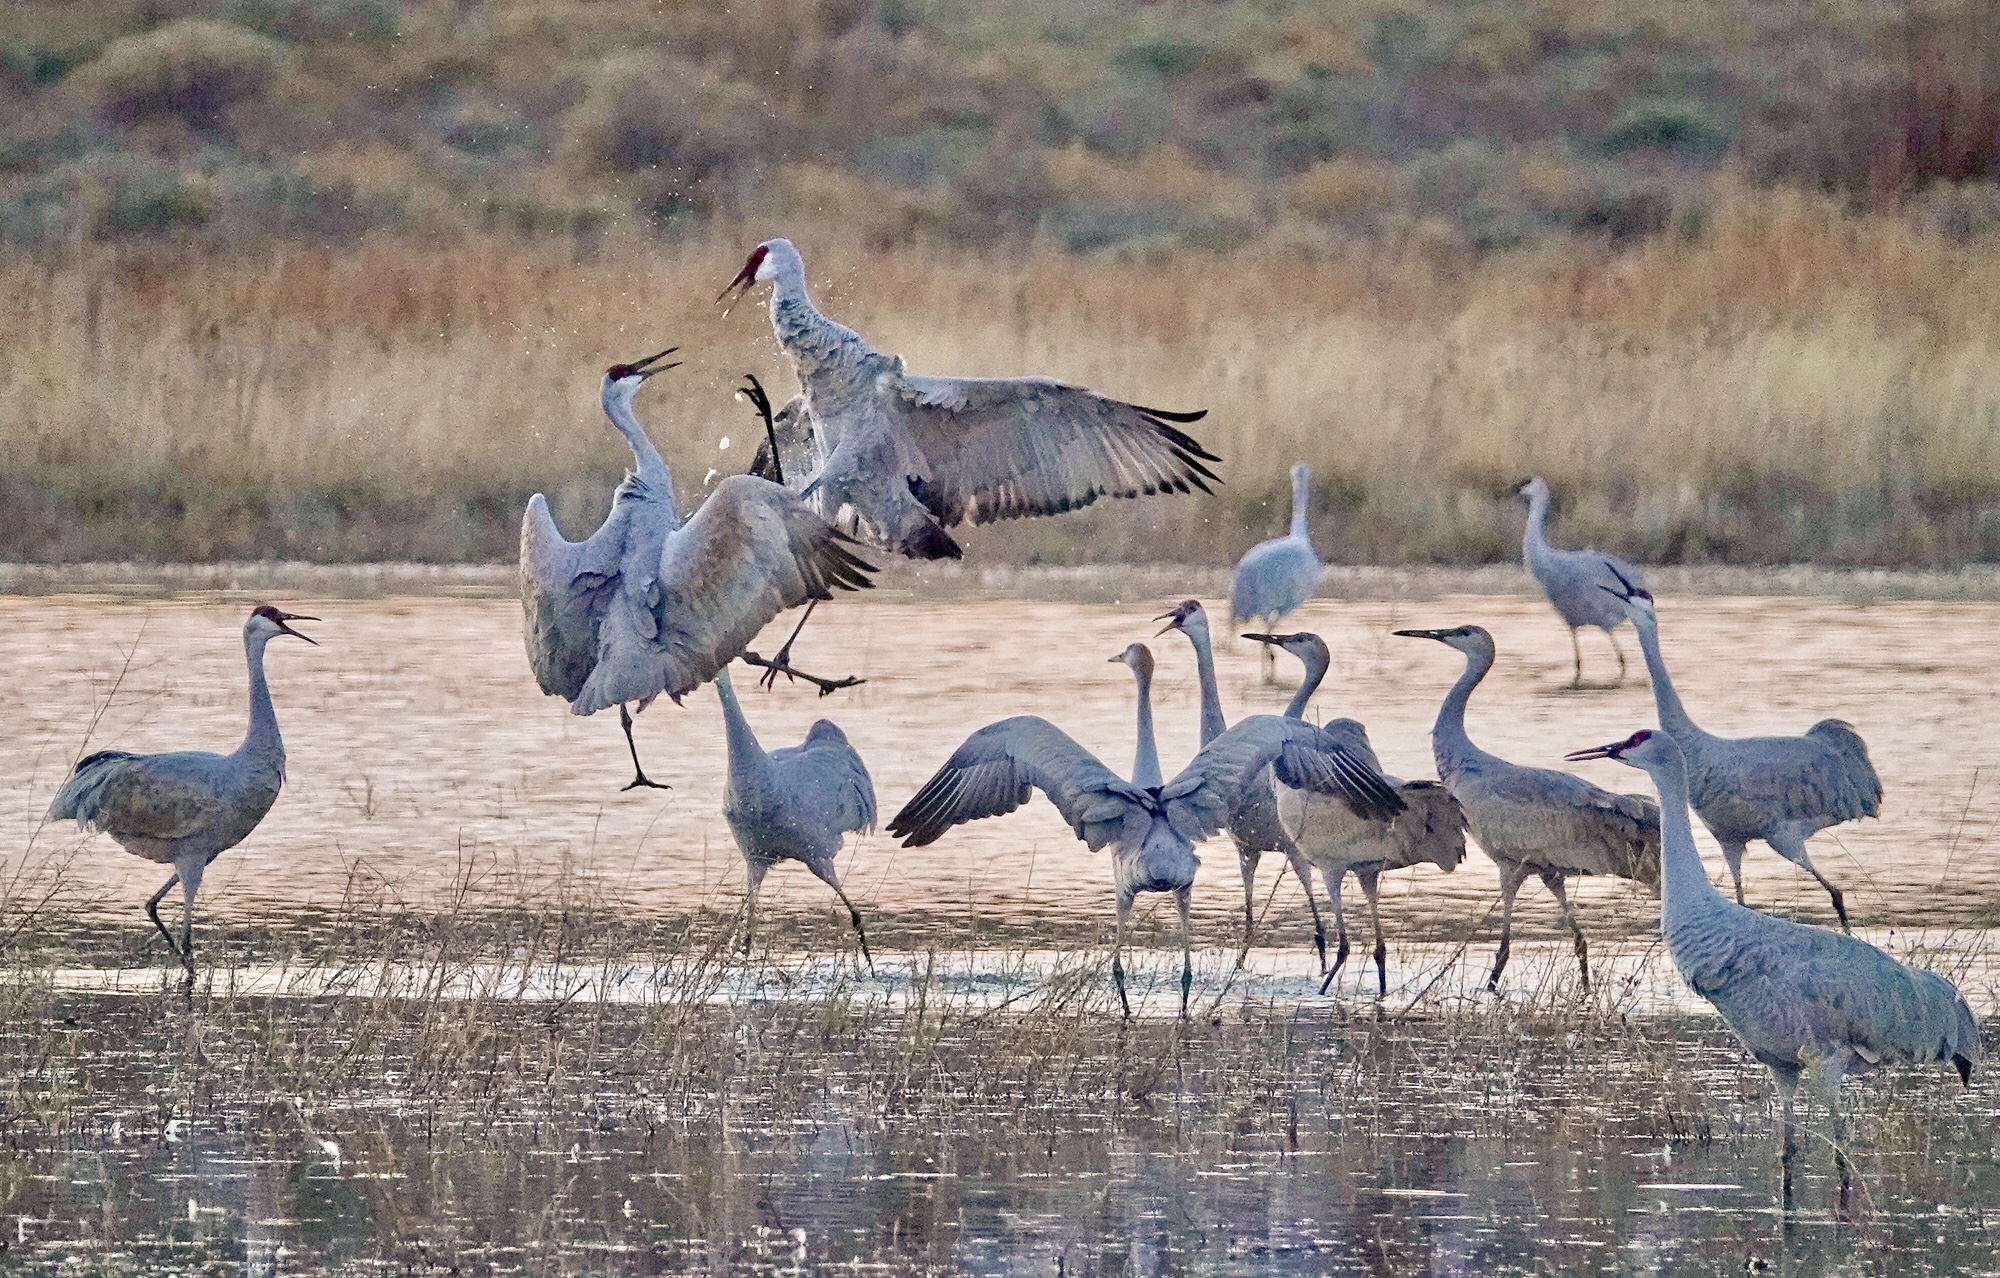
Sandhill Cranes in confrontation after sunset. 600mm, 1/1000th @ ISO 1600. An amazing shot with any camera.
In general wildlife shooting, occasionally the iii would hunt when trying to get a bird or beast in lower light, especially with a confusing background. Not the iv. I recommend keeping the camera set to “continuous focus”, which seems to turn on the Phase Detection Focus points for faster focus. The focus is so fast that you quickly forget to even think about it. Point and shoot!
European Kingfisher, Tagus Estuary, Portugal. Early morning in low light.
The new processing engine has also enabled some refinements which I am only beginning to appreciate as I use the iv more. Auto HDR has been improved to the extent that I rarely use any of the other HDR settings (you can still set 1EV to 6EV differences) and, if you are careful, you can shoot an HDR right out to 600mm on the zoom. The iii could not assemble an HDR much beyond 100mm. Highlights in Auto HDR are now very well controlled. They were not in the iii. That does not sound like much, but since I use In-camera HDR a lot, it means that I do not have to think about adjusting my HDR settings as often. As a Point and Shoot photographer I am all for that!
600mm in-camera HDR. Not possible with most cameras.
Another more subtitle improvement is the menu system. There are still a bewildering number of options and menu screens, but menu items are now grouped in more logical manner on each menu screen, with each screen clearly labeled so you know where you are. I use the excellent function button and function menu almost exclusively when in the field, so I never minded the Sony menu system, but I know that some did. 🙂 The changes should make it easier for folks to find what they are looking for, but I still recommend using the function menu whenever possible.
Some folks are excited about the 24 frames per second (with focus between frames!) capability of the RX10iv. That is essentially movie frame rate, and you can capture action sequences in the equivalent of a 20 mega pixel per frame video. I have not yet found a use for it. Somehow even the 10 fps “medium” speed seems faster and smoother than the 10 fps top speed on the RX10iii did…and focus between frames is just a wonderful improvement. They have also added a 2 fps slow speed continuous. And the size of the image buffer is amazing. I think I read that you can take over 300 frames before the camera freezes up to clear the buffer. (While I have tested the limits, one thing I discovered is that, though you can continue shooting, the buffer is clearing in the background, and you can not make changes in the settings of the camera until the buffer completely clears.) I can tell you one thing…you can burn through an SD card really fast at 24 fps.
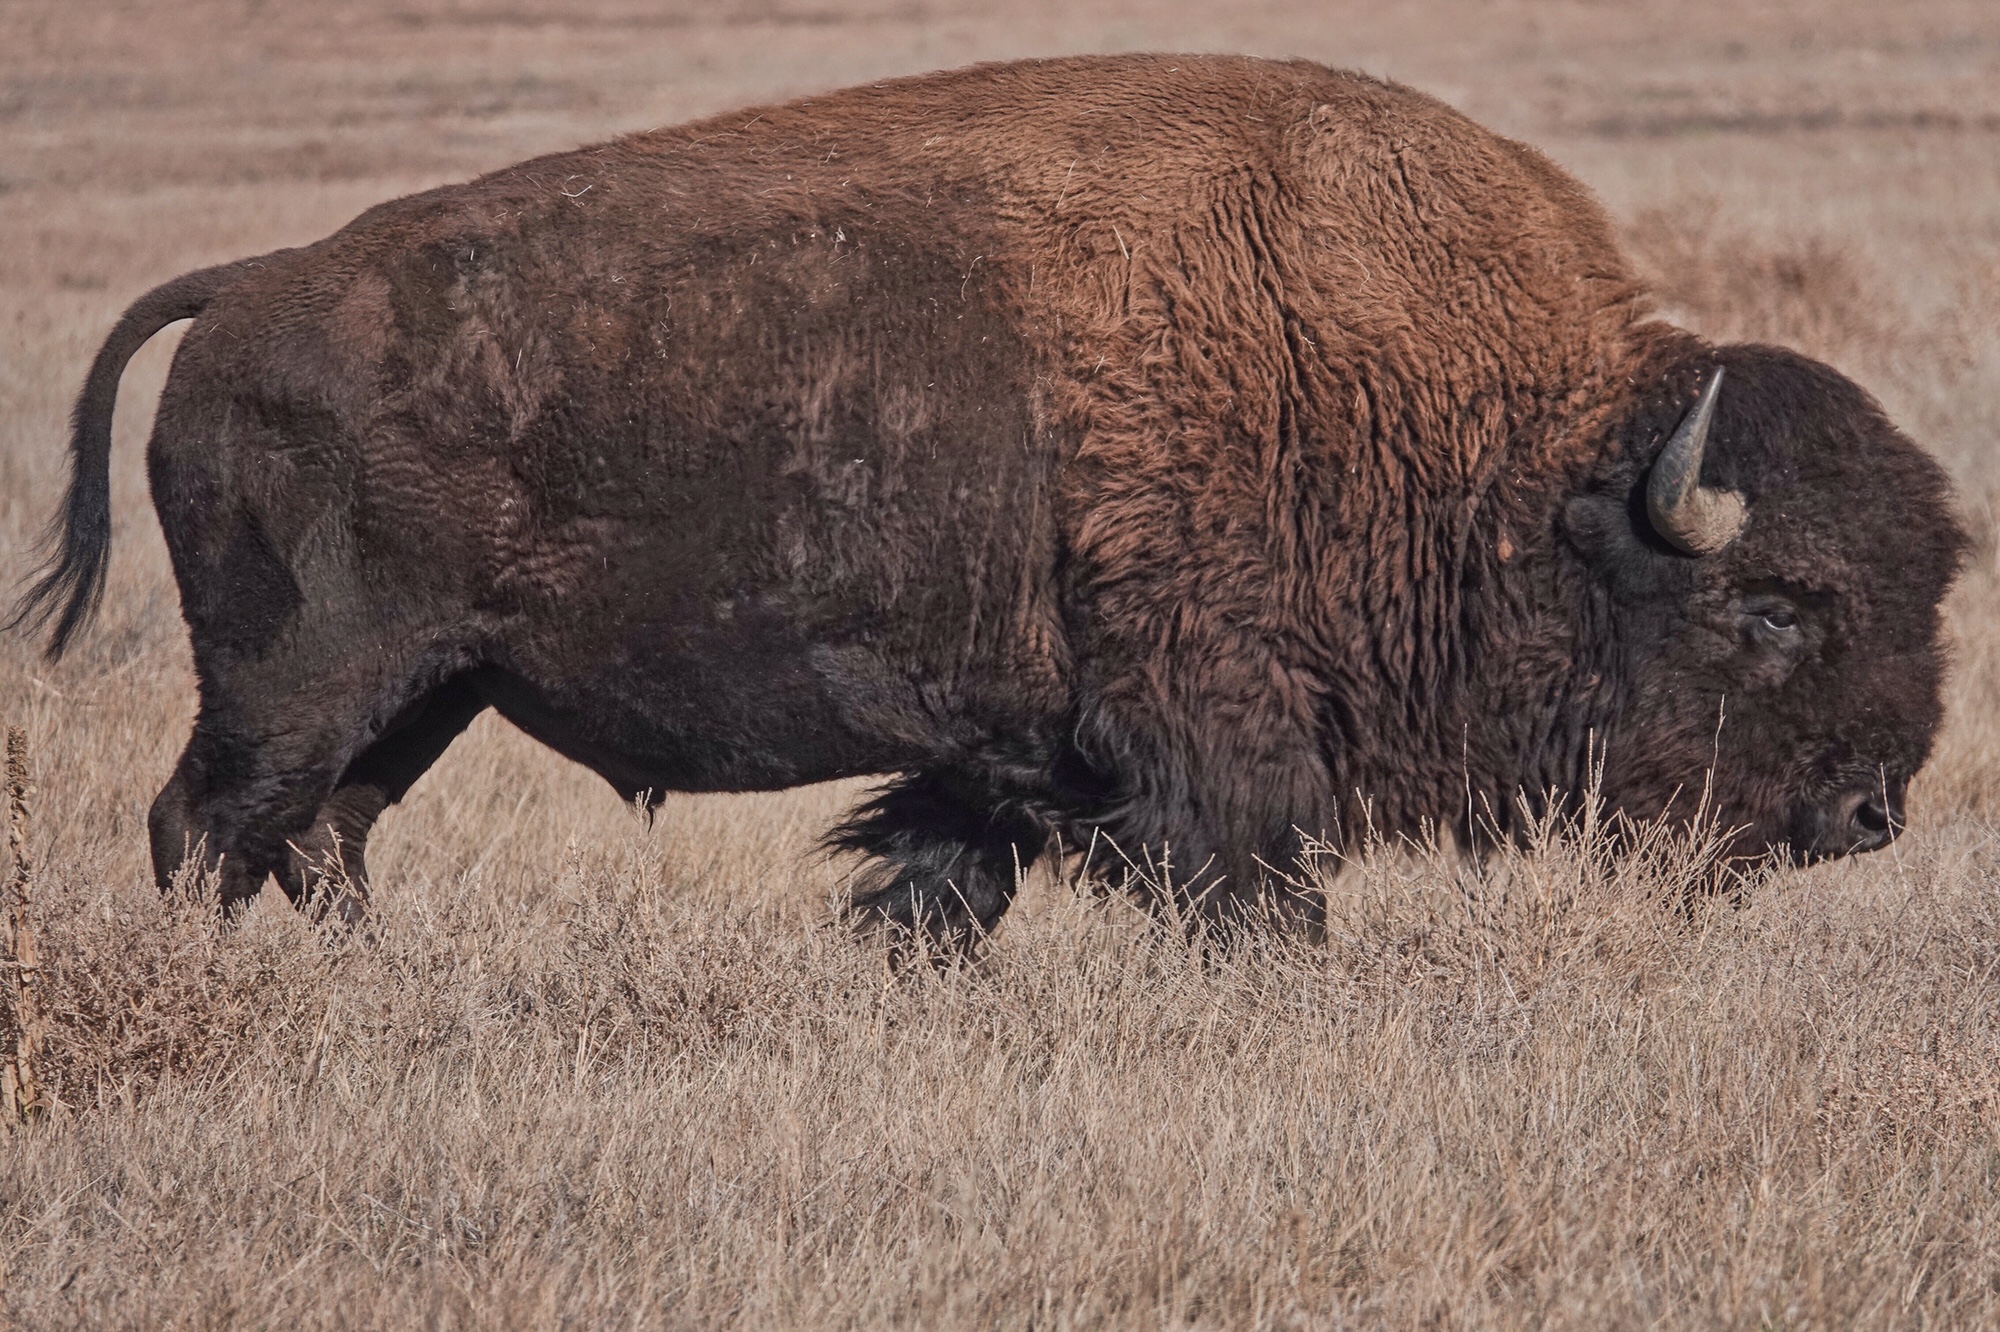
I used touch to focus to place the focus exactly over the Bison’s eye without reframing.
Another change is the addition of touch-to-focus on the new touch screen. It is actually more like touch-to-move-the-focus-area unless you have the camera in continuous focus mode…and it does not, like some implementations, actually take the image. You still have to use the shutter button for that. Many folks on the dpreview Sony Cybershot forum recommend turning touch to focus off, as you do sometimes accidentally move the focus point when handling the camera…however I find touch focus to be really useful. For instance, when shooting a American Bison at close range, I was able to touch the screen to instantly move the focus to the eye of the beast, where I wanted it. On close-ups of birds, I often just tap the screen, again to move the focus to the head or eye. When using Anti-motion-blur mode inside at parties, one of the things I disliked about the mode in the iii was that you lost control of the focus point. On the iv in the same mode, you just tap over the face you want in focus, and, presto, good to go.
My daughter Anna at graduation. Anti-motion blur mode for the low light, and touch to focus to make sure the camera focused on her face.
Actually touch to focus is one of the few things the new touch screen actually does. You can’t use it to set menu items or to navigate the menu system. You can, however, double tap an image in review mode to zoom it, and move the image around to view other parts with your finger. Strange choices on the part of the Sony engineers…but they tried. And, despite the occasional fumble when I get the camera up to my eye and find that the focus square is way off in the upper left hand corner, I do find touch to focus worth getting used to.
It is hard to say for sure, but my impression is that the new sensor and processing engine have also improved higher ISO performance slightly. It was already pretty good on the iii, but in similar situations the iv just seems to do a bit better. And if you are not familiar with the image quality of the Sony 1 inch sensors in the RX series, all I can say is, be prepared to be impressed. Between the exceptional ZEISS glass and the Sony sensors and processing engines, the RX series in general, and RX10iv in particular, produce images that hold up very well, at normal viewing sizes and distances, to anything on the market, including full frame cameras and lenses many sizes larger than the relatively compact RXs. Certainly if you are using the Sony RX10iv as your all around travel, wildlife, landscape, and party camera, you will have nothing to apologize for when displaying your images (and much to be proud of).
Crane against the sunset, Bosque del Apache, New Mexico. 600mm.
I already loved the RX10iii. It was the best camera I have ever had the pleasure of traveling with, and I owned it during 18 months when I visited so many wonderful places. I have only had the iv for a few months now (since a few days after it was released), but already I love it even more. It has not been as many places yet, but it will get there…and I know that when it does, it will bring back the images I want, day after day, time after time, amazing place after amazing place. I have no qualms about calling it the best fixed-zoom, superzoom, compact camera ever made. I plan on wearing it out before they come out with the RX10V (which will go to 800mm at f5.6 of course 🙂 This is my camera and I love it!
Those of you who follow my daily photo posts on Pic for Today, Facebook, or Google+ will have noticed that I have a new camera. Sony recently announced and released the RX10iii (or RX10M3, or RX10 Mk 3…it has been called all three. Even Sony is confused about the name. It is the RX10iii on the front plate of the camera itself and on the box, but it is the RX10M3 in the exif data recorded with jpegs??)
The big features on this new offering in the RX line are the sensor: the newest 20mp, 1 inch sensor with the digital signal processor right on the back of the chip…and the zoom: a 24-600mm, f2.4-f4, ZEISS VarioSonnar design.
Farmington Falls in Farmington Maine. In-camera HDR. 6 stop difference. -1.3 EV. Program shift for slow shutter speed. Processed in Lightroom.
The sensor gives the camera better image quality (by far) than any P&S sensor camera to date, fast and sophisticated jpeg processing, and exceptional video features, including well implemented 4K and ultra slow-motion recording. The increased IQ is not surprising considering that the sensor area is 4 times that of the Nikon P900 and its like, and the individual light receptors (all 20mp of them) are also 4 times bigger. And it is absolutely the latest technology from the undisputed leader in sensor design (many DSLRs (not to mention P&S and phones) have Sony sensors inside, no matter what the brand name on the outside), which means that Sony is able to nurse near APS-C image quality out a sensor 1/3 the size.
(Any of the images here can be viewed at any size up to original by clicking the image, which will take you to my WideEyedInWonder site. Size controls are at the bottom right.)
The lens, in theory, provides the reach to put this camera in the super-zoom category…though it is pitifully short by today’s Point and Shoot super-zoom standards where 1200mm is the norm, 1440mm is becoming common, and the Nikon P900 reaches 2000mm. Still 600mm on a DSLR is considered a super-long lens, and it is the most common lens used in bird and wildlife photography. And the ZEISS lens is an f2.4 to f4: a fast lens by any standard, and super fast for a super-telephoto zoom.
Northern Perula, Magee Marsh, OH. 600mm at f4. Cropped slightly and processed in Lightroom.
The only other camera with a 1 inch sensor and a zoom that reaches 600mm equivalent is the Canon G3X, which requires an add-on Eye Level Viewfinder (EVF) for practical bird and wildlife use. Performance of the Canon lens is generally rated somewhat mediocre, and its jpeg processing features (in-camera HDR, sweep panorama, etc.) are very weak when compared with the Sony.
The third 1 inch sensor “super-zoom” offering is the Panasonic Lumix FZ1000 (or Leica Typ 114 which is practically identical). The FZ1000 has a Leica designed 25-400mm zoom, which is generally rated above the Canon zoom for performance, but is considered somewhat soft at both ends of its zoom range…and it lacks, imho, the reach to really be in the super-zoom class.
(Nikon has announced, but not delivered, a DL 24-500 1 inch sensor camera. Originally intended for June of this year, it is now delayed until at least November…and may, honestly, never see the light of day.)
I like Sony cameras. I carry the Sony HX90V as my landscape, occasional macro, and people shots camera along-side the Nikon P900, since it does both in-camera HDR, and tel-macro, better, and is less obtrusive at parties. And it is small enough to fit in a pocket. Prior to my Nikon P900 my superzoom was the Sony HX400V. Landscapes, especially HDR landscapes, have become a large part of my work over the past two years, and, while I like the HX90V for its images and size, I know that that the P&S sensor is limiting the detail that can be rendered in those big expansive views. And, while the HX90V is better at tel-macro than the P900 (close focus 7.5 feet vs. 16.5 feet) it is still not the ideal butterfly and dragonfly shooter. So, when the RX10iii was announced, and when I read that it also has excellent macro focus at 600mm (28 inches), I was very interested.
Aurora Damselfly, freshly emerged. Emmons Preserve, Maine. 600mm macro. 2x Smart Digital Tel-converter for a 5mp image at 1200mm equivalent from about 3 feet. Focus fine tuned using Direct Manual Focus (DMF). Great for macros.
In the time between announcement and delivery of the Sony RX10iii I had an opportunity to play with, and shoot with, both the Canon and Leica 1 inch zoom offerings for long enough to know that the Canon was out of the running, and that I could certainly learn to love the Leica/Lumix, despite its short zoom.
As it happened I also had a chance to field test the Sony RX10iii before making the decision. I called in a favor from the excellent folks at Hunts Camera and they brought me one to try at Magee Marsh two days after the camera’s release, during the Biggest Week in American Birding where they have a booth in the Optics Alley tent (TBWIAB is also colloquially known as warblersock, and there is no place better to put a new camera through it paces…though I had to keep reminding myself that I would not be buying camera for birds…landscape and macro…remember!) After a day of using the RX10iii I got out my credit card, took a deep breath, and bought it. 🙂
The deep breath was necessary because the camera is expensive: at $1500 almost twice as expensive as the Lumix or Canon, and three times the cost of even an expensive P&S super-zoom. And it is big: considerably bigger than the Canon 3GX, the same size but heavier than the Lumix FZ1000, and both slightly bigger and quite a bit heaver than my Nikon P900…the biggest P&S super-zoom to date.
Still…once I had handled the RX10iii, run through the menus and explored the features, and especially once I had processed a few of the images, my fate was sealed!
Handling, controls, etc.
As I mentioned, I like Sony cameras, mainly because of the range of control provided over features like Dynamic Range Optimization, in-camera HDR, Creative Styles (jpeg processing profiles that can be fine tuned for saturation, contrast, and sharpness), and special features like Anti-motion blur for party shooting. Sony provides enough control over the jpeg processing so that I feel no need of RAW. (The RX10iii does record RAW and RAW plus jpeg, but I prefer to use the features built into the jpeg process…DRO, HDR, Anti-motion blur, etc….I am a Point and Shoot photographer at heart, and it fits my workflow in post processing better.) The RX10iii has all the Sony features, and since they are essentially in the same place in the main menu and function menu as they are in the HX line, I quickly felt right at home.
One of the benefits of the big body on the RX10iii is the range of physical controls provided. You have 3 Custom Buttons, a big button on the lens, two control rings on the lens, a control thumb-wheel upper right on the back, a dedicated Exposure Compensation wheel far right top, and a four position switch for focus modes. This is in addition to the normal Auto/PSAM etc. control dial on the top left, and the 4 way rocker switch surrounding the multi-function button on the back. And it is all totally customizable. Do you prefer the wider lens ring for focus (as I do)? Or you prefer right to left for close and far focus? Just set it so. Do you want easy access to the metering or focus area settings? Assign them to Custom Buttons. Are you used to having ISO on the right rocker switch (it is there on a lot of cameras). Assign it! You find yourself using the built in Smart Digital Tel-converter a lot? Put it on the lens button. Don’t like the arrangement of the functions in the function menu? Change it. It takes some time, and some experience with the camera, but you can set the Sony RX10iii up to match exactly your shooting style and needs.
And the camera, in your hands, just feels solid and serious. Heavy, yes, but well balanced (and light compared to any other rig with a 600mm f4 attached). Sony says the body is dust and moisture resistant, and I can believe it. This feels like a finely crafted machine. Picking up my P900 or P610 after…well, I love them, but they feel like toys. It is just that the RX10iii is so clearly a cut above them in build quality. It would have to be, of course, at least in part, to justify the price!
Image Quality
And that brings us to image quality. Again, there are two contributing factors: the sensor/image processing engine (since I shoot jpeg), and the lens.
The image quality is simply outstanding. Compared to my Nikon P900, the images feature smooth, artifact free, backgrounds at almost any ISO; vivid, but not oversaturated colors; great dynamic range; and very fine detail. P900 images, while they render amazing feather detail at 2000mm and capture accurate (for the most part) color, look flat and 2 dimensional, with much less subtly in the color rendition, when compared to the images from the RX10iii. The images from the Nikon P900 are wonderful, technically amazing. The images from the RX10iii are beautiful. They have an eye appeal that is just not there in the images from any P&S super-zoom I have used to date. (The Sony HX400V comes closest…but the almost total lack of artifacts…and the finer detail of the RX10iii put its images in another class from even its close sibling.)
The follow two pics show both the P900 and RX10iii at their best…at least for wildlife. The P900 fills the frame with a warbler at 20 feet, and shows exceptional feather detail. The RX10iii captures the beauty of the bird and its surroundings in a natural, attractive image.
The RX10iii simple beauty
The P900 at its best, 2000mm
Then the lens…and the RX10iii is really all about the lens. This is, quite simply, as good a wide angle lens as I have ever used (and that includes the ZEISS Touit 12mm for the Sony Alpha APS-C series) and a totally amazing lens at 600mm and f4. Totally amazing! The resolution and sharpness are wonderful. The brightness and contrast are totally realistic. In in-camera processed jpegs, there is NO color fringing. The image stabilization (like that of the Nikon P series) is totally up to the task. You can hand-hold at 600mm…even 1200mm with digital enhancement or in-camera cropping (more on that later). ZEISS and Sony have really stepped it up on this design, and, imho, set a new standard for lens quality, certainly in the super-zoom class, and, I think, quite possibly in zoom lenses in general. Well done ZEISS and Sony!
Combine this lens with this sensor and image processing engine, and, as DP Review perhaps somewhat over enthusiastically said, it simply destroys the competition. 🙂
Cedar Waxwing. 1200mm equivalent (in-camera crop).
But I come back to the beauty of the images…that indefinable something that makes them a pleasure to look at. It is addictive, and the more I shoot with the camera, the better I like it.
Of course, being me, I have run some actual side by side tests with the HX90V for landscapes, and with the P610 and P900 for birds and wildlife (though finding a bird that would sit for me while I switched cameras proved to be a bit tricky…and I have not found one in and ideal situation yet.) I also tested the RX10iii using both Clear Image Zoom (digitally enhanced to reach 1200mm), and the Smart Digital Tel-converter function (in-camera cropping to achieve the same 1200mm field of view and image scale but in a 5mp image) to see if it could come close to…or even, maybe, equal…the resolution of the P610 at 1440mm and the P900 at 2000mm. Well I had to try, didn’t I?
Macro
I have been missing a great macro camera since I moved on from the Canon SX50HS a few years ago. I like to shoot flowers, plant detail, and bugs…mostly dragonflies and butterflies, and the Canon, which focused to 4 feet at 1200mm equivalent, was the ideal tool. Then too the Canon had a digital tel-converter that you could kick in at any focal length…which made wide angle macro practical, since you could get the macro focus of the 24mm position, and the image scale and working distance of a 48mm equivalent. The RX10iii focuses to 28 inches at 600mm, and therefor offers almost the same image scale as the Canon at its closest. The Smart Digital Tel-converter will give you 5mp close-ups at twice that scale. Or, especially for macros where most of the image is taken up by the subject, you can use Clear Image Zoom for 20mp images, though with some added artifacts, at that same scale. (If you need 20mp, you can also use a program or plug-in in post-processing, like On1’s Resize 10, to enlarge the 5mp image back to 20mp, with very good results.) By the way, macro is a good place to use Direct Manual Focus (see below for more). If you look back at the shot of the Aurora Damselfly above, you will see that the focus is precise on the head of the bug…sharp because I used DMF to focus exactly there.
Whitetail Dragonfly (Frosted likely). 1.4x Smart Digital Tel-converter. DMF for fine focus.
Teneral Chalk-fronted Corporal (dragonfly). 2x SDTC. (1200mm equivalent at 5mp.) From about 3 feet.
HDR Landscapes
Sony has the best implementation of in-camera HDR in the business. You can use Auto HDR, or you can choose 1 to 6 EV differences between the 3 images used to create the final HDR file. You can also set Creative Styles to suit you, and use Exposure Compensation to shift the mid-point of your three exposures. Look back at the waterfall shot above and note the caption. Then too, the in-camera program that aligns images is nothing short of amazing. In most cases it will be able to sort out some movement in the image…like reeds blowing in the wind, or water moving along the shoreline…without any “ghosting”. (Ghosting is what happens when the same object appears in the finished image twice, but slightly out of alignment, because it moved between exposures.) The three exposures have been taken fast enough for several Sony camera generations so that you do not need a tripod…but with the new sensor with the digital signal processor built in…the RX10iii is super fast. The HDR files from the RX10iii look good right out of the camera…and, with a bit of adjustment of levels in Lightroom (or similar) can be made to look completely natural…as close to the naked eye view as you are going to get with a digital camera.
A good stiff breeze was moving the cattails in the foreground, but Sony HDR managed to sort it out.
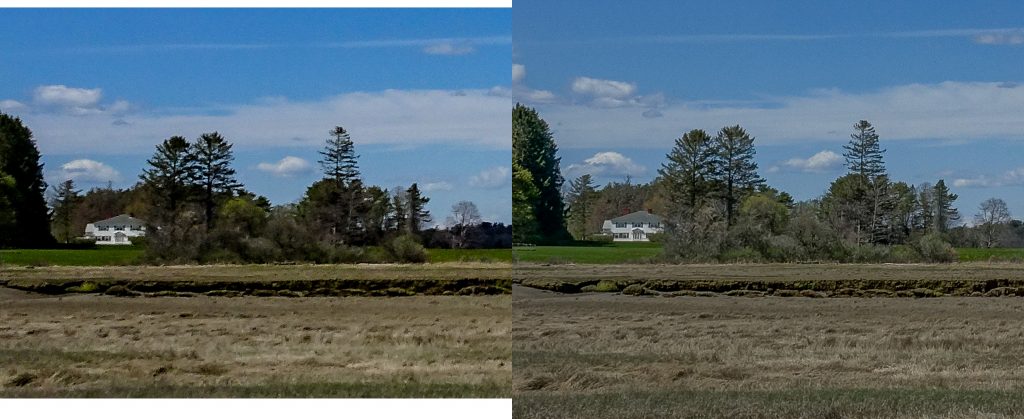
I tested the HDR capability of the RX10iii against the HX90V. In every shot, the RX10iii shows finer detail and detail better rendered. (Previous tests showed that the HX90V did way better at HDR than the Nikon P610 and P900…which have only one level (auto) of HDR. Previous testing also showed that the HX90V was very close in image quality for HDRs to the Sony Nex 5t, with its APS-C sensor and its 16-50mm kit zoom. Too close to call. The combination of the new sensor in the RX10iii and the exceptional ZEISS VarioSonnar zoom yield HDR landscapes that are noticeably better than the Nex 5t. I don’t have a more recent Sony APS-C body to test against, but my feeling is that the RX10iii is producing in-camera HDRs that are about as good as you are going to get from any camera.)
Here is a comparison crop from the HX90V and the RX10iii. Two in-camera HDRs taken seconds apart.
HX90V on the left, RX10iii on the right. Processed with the same Lightroom preset.
Telephoto: Wildlife and Birds
My original thinking was that the RX10iii would not have to compete with the Nikon P610 and P900 for birds and wildlife. It was replacing my HX90V…and perhaps my P610 for butterflies and dragonflies…but not my P900 for birds and wildlife.
That, of course, was before I discovered how much fun the RX10iii is to shoot with…and how good the images look.
Fun: The EVF on the RX10iii makes the EVF on the Nikon Ps look, well, dingy…and the EVF on the Ps is among the best of any P&S superzoom currently on the market. The Sony EVF is not like using and EVF at all. It is very close, in my opinion, to using an optical view finder. The image is so crisp and detailed, so bright and contrasty, that it is easy to find birds, even in a confusing background…way easier that in either Nikon P model. That means you are on birds faster and enjoy looking at them more. Fun.
The RX10iii is also fast…13 frames per second…and the buffer clears within a second. High speed on the Nikons is 10 fps, and it takes 7 to 8 seconds for the buffer to clear. That is so annoying that I only use Low Speed Continuous on the Nikons, 2 fps. I had learned to live with it…but the Sony is just more fun.
Sony’s implementation of Direct Manual Focus and the placement of the focus ring on the lens barrel is simply brilliant. (Not perfect, focus by wire using the electronic focus ring is not the same as mechanical focus, but brilliant all the same.) Setting the camera to DMF means that you still have auto focus, but you can override it at any time by just turning the focus ring. This means that, if the camera can’t find focus quickly, you can get it in the right ball-park using DMF, and then let Auto finish (in which case Auto will lock on almost instantly), or you can let Auto get you close, and then fine tune focus with the ring. In that case, when you have the shutter button half-pressed for focus, turning the focus ring also magnifies the image by an amount which you specify so you can really see what you are doing. (See the caption up above under Macro for how much help this is in shooting Macros.) Again, DMF adds to the fun factor.
macro, with DMF aided focus. 1200mm from a 5mp in-camera crop (Smart Digital Tel-converter).
Cedar Waxwing in Apple Blossoms. DMF to the rescue!
Images: I have enthused before already about the beauty of the RX10iii images when compared to the Nikon P series. Maybe it is just my eye…but I really, really like the why this Sony renders an image.
That said, I have been experimenting with the RX10iii for birds and wildlife. DMF is great, and the focus on the Sony is faster than the Nikon P900, but the P900 has a kind of magic built in that allows it to focus on the bird, even when the bird is mostly hidden by foreground foliage and twigs. In a similar case with the Sony, you have to resort of DMF. The time difference is not significant, since it often takes the Nikon P several tries, several shutter button half presses, to do its magic and you can get there with a twist of the focus ring and a single press on the Sony…but it is different. It is not magic!
And of course there is a significant difference in the reach between any current P&S superzoom and the RX10iii’s paltry 600mm. There is nothing like reaching out with the P900 at 2000mm equivalent and absolutely filling the frame with a warbler at 20 feet! And the feather detail that the Nikon captures is simply amazing. (Or fur detail if not shooting birds.) The background of the photo might not look very appealing…it might be full of noise and sharpening artifacts, but who is going to notice that when the bird takes up most of the frame?
To come even close to the P900’s reach, you have to resort to either Clear Image Zoom or to the Smart Digital Tel-converter on the Sony. Clear Image Zoom is similar to Perfect Image Zoom on the Nikons. It applies special processing to a crop from the center of the senor to provide the appearance of a longer focal length, and a full size image. On the Nikons it can push the zoom out to 2880mm on the P610, and 4000mm on the P900, with decent results. On the Sony CIZ pushes the zoom out to 1200mm, again, with quite good results. The Sony, however, will also just save that cropped portion of the sensor as a file…that is what Smart Digital Tel-converter does. You get a 5mp image, with no added digital artifacts, at 1200mm equivalent.
1200mm equivalent, optical zoom, Nikon P610
1200mm. 600mm optical zoom, plus 2x Clear Image Zoom. Sony RX10iii
I have experimented with both on the RX10iii to determine how close I can come to the detail offered by the P610 or P900. And the answer is, pretty close. 🙂 Due to the bigger sensor, and perhaps the better jpeg processing engine, CIZ at 1200mm comes very close to the level of detail that you get with the P610 at and optical zoom of 1440mm, and pretty much matches it a 1200mm, when you use the P610 (or P900 for that matter) at that optical focal lengh. At 600mm equivalent, full zoom on the Sony, or set to 600mm on the Nikons, the Sony wins hands down.
At 2000mm the Nikon P900 offers considerably more image scale than the Sony, even stretched to 1200mm (fills more of the frame with your subject), and pretty amazing feather and fur detail. However, using the Smart Digital Tel-converter for a cropped 5mp image on the Sony, while it does not equal the scale, yields very similar feather and fur detail. It also produces a much cleaner image…with far fewer digital artifacts, especially in the background of the image. And there is the beauty factor.
2000mm optical zoom. Nikon P900.
1200mm. Smart Digtial Tel-converter (in-camera crop to a 5mp image). Sony RX10iii
1200mm. The image above, upscaled to 20mp using On1’s Resize 10 plug-in.
Finally I experimented with upscaling the 5mp image back to 20mp using On1’s Resize 10 plug-in for Lightroom, which I downloaded as a trial. Upscaling is essentially what the camera does when using CIZ, but the scaling in Resize 10 uses “true fractal technology” and is just more sophisticated than in-camera scaling, and the results are very impressive. (see the image immediately above)
The following gallery shows the results of comparison shots of the only really cooperative bird I could find…at ISO 100. Clicking the image will open the attachment page where there is a link to the full sized image at the bottom of the page (next to the magnifying glass). Left click the link to choose Open in a new tab, to compare two images by flipping back and forth between them.
P900 600mm optical
P900 1200mm optical
P900 2000mm optical
RX10iii 600mm optical
RX10iii 1200mm 4 feet closer
RX10iii 1200mm 5mp in-camera crop
The next gallery shows the results of comparison shots of the same species…in subdued light…at ISOs of 400 and 500. The RX10iii 1200mm, 20mp shot is the 5mp shot upscaled in On1 Resize 10. The final shot is the RX10iii at 1200mm, but I moved closer to the bird by 4 feet, to achieve the same image scale as the P900 from it’s minimum focus distance of 16.5 feet.
P900 600mm
P900 1200mm
P900 2000mm
RX10iii 1200mm
RX10iii 600mm
RX10iii 1200mm 20mp
RX10iii 1200mm 5mp
My conclusion is that the P900, overall, still does the best job for wildlife and birds, but considering everything I shoot, and everything else the RX10iii does so well, I could easily get away with just carrying the RX10iii. I can live with the 5mp cropped 1200mm equivalent, given the beauty of the images, and the fact that most of my images are posted to the web at 3mp anyway. And the On1 Resize 10 plug-in (which is so good that I actually purchased it) will, in fact, produce a full-sized, 20mp image, if and when I need it.
5mp image from above, upscaled to 20mp in On1’s Resize 10. Compare at full size by clicking for my WIEW site and using the size controls in the lower right hand corner of the page.
I have been carrying two cameras for a while now…both the Nikon P900 and the Sony HX90V…to cover the range of my nature photography interests…from macros, to HDR lanscapes, to sweep panoramas, to tight shots of wildlife and birds. The RX10iii comes as close as any camera can to a one-camera-does-it-all solution for my needs. For macro and landscape it is simply wonderful…providing as much detail in beautiful, appealing images as I will ever need, and stretching out to 1200mm equivalent with excellent detail, and that same beauty of image, for wildlife and birds.
All well and good, the Sony RX10iii may be a great camera, but, harkening back to the title of this review, is it really a Point and Shoot Superzoom?
I always say Point and Shoot is an attitude not a class of equipment…and the way I will use the RX10iii is the same way I use any Point and Shoot superzoom. I will let the camera do as much as it reasonably can, using all the automation and all the jpeg processing features that Sony engineers have built in, and I will concentrate on finding the images worth capturing, and capturing them. Let the camera do all it can do, see, point, shoot, share. That is the Point and Shoot nature photographer’s mantra.
And that leaves us with the question of whether a $1500 camera can be classed as a Point and Shoot? I could buy 3 Nikon P610s for that and have money left over for extra batteries, a charger, and as many SD cards as I might want. Part of my attraction to Point and Shoot is that it makes quality nature photography available to almost anyone who wants to give it a serious try. The $1500 price tag on the RX10iii puts it out of consideration for many beginning nature photographers, and many who are well beyond beginner.
At the same time, $1500 is still only about 1/10 the price of a pro DSLR body and a 600mm f4 image stabilized lens…and that does not count the cost of all the other lenses you would need to fill the gap down to 24mm at the wide end. Even an entry-level DSLR and the least expensive 150-600mm zoom would set you back about the same as the RX10iii…and again, you would need at least 2 more lenses to cover the 24-150mm range and macro. So, while the RX10iii is not as affordable as a standard Point and Shoot superzoom, it is still what we might call a bargain in a full service outfit for serious nature photography. (And that is not to mention the differences is size and weight!)
If your primary interest is bird photography, and occasional wildlife, you might still be better served by something like the Nikon P900. My P900 will be coming with me on any future nature photography trips. And if your budget, or your sense of thrift, will not stretch beyond $600, you can still be a successful and happy Point and Shoot nature photographer with any of several current superzoom offerings, in the $400-$600 range. Just let the camera do all it can, see, point, shoot, share, and enjoy.
Baltimore Oriole in Apple Blossoms. Sony RX10iii
If your interests are wider, with a serious interest in everything from macro, through dramatic landscapes, to wildlife and birds: if you value a kind of ineffable beauty in the images you take; and if $1500 does not seem unreasonable to you, then I can safely predict that you are going to be just as over-the-top delighted with the RX10iii as I am.
In fact, if I did not know better, I would think the engineers at ZEISS and Sony had me in mind when they designed the RX10iii. This is, in so many ways, my ideal camera.
But, honestly, is it a Point and Shoot superzoom? It is if you want it to be. 🙂
Sony HX90V. Notice finger grip, and control ring around lens next to the body.
I really like the Nikon P900, which I am using for the majority of my bird and wildlife photography these days, and which does a good job on nature photography of all kinds (it is hard to argue with the excellent 83x zoom and amazing image stabilization), but since I switched to it from the Sony HX400V, there are several things the Sony did well that I find myself missing. The main ones are: fully adjustable in-camera HDR and more robust Dynamic Range Optimization options, reliable macro, and Anti-motion Blur mode for inside shots. The Nikon does all these things, after a fashion, but it does not do them as well as the Sony HX or RX series.
Then too, I have now passed both the Sony HX400V and the Canon SX50HS, my previous “back up cameras”, on to others. That left me with just one camera for trips, and it is never safe to travel for more than a few days with only one camera. What if something bad happens? Imagine it: stuck in Panama for a week without a working camera. Never!
Which is why the Sony HX90V, when it was first announced, appealed to me. It has the pop-up electronic view finder from the RX 100 iii and iv; the control ring around the lens from the whole RX series (see above); the finger grip from the RX 100 iv (also in the pic above); a flip up 180 degree, selfie ready, LCD like the Alpha 5000 and 6000; and the world’s smallest 30x zoom …24 to 720mm equivalent field of view (and a ZEISS Sonnar at that). Given past experience with Sony’s souped up digital Clear Image Zoom, that means possible pics out to 1440mm in a pinch.
And it is small enough to carry along with the Nikon P900 without even thinking about it.
Sony HX90V at 720mm and Nikon P900 at 2000mm.
Viewing options. Pop-up, pull out EVF, flip up LCD.
It also has the truly inspired Function button and menu I had loved on the HX400V…which gives you easy access to anything you are likely to want to set…and three fully programmable memory locations for settings you use often. And, of course, the traditional Sony Creative Styles options, which allow you to fine tune how the jpeg images are processed and encoded in the camera before they are written to the card. (Sony’s answer to RAW.) All in all, the level of control possible with the Sony simply puts the Nikon in the shade…it is a good thing the Nikon lens and IS are so good!
Of course, no amount of control matters if the images are unsatisfying. Like all Sony cameras, especially the P&Ss, the images from the HX90V will not stand a lot of pixel peeping…they are not as clean at the pixel level as Nikon or Canon images. However, at normal viewing and printing sizes, they are simply excellent…sharp, vibrant, and lively.
Since it is a primary interest of mine, we will begin with a few in-camera HDRs: you can set in-camera HDR for anything from 1 EV differences in exposure, for a very subtle effect, to 6 EV differences, to capture deepest shade and boldest highlights. There is also an Auto setting which does an excellent job in all but the most extreme conditions.
Then you have macro effects down to 5 cm (2 inches). I find that about 35-40mm equivalent works really well, along with DRO level 5 or Auto. You actually get an excellent macro effect.
The long end of the zoom is useful, with or without some Clear Image zoom, for close-ups of bugs, and the occasional grab shot of a cooperative bird. This (along with super-bright sunny days) is where the pop-up EVF comes into play! It is much easier to hold the camera still when it is up to your eye.
The flip up selfie mode on the LCD panel does a good job.
Me at Nubble Light, in Maine
Panorama shots are as easy as they are with any Sony. You have your choice of “standard”, “wide”, or “360 degree.”
Wild Roses along the Bridle Path
Big Beach, Kennebunk ME. Wide format pano.
Some of the Picture Effects are also interesting. I have enjoyed playing with HDR Painting, which can be adusted to one of three levels, and produces a nice “slightly over the top”, tone-mapped HDR look.
In-camera, HDR Painting Picture Effect. This is on the “low” setting.[/caption
Sunsets are always a good test of a Point and Shoot. I tried both the Multiple Frame Noise Reduction Mode and in-camera HDR. I like the results from HDR better. Pleasing rendition of colors, and very little noise in the image.
Sunset over Back Creek, with fisherman 🙂
I went to Strawberry Banke, a local historical district in Portsmouth NH, today, and had a chance to try out several modes for indoor use. I tried straight in-camera HDR, Anti-Motion-Blur Mode, and Multi Frame Noise Reduction (with is actually an auto ISO setting). All three worked well, and provided higher ISO equivalent images in low light that showed much less noise than you would expect. Anti-Motion Blur tended to have the most noise, as it consistently selected higher ISOs suitable for moving subjects. In-camera HDR was relatively clean, and, as expected had the most extended range…usable highlights and open shadows. Multi Frame Noise Reduction ISO mode produced the cleanest looking images, amazing clean for hand-held indoor shots in very dim natural lighting, but would not be suitable for indoor action. This is a hand-held Multi Frame NR shot in a historical kitchen with only window and fire light. I think it is pretty amazing.
Strawberry Banke hearth cooking demo. Portsmouth NH. Multi Frame NR
So…all in all the Sony HX90V is a great second camera. It does everything I had hoped, and almost everything the Nikon P900 does not do well. It is even a great first camera. The degree of control offered, the viewing options, the excellent long zoom, the advanced multi-frame features, etc. put it right there in the top choices for a P&S superzoom for nature and creative photography…as long as you don’t need more than 720mm of reach (1440mm with Clear Image zoom).
And finally, of course, the Sony HX90V was conceived as a travel zoom…and as that I can not imagine a better choice! It does it all and it does it all well…fits in a large pocket…and is the ideal camera to carry absolutely everywhere you travel. Good job Sony!
P900 with my custom modified tulip shade. Big glass!
For several months the Nikon P900 was rumored around the internet. The optimistic claimed a 83x zoom! A Superzoom to top all superzooms! From Nikon.
A lot of digital ink went into poopooing the rumor. Something between “Fat chance!” and “Dream on!” seemed to be the consensus. I will admit, I was not a believer either…especially not after Nikon announced the P610 for delivery in early March….a significant upgrade to the P600, with improved focus speed and reliability, improved buffer clearing times for continuous shooting, and, by all reports, at least slightly improved image quality…and that on top of IQ that was already rated “best in class” for 16mp superzooms by many. I put one on pre-order the day it was announced!
And then, only a few weeks later, before, in fact, the P610 was readily available at retail, Nikon officially announced the P900 for delivery in late March. What? Unbelievable!
And, yes indeed, the zoom reached 83x…and the new camera included all the focus and buffer improvements of the P610. As you might expect, given the huge zoom, it is a big camera…twice the size and weight of the P610. Still, 2000mm equivalent field of view…and perhaps decent digital enhancement out to 4000mm for truly desperate situations. I debated less than a day before canceling my P610 order and preordering the P900.
Before the first units were in the hands of users, eager photographers had filled two P900 threads on the Nikon Coolpix forum at dpreview. That is over 300 posts. And that was before anyone outside the industry insiders had actually seen the camera. And those were not the only threads going either. In fact, the P900 was also under discussion on the Canon Powershot forum and several others. I think it safe to say that no superzoom (with the possible exception of the Canon SX60HS, the replacement for the wildly popular SX50HS) has generated as much interest before it shipped.
And once the first units reached customers, it became apparent from early posts on the forums that, unlike the SX60HS, for most people, the P900 was not going to be a disappointment! There were a few nay-sayers, but they were mostly people who had unrealistic expectations of a Point and Shoot superzoom, and did not give the camera a fair chance, or a few who clearly got defective early production units. (Those with defective cameras were able to trade in for new units, and in every case the problem was solved.)
My P900 came direct from Nikon a few days after the first units were in the hands of eager dpreview forum members, and I was out in the yard the next morning testing it against the Canon SX50HS and the Sony HX400V. We are still experiencing the dregs of winter in Maine, with snow on the ground, and not much color showing, so I had ordered some artificial parrots (made of dyed chicken feathers) specifically for testing. Between shots of my artificial parrot tree and the brick work on the chimney, I was pretty well convinced by the end of the morning that Nikon had done the big zoom right. And as I continue to experience the camera in my daily trips afield, I have come to appreciate what a marvel it really is.
Image Quality:
For most photographers, no matter how long the zoom, overall image quality comes first. We all know that the small sensors in our P&S superzooms will never equal the performance of an APS-C or full sized sensor, but we want something that comes close…close enough to produce satisfying images when viewed as large as we are likely to ever view them…and that will make the occasional print up to 13×17 or so. That means a sensor and image processor that produce images with good detail, as little noise as possible, and few if any “digital artifacts.” We want an image that looks like a real photograph, and not like a water-color painting. We expect some water-color effect…smearing of fine details and blotching of smooth color patches…when the image is viewed at 100% or greater…that comes with the tiny sensor…but it can not be obtrusive or obvious. And any defects should be invisible at normal viewing and printing sizes. Like I say…a photograph not a painting.
In my tests the image quality of the P900 did not really break any new ground, but it was easily as good as, and maybe slightly better than, the 12 mp Canon SX50HS…which is still, even after the introduction of the SX60HS, widely perceived to provide the best image quality of any superzoom. There is a little more noise in empty backgrounds, but also slightly more detail in detailed areas of the image. The P900 also easily matched and slightly surpassed the image quality of the Sony HX400V, which has been my go to camera for more than a year, showing less digital artifacts, equal or better detail, and about the same level of noise. And this is true throughout the ISO range, from 100-1600 where I did my testing.
Test shots are from the same distance at the same zoom setting, 1200mm…the Nikon and Sony images are resized from 16mp and 20mp scale to match the scale of the 12mp Canon. You can click on any image to open at at full size in your browser.
ISO 100: Canon SX50HS, Nikon P900, Sony HX400V
ISO 400: Canon SX50HS, Nikon P900, Sony HX400V
ISO 800: Canon SX50HS, Nikon P900, Sony HX400V
ISO 1600: Canon SX50HS, Nikon P900, Sony HX400V
Of course Image Quality is more than the pixel level performance of the sensor and processor. You also have to consider overall color representation, balance (or fidelity), and clarity (or vividness), as well as the balance of light and dark tones (dynamic range). To be honest, I have not liked the way Nikon has reproduced color and tones in the past. To me Nikon Point and Shoot images were always “flat” and “poster-like” with colors that were just a bit off. That was one of my major concerns in preordering the P900, but I was somewhat reassured by the sample images being posted by Nikon and early adopters.
I have written about the apparent aesthetic differences in the way different camera companies choose to “render” the digital image, and that is also apparent in comparing the images from the Nikon P900, Canon SX50HS, and Sony HX400V. Straight out of camera (sooc), the Nikon images look a little “thin” compared to the Canon or Sony. Partially this is due to the fact that even at the same settings in the same light the Nikon images are always lighter overall than the other two. Either, to be charitable, the Nikon sensor is simply more efficient (requires less light for an equivalent exposure), or Nikon has mis-calibrated the ISO settings on the P900. I choose to be charitable…especially since in a long zoom camera, lower ISOs and higher shutter speeds are always welcome!
Partially because of the difference in brightness, though, the colors in the sooc images from the Canon and Sony look richer, and more saturated. Even when the Nikon images are adjusted for brightness, in direct comparison some may still prefer the colors in the Canon images. However, in actual use in the field, under a wide variety of conditions, I find the Nikon colors to be relatively accurate, and quite pleasing, once the images have gone through my standard post processing work flow.
Still experimenting with the best in-camera setting for landscapes
The difference between the Nikon and Sony is harder to pin down, since there I am convinced there are real aesthetic differences in how the two companies render images. The Sony sooc images are more impressive at screen resolution, with vivid colors, great tonal range, and lots of apparent detail…and they require less work in PP to bring them to a finished state…however, if you look at them at 100% they are much more painting-like than the Nikon images. The Nikon images can be punched up in PP to show the same vivid and full toned effect as the Sony, but maintain more “real” detail at larger sizes. They are more photo like…with “grain” instead of digital artifacts.
In general any doubts I might have had about Nikon color have put the rest but actual use in the field. I would rate it the equal of the Canon SX50HS or Sony HX400V…different but equal. 🙂
Lens Quality
Clearly the stand out feature of the P900 is the huge zoom…83x…a leap and bound beyond its closest rival, the Canon SX60HS with 65x (though the Canon only reaches 1365mm since it starts at 21mm.) The next longest zooms, including the Nikon P610, are 60x, 24mm – 1440mm equivalent field of view. The P900 stretches from 24mm to 2000mm. That is a significant advance.
Relative size from the same position at 1200, 1400, and 2000mm equivalents
Well and good, but more zoom is only useful if the lens is sharp, with sufficient contrast, and relatively free of distortions…and that is a tall order for such an extreme zoom range. Yet, the lens and software designers at Nikon have managed it to perfection. The lens is sharp throughout its range, from 24mm to 2000mm, and produces images with excellent contrast. I am certain if we could see the RAW files, that there is a lot of distortion and some serious chromatic aberration (color fringing) in a lens this long and this complex, but by the time the software finishes with the jpeg, all distortions and almost all color fringing has been removed. Impressive indeed.
Maximum aperture at wide angle is f2.8, quite bright by superzoom standards, and it manages to hold to f6.5 at the long end. Though f6.5 might not sound impressive, this is actually, all things being relative, one of the brightest zooms on any superzoom…and certainly the brightest long range zoom ever made. Not bad at all.
This is not just a long zoom, it is an excellent long zoom, an excellent lens period…one of the best lenses I have ever used. Amazing!
These two image serve as demonstrations of lens quality, VR effectiveness, and image quality.
Both are hand held at 2000mm equivalent field of view.
Image Stabilization.
Superzoom cameras would not be nearly so popular (or so much fun) if they did not have image stabilized lenses. Being able to work a long telephoto shot without a tripod is essential, in my opinion, to the superzoom experience. Nikon calls Image Stabilization, “Vibration Reduction” and with the P610 and P900 claims a new system that provides a 5 stop advantage. You don’t have to understand camera stops to understand that 5 stops is a lot…and in practice, the VR on the Nikon P900 is simply the best I have ever used. It is completely possible…indeed, it is easy…to hand hold shots at 2000mm and 1/500th of a second. (see images above). I have gotten good results down to 1/125. That is simply amazing. Of course, I have had a lot of practice hand holding superzooms…but, honestly, the Nikon P900’s VR performs above and beyond expectations.
And, for reasons I can not quite fathom, the view on the LCD and in the EVF during framing is among the most stable I have ever seen, even at 2000mm equivalent. There is none of the distracting (not to say debilitating) jitter you see at high power in the viewfinders of the Canon SX50HS for instance. This extra stability and ease of framing makes an excellent lens a joy to use!
One difficulty I had in testing was that the Nikon, as mentioned above, consistently used higher shutter speeds at any given ISO than the Canon or Sony (and even so the Nikon images were the lightest of the three). That meant that the Canon and Sony image stabilization was more severely challenged than the VR on the Nikon. I had to shoot a lot more frames to get a critically sharp image with the Canon than the Sony, and more frames with the Sony than the Nikon. In fact the Nikon gave me a sharp image the first time, every time. Since I am able to easily hand hold the Nikon at 2000mm equivalent, and even 4000mm equivalent with digital enhancement (what Nikon calls Dynamic Fine Zoom) I am convinced that Nikon’s claimed 5 stop Vibration Reduction system actually works.
2000mm not enough? How about 4000mm with digital enhancement?
Focus speed and reliability.
One of the often mentioned weaknesses of the Nikon P600 was its slow and unreliable focus. Even in good light the P600 often had to “hunt” for correct focus, and in poor light it sometimes could not find it. Not so the P900. The P900 has, hands down, the fastest and most reliable focus of any superzoom I have used to date. It is as fast and more reliable than the focus on my Olympus 4/3s mirrorless camera. Where the Canon SX50HS and Sony HX400V were hunting and sometimes failing to find focus, the P900 snapped to focus all but instantly on the first press every time. Again, this is an impressive achievement on the part of Nikon.
Eastern Bluebird. A difficult focus problem for many cameras.
And, again for reasons I can only guess at, the auto focus is very discriminating. You can control the focus area, from 9 area Target Finding Auto Focus(where the cam era tries to locate the most likely subject in the frame), down to a very small square that you can move around the frame manually with the control wheel on the back. I have been using the “normal” manual focus square, and time and again it has found focus on birds mostly hidden in small branches, and even hidden behind foreground twigs. Perhaps some of the “Target finding” magic is at work even in manual square auto mode, but whatever is going on, it is magic! It is sometimes necessary to let the camera know the approximate distance to your subject by focusing on something in clear view (a branch, a leaf, etc.) at the same distance…but once you do, the camera will find the bird deep in the bush and focus on it, and not the branches around or in front of it. Did I say it was magic? I will say that it is so much fun…and that I am getting shots I could only dream of without resorting to manual focus in the past. And the P900 does have manual focus and focus peaking (a white outline on in-focus objects), controlled by the thumb wheel on the back of the camera, or the zoom lever on the lens, for those times when you really do need it…it is just that with the precision and apparent intelligence of the auto focus, I am not sure most folks will ever need it.
Magic! This is auto focus, hand held at 2000mm equivalent.
Continuous shooting
I am into birds and wildlife, and I suspect most people who are interested in the P900 will be as well. The long zoom is the attraction. However, when shooting moving (which is to say, living 🙂 birds and wildlife, a good continuous mode is essential for catching live action and for insuring at least one sharp shot out of the sequence.
The second most common complaint about the P600 was how slow the buffer cleared after a continuous burst. The 7 frames per second for 7 frames, or 2 frames per second for 60 frames, continuous rates were fine, but it took up to 30 seconds for the buffer to clear after a burst of 7 shots. That is 30 seconds when the camera is locked up…you could not even frame your next shot. This alone was enough for me to drop the P600 from consideration as a serious P&S nature camera, despite its other fine features and reported excellent image quality.
Buffer clearing is also one of my only disappointments in the Sony HX400V. It too is locked up for many seconds after a burst.
With the P900, Nikon has at leased addressed the problem, if not solved it. The P900 has the same 7 fps and 2 fps, High and Low speed, continuous modes, but on High the buffer clears in about 7-9 seconds (depending on the amount of processing you have set the camera to do on each image) after a 7 shot burst. In Low speed continuous, it can take about one second per shot to clear the buffer, but you can begin to frame your next shot before the buffer is cleared, since instead of blacking out the view finder, as it does in High speed mode, all you have is a little animated swirl of dots to indicate “clearing in progress” in the center of the frame…and you can start your next sequence before the current one is completely cleared. In fact, with 90mbs UC-1 Class 10 SD card (IQ at Fine, Noise Reduction at Low, Picture Control at Standard, and Active D Lighting to Low) there is no buffer clearing delay at all in Low speed continuous. In both modes, during the actual burst the view stays live. In High speed, the display flickers. In Low speed, there is a very brief blackout between frames but the view comes live again to show you where you are.
I generally use the Low Speed Continuous for the faster clearing, and because 7 fps often gives me 7 identical images…2 fps is fast enough for most bird and wildlife action.
There are several other, lower resolution continuous modes for capturing really high speed action, and there is a Best Shot Sequence mode which shoots up to 10 frames and only saves the sharpest. I am still experimenting with that to see if it might be useful for birds…but with the exceptionally fine VR, I am not sure it is of much use.
(I might note here, that if continuous shooting is your thing, either the Canon SX50HS or, even better, the SX60HS, will have better continuous performance. And, second note, in my experience the P900 will benefit from the fastest SD card you want to throw at it 🙂
EVF and LCD
One of the new features of the P610 and P900 is the higher resolution Electronic View Finder. At 908k it is tied for top resolution with the SX60HS, and far superior to either the previous P600, the SX50HS, or the Sony HX400V. Like the SX60HS, it is relatively small for all its detail, so the Sony might impress as better at first glance since it is both bigger and brighter. However the higher resolution comes in handy in the field, in making it easier to pick your subject out of a confusing background. After a few days of using it on factory default, I found the menu entry to turn the brightness up (Settings:Monitor:EVF options) and that helped a lot! It is, all said and done, the easiest EVF to use that I have seen on a P&S superzoom.
The monitor itself is fully articulated, from folded in against the back either facing the camera (for protection) or facing out for viewing…to off to the side and angled for ground level or over the head shooting. It even faces forward for selfies. It too is relatively high resolution at the same 908k dot pitch. I found it easy to use in just about any light, and I really enjoy the full articulation. It is, by the way, if you are keeping score, only equaled by the Canon SX60HS (the SX50HS has the same articulation but much lower resolution), and clearly superior to the single axis articulation on the Sony.
Size and weight
Nikon P900, Olympus OM-D E10 with 75-300 zoom, Canon SX50HS
Okay, this is really the elephant in the room. 🙂 The P900 is big, and it is relatively, by superzoom standards, heavy. It is over twice the size and weight of the SX50HS, and a third again as big and heavy as the already large Sony HX400V. It is a size larger than my Olympus 4/3s body and the 70-300mm zoom. In fact I have to use the same size case for the P900 and the Oly and zoom, and the P900 is a tighter fit. It is not a compact camera. But then, it could not be. A zoom reaching 2000mm equivalent at f6.5 is going to be big. Think of it in terms of a larger sensor. This is really a 4.3 to 357mm zoom. Look at any f6.5 300-400mm zoom lens for any camera. How big is it? Yes…it is about the same size. That is just physics. The zoom on my P900 is just slightly larger than the 70-300mm f6.7 zoom for my Oly. And with a zoom that large, it makes sense to make the body larger too. Nikon could have fit the P900 body into the same space as the P610 body, but it would have looked really funny behind that big lens, and the handling would, in my opinion, have been seriously compromised. As it is, the camera over all is very well balanced and feels great in my average male hands. Even with the zoom fully extended, it still feels “right”. Nikon has provided an excellent grip around front, a raised and angled thumb pad, and textured griping areas near the end of the zoom housing on the body…all perfectly placed for my hands with the camera in shooting position. Already, after only a week of using the camera, the SX50HS, and even the Sony HX400V feel “dainty” and slightly “fussy” by comparison. This is real camera, built to feel like a real camera…and it does.
It is a handful…but a comfortable handful.
(Most of the weight of the camera is undoubtedly glass. The lens elements are so heavy that you can feel the inertia when you zoom, like hanging on to a gyroscope, especially when everything is in motion in turning the camera on or off. For a second there, the camera seems to have a mind of its own.)
I find that I can carry the P900 easily all day, without much more fatigue than a more compact solution…and, given the advantages of the long zoom, that is all I need.
P900 nestled in an Amazon Basics DSLR holster. Including the tulip shade.
Controls and layout
The Sony HX400V has the best set of controls and best layout of any camera I have used, except for my Oly Micro 4/3s. Fortunately, the P900 is a close second. It lacks some of the control features of the Sony…it only has one User Settings memory instead of two, there are less options to control what Sony calls Creative Styles and Nikon calls Picture Controls, the HDR settings options are sparse by comparison, as are the Dynamic Range extension options, etc. And the Sony Function button brings up a full selection of the things you might want to set…at your fingertips, while the Nikon function button only really provides easy access to one function at a time (the others are available but they are hidden behind a separate Function icon…another layer deep). The Sony thumbwheel is better integrated with the control system and easier to use. (On the other hand, the Canons have no thumbwheel at all). Zoom control on the Nikon zoom housing is handy, and it can be switched to manual focus when your are using manual focus, but there is nothing as intuitive as Sony’s fly by wire lens ring for either zooming or focus. And why, Nikon, can you not set the zoom control to override auto focus in the auto modes (as you can the ring on the Sony)?
But all that is really just quibbles. If I had never seen the Sony, I would be completely satisfied with the controls and layout of the Nikon. The thumbwheel is there and works. The menu layout is rational and easy to access. The function button, if slower than the Sony, does give you pretty quick access to commonly changed functions. The only thing clearly lacking is an ISO button or the ability to set one of the other controls to ISO.
The Snap-back-zoom button (also available on the Canons…a button on the zoom housing that increases the field of view when at high zoom with a single press, so you can find your subject, and then returns the zoom to full extension when released) is a great feature, but with the high resolution and exceptionally stable EVF, I find that I am not using it as much as I might.
All in all Nikon as provided the P900 with a usable set of controls and an intelligent layout. What more could you ask?
Scene modes.
I carry a superzoom because of the extreme versatility it provides. For me it has to be a “does it all” camera. I retired the SX50HS for the Sony HX400V in order to get two features that I had come to value in a Samsung pocket compact that I got in between: in-camera HDR, and sweep panorama…both of which I enjoy.
In-camera HDR takes three exposures at different settings, and then combines the three into one full range composite showing a higher dynamic range than any single exposure could manage. When done right it makes for extra dramatic, though still realistic, landscapes (especially with clouds), and a sense of heightened reality in shots of buildings etc. The Sony HX400V is hard act to follow here. It has the best, most flexible, HDR modes of any camera I have ever used. You have fine control over how the final image will be composited, and it does it so well and so smoothly that there is really no reason not to use it for every landscape and much street photography. The detail recorded is a rich and as beautiful as any standard shot…only more-so. And you never needed a tripod. Hand held HDR was totally possible with the Sony.
One of my greatest disappointments in the SX60HS was just how poorly the in-camera HDR had been implemented. It was there, but, short of using a tripod, I never got it to produce acceptable results. The fine detail in the images it produced was always completely smeared, and the colors were always off. Not pretty.
The Nikon is somewhere between the two. In-camera HDR is buried in the Scene Modes under Backlighting, where it is one of two options (the other is using fill flash.) You have no control over how the composite is produced, and there is (again, short of using a tripod and turning VR off) always, to my eye, a slight decrease in fine detail due to the way the three images are stacked. On the other hand, it makes really nice skies with clouds! They require some extra processing due to the added noise introduced in combining the three images (something Sony evidently processed out before writing the image to card), but the cloud effects can be very impressive. So, in-camera HDR: not great but usable.
Usable in-camera HDR with nice cloud effects.
Sweep Panorama, on the other hand, in the few I have had a chance to try, seems to work quite well. Sweep panorama is when you press the shutter release and sweep the camera around in an arc in front of you, 120 degrees,180, 360, etc. while the camera records the scene one sliver at a time and writes the whole sweep to the card as a single image. It is much soother and organic than the kind of panorama where you take overlapping images and try to assemble them in software afterward. On the other hand, it does not produce as high resolution images. Still, for use on the web, or casual printing of the wide and wonderful sweep of the landscape, they are fine: 4800 x 960 for 180 degrees, or 9600 x 960 for 360 degrees.
Sweep Panorama, or as Nikon calls it “Easy Panorama”
Sports mode generally makes focusing on moving subject easier and sets the camera for burst to catch action. On the Canons and Sony, it worked well, very well, for birds in flight…one of the trickiest subjects the Point and Shoot Nature Photographer can attempt. While I did not try the Canon SX50HS, the Sony also worked really well for particularly active birds…like feeding Reddish Egrets…keeping the bird in focus and facilitating a burst at the critical moment. My limited experiments with the P900 are promising. I need to get somewhere with a lot of bifs, but I think it is going to work fine.
The Close-Up scene mode seems to work well for macro. It presets the lens to macro range, and it might do some extra processing on the background for separation of subject (I am not certain yet, and Nikon is not saying). Macro, either selected by the Close Up mode, or manually using the control wheel on the back of the camera, works within a zone at the short end of the zoom, focusing from 0 cm at full wide, out to about 3 cm at 100mm equivalent. Excellent! Close up mode also gives you a second exposure option, where the camera takes three images at a fast shutter speed, and stacks them for the correct exposure…to eliminate noise.
Close up mode, about 100mm equivalent from less than an inch.
Landscape Mode, while still technically a scene mode, has a dedicated icon on the control dial, right along with Auto, Program, Scene, etc. It is a one turn set. There are two options available via the Menu button: Normal single shot, and Noise Reduction burst. Both options set exposure, Active-D Lighting, contrast, sharpening, and saturation to what the Nikon engineers deem is most pleasing for a landscape shot. Single shot is what it sounds like: press the shutter and click. NR Burst takes three images at low ISO and “sums” them to achieve the correct exposure, which should, in theory produce a resulting image with lower noise. In my testing, it appears that there is a light level threshold before NR kicks in, even when you have it set. In normal daylight you still get a single shot. In lower light, near dawn or dusk, you get the NR burst.
The good news is that the Nikon engineers and I apparently agree on what a landscape ought to look like. The rendering is rich and vibrant, with lots of detail (without being over-sharpened). It is particularly effective for landscape with clouds and the cloud rendering is almost as good as the built in HDR. In fact, once a bit of PP is applied, Landscape mode images look a lot like the images produced by the built in HDR, only they have a lot more fine detail! This is good. I like it. I will use it!
In-camera HDR, processed in Lightroom
Landscape mode, processed in Lightroom. Notice the greater detail and equally as fine clouds.
Great Landscape mode clouds!
I have not yet tried most of the the other scene modes. I will get back to you at least on Hand-held Night Scene.
There is a Birdwatching Mode (clearly Nikon recognizes that one of their major customer groups are birders). Unfortunately it seems pretty much useless. In theory, it starts with a wide view to find the bird, then with a press of the OK button, zooms into 800mm equivalent and takes a burst of pics. That is were it breaks down. I can find no way of returning the zoom to the wide position without zooming it back manually. That I can do myself thank you, without any scene mode. And I am not sure why anyone would use this setting instead of the snap-back zoom button which is there all the time and gives you the option of the full 2000mm reach ????
Drawbacks and disappointments.
Biggest: close focus at the 2000mm end is only 16.5 feet, and that is far…maybe not for most birds and wildlife, but it is very far for bugs! Average working distance for dragonflies and butterflies is in the 6 foot range. That is where the SX50HS shines, focusing to 4.5 feet at 1200mm gives you amazing close-ups of dragons and butterflies in the field. I will have to experiment with readjusting my expectations and shooting from further away, but already I am missing the close focus. I may have to resort to carrying the SX50HS on bug specific outings…that or buy a P610 (6 feet at 1440mm). We shall see.
And then, as I mentioned, HDR could be better implemented. I will also miss the “Anti-Motion Blur” mode from the Sony…which I used for indoor shots quite a bit. The previously mentioned lack of a dedicated ISO button is a drag, as is the missing option to reprogram any of the existing buttons. Oh, and wifi is poorly implemented…it only really works with the Nikon app on Android and iOS devices. There is, as far as I can see, no way to transfer images via wifi from the camera direct to your laptop. And, from what I hear, the Android and iOS apps are pretty basic. I mean, why bother with wifi at all if you are not going to do it right?
The tripod screw socket is way off to one side, making it unnecessarily difficult to balance the camera on the head of the tripod. Why?
Some will complain about the lack of RAW shooting, but I am not one of them. I have yet to see the advantage of RAW for the work I do. And the same goes for a hotshoe. I don’t use external flash and would not carry it the field. No loss.
And that is really about it. Not a long list at all, considering.
Conclusion.
There is very little that Nikon did not get right in this very ambitious attempt to blaze new ground in the superzoom market. Longest zoom, and a great zoom to boot. Excellent Image Quality overall from a more than averagely efficient sensor and an excellent jpeg image processing engine. The best image stabilization of any superzoom to date, making hand holding this huge lens totally possible. Fast, reliable focus (the fastest and most reliable I have experienced, with a bit of magic built in that makes focusing through foreground twigs and leaves possible). Excellent EVF and fully articulated LCD monitor. Decent continuous mode. Excellent macro mode. Usable in-camera HDR. Excellent Easy Panorama mode. And balance and handling layout that make using this admittedly big superzoom a joy in the field.
Can you tell I like it?
A week from today, I leave for a week in Panama at Tranquilo Bay Resort to scout for a Point and Shoot Nature Photography trip to be scheduled for next year, and then a week in St. Augustine FL to teach Point and Shoot Nature Photography workshops at the Florida Birding and Photo Fest. By the time I come back I will have a lot more experience with the camera under my belt and perhaps will have more to say…but for now…I think Nikon did the big zoom right!
Hairy Woodpecker a the feeder. Hand held at 2000mm equivalent. What the P900 is all about!
[Note! 5/12/15. Today Nikon released firmware update 1.1 for the P900 which may address some or all of the issues mentioned below. I will let you know as soon as it has a fair trial. 🙂
Be aware that a significant number of P900 owners are experiencing apparently random system crashes requiring removing the battery to reboot the camera. One user (at least) has suffered complete failure after a crash. Also, as of the middle of April, there are NO P900s available for sale from reputable dealers. A few continue to appear on ebay and from Amazon partners at inflated prices, but it appears that all official channels are out of stock. Rumor has it that it might be 5 months or more before the P900 is available again. My own P900 has frozen twice…and recovered each time after removing the battery and reinserting it. I still stand my the review. It is an amazing camera, but there might be some issues in the first production run.]


