Sony HX90V. Perfect (almost) second/first/travel P&S superzoom

Sony HX90V. Notice finger grip, and control ring around lens next to the body.

I really like the Nikon P900, which I am using for the majority of my bird and wildlife photography these days, and which does a good job on nature photography of all kinds (it is hard to argue with the excellent 83x zoom and amazing image stabilization), but since I switched to it from the Sony HX400V, there are several things the Sony did well that I find myself missing. The main ones are: fully adjustable in-camera HDR and more robust Dynamic Range Optimization options, reliable macro, and Anti-motion Blur mode for inside shots. The Nikon does all these things, after a fashion, but it does not do them as well as the Sony HX or RX series.

Then too, I have now passed both the Sony HX400V and the Canon SX50HS, my previous “back up cameras”, on to others. That left me with just one camera for trips, and it is never safe to travel for more than a few days with only one camera. What if something bad happens? Imagine it: stuck in Panama for a week without a working camera. Never!

Which is why the Sony HX90V, when it was first announced, appealed to me. It has the pop-up electronic view finder from the RX 100 iii and iv; the control ring around the lens from the whole RX series (see above); the finger grip from the RX 100 iv (also in the pic above); a flip up 180 degree, selfie ready, LCD like the Alpha 5000 and 6000; and the world’s smallest 30x zoom …24 to 720mm equivalent field of view (and a ZEISS Sonnar at that). Given past experience with Sony’s souped up digital Clear Image Zoom, that means possible pics out to 1440mm in a pinch.

And it is small enough to carry along with the Nikon P900 without even thinking about it.

Sony HX90V at 720mm and Nikon P900 at 2000mm.
Viewing options. Pop-up, pull out EVF, flip up LCD.

It also has the truly inspired Function button and menu I had loved on the HX400V…which gives you easy access to anything you are likely to want to set…and three fully programmable memory locations for settings you use often. And, of course, the traditional Sony Creative Styles options, which allow you to fine tune how the jpeg images are processed and encoded in the camera before they are written to the card. (Sony’s answer to RAW.) All in all, the level of control possible with the Sony simply puts the Nikon in the shade…it is a good thing the Nikon lens and IS are so good!

Of course, no amount of control matters if the images are unsatisfying. Like all Sony cameras, especially the P&Ss, the images from the HX90V will not stand a lot of pixel peeping…they are not as clean at the pixel level as Nikon or Canon images. However, at normal viewing and printing sizes, they are simply excellent…sharp, vibrant, and lively.

Since it is a primary interest of mine, we will begin with a few in-camera HDRs: you can set in-camera HDR for anything from 1 EV differences in exposure, for a very subtle effect, to 6 EV differences, to capture deepest shade and boldest highlights. There is also an Auto setting which does an excellent job in all but the most extreme conditions. 

Then you have macro effects down to 5 cm (2 inches). I find that about 35-40mm equivalent works really well, along with DRO level 5 or Auto. You actually get an excellent macro effect.

The long end of the zoom is useful, with or without some Clear Image zoom, for close-ups of bugs, and the occasional grab shot of a cooperative bird. This (along with super-bright sunny days) is where the pop-up EVF comes into play! It is much easier to hold the camera still when it is up to your eye.

The flip up selfie mode on the LCD panel does a good job.


Me at Nubble Light, in Maine

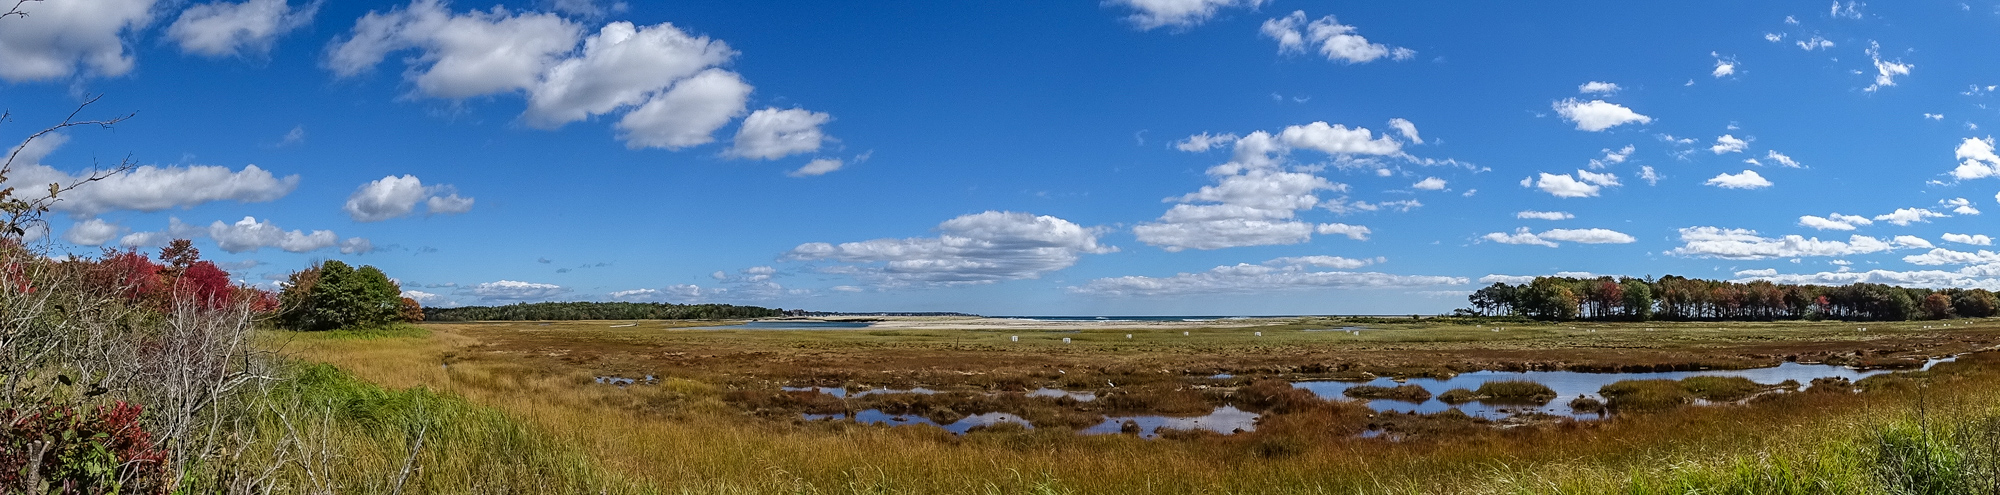
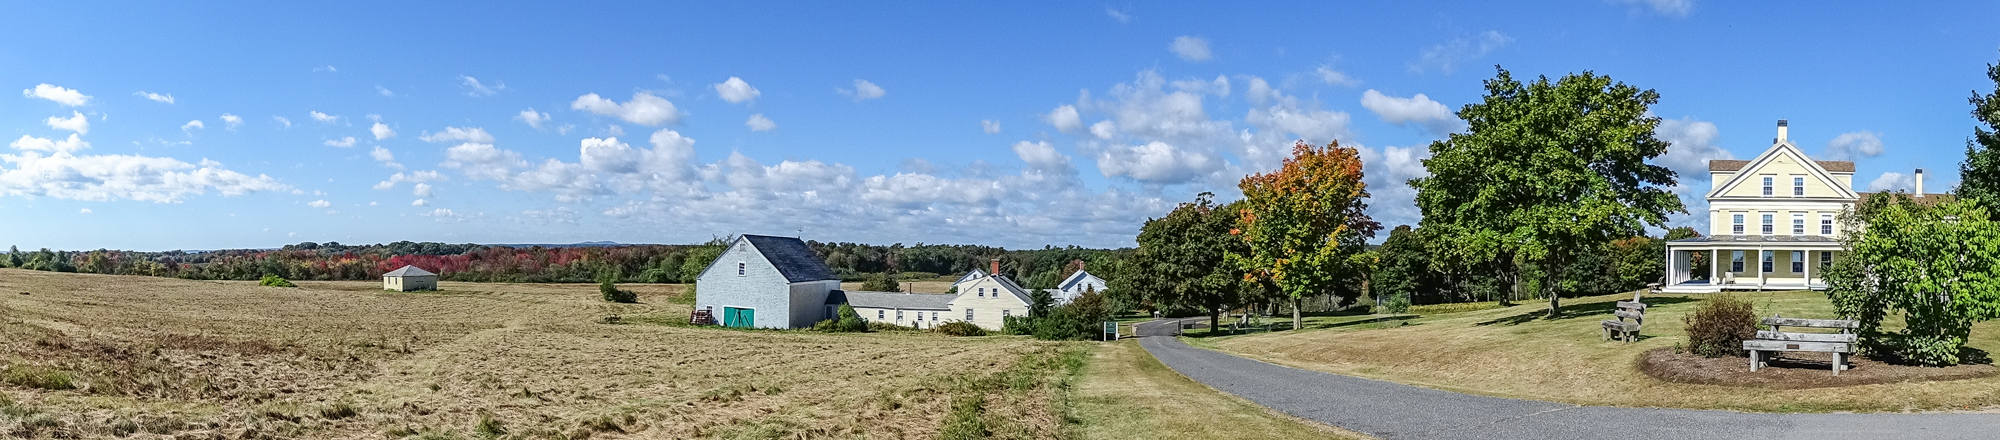
Panorama shots are as easy as they are with any Sony. You have your choice of “standard”, “wide”, or “360 degree.”

Wild roses along the Bridle Path
Wild Roses along the Bridle Path


Big Beach, Kennebunk ME. Wide format pano.

Some of the Picture Effects are also interesting. I have enjoyed playing with HDR Painting, which can be adusted to one of three levels, and produces a nice “slightly over the top”, tone-mapped HDR look.

In-camera, HDR Painting Picture Effect. This is on the "low" setting.
In-camera, HDR Painting Picture Effect. This is on the “low” setting.[/caption

[caption id="attachment_856" align="alignright" width="660"]Illustration Picture Effect, Blueberries. Illustration Picture Effect, Blueberries.

Sunsets are always a good test of a Point and Shoot. I tried both the Multiple Frame Noise Reduction Mode and in-camera HDR. I like the results from HDR better. Pleasing rendition of colors, and very little noise in the image.

Sunset over Back Creek, with fisherman :)
Sunset over Back Creek, with fisherman 🙂

I went to Strawberry Banke, a local historical district in Portsmouth NH, today, and had a chance to try out several modes for indoor use. I tried straight in-camera HDR, Anti-Motion-Blur Mode, and Multi Frame Noise Reduction (with is actually an auto ISO setting). All three worked well, and provided higher ISO equivalent images in low light that showed much less noise than you would expect. Anti-Motion Blur tended to have the most noise, as it consistently selected higher ISOs suitable for moving subjects. In-camera HDR was relatively clean, and, as expected had the most extended range…usable highlights and open shadows. Multi Frame Noise Reduction ISO mode produced the cleanest looking images, amazing clean for hand-held indoor shots in very dim natural lighting, but would not be suitable for indoor action. This is a hand-held Multi Frame NR shot in a historical kitchen with only window and fire light. I think it is pretty amazing.

Strawberry Banke hearth cooking demo. Portsmouth NH. Multi Frame NR

So…all in all the Sony HX90V is a great second camera. It does everything I had hoped, and almost everything the Nikon P900 does not do well. It is even a great first camera. The degree of control offered, the viewing options, the excellent long zoom, the advanced multi-frame features, etc. put it right there in the top choices for a P&S superzoom for nature and creative photography…as long as you don’t need more than 720mm of reach (1440mm with Clear Image zoom).

And finally, of course, the Sony HX90V was conceived as a travel zoom…and as that I can not imagine a better choice! It does it all and it does it all well…fits in a large pocket…and is the ideal camera to carry absolutely everywhere you travel. Good job Sony!

Wood Lily landscape.

Sweep Panorama

Approaching an 180 degree sweep. Wells National Estuarine Research Center at Laudholm Farm. Sony HX400V.

Sometimes, when faced with a grand landscape, wide-angle, no matter how wide the wide end of your zoom is, is simply not wide enough. Most of the recent P&S superzooms reach 24mm equivalent field of view…and a few reach 21mm. Both will embrace a generous expanse of land and sky, as you see in this conventional wide angle shot.

24mm equivalent field of view of the same scene.

But is that enough? When faced with a landscape and sky like this one, I am always tempted to try a panorama shot.

There were, back in film days, specialized panorama cameras that featured rotating lenses that painted a panorama on a long strip of film on a curved film-plain. In the digital era, panoramas were created by taking several overlapping frames and stitching them together in software after the fact. The software started out as single purpose, stand-alone programs that you used before or after whatever photo editing program you used. The challenge was to match the edges of the frames perfectly and then blend the exposures at the edges to create a seamless image. Not easy, even with the help of a computer. Eventually the math behind the problem became well enough established so that main-steam photo editing software, even inexpensive software like Photoshop Elements, had a panorama function built in. They did a decent job, as long as your exposures were relatively consistent, and you did not use a lens with too much distortion at the edge of the field where the images had to blend. And, if the perspective of the three shots worked. Shooting from a tripod might keep the images aligned, but, ideally, rather than rotating about a fixed point, the camera should sweep through an arch so that the lens, essentially, rotates as it did in a dedicated panorama camera to embrace the scene. Specialized tripod heads were developed to accomplish that, but panoramas were still not easy to do. Which is why we saw so few.

A sweep-panorama with buildings. Note that the perspective remains relatively accurate.

I seem to remember that Sweep-panorama was first introduced in phone cameras. The tiny fast CMOS sensors in phones were able to essentially paint the image to a file one narrow band at a time as the phone was swept across the extent of the landscape, almost as though you were panning a video camera. Nice trick. And, since you were framing the image on the LCD of the phone, it was natural to hold the camera out from your face and sweep it in an arch by rotating your whole body. Ideal! Suddenly panoramas were a lot more common.

I believe it was Sony who first introduced sweep-panorama to the P&S world, along about the time the first fast back-illuminated CMOS sensors found their way into P&Ss. The other makers lagged somewhat…building in conventional multiple scene stitch together assist panorama assist…but with this last generation of P&S superzooms, I am pretty sure they all feature sweep-panorama.

Keys to success:

1) Meter off the area of the scene you want to be best exposed. Do no simply point at one edge and press the shutter. Pick the area of the scene with the average brightness, or the area, as above, that is most important to you, point at it, half press the shutter to lock exposure (that works on most cameras, some may have a separate exposure lock button), rotate back to one edge of the scene and fully press the shutter button to start exposure.

2) as above, hold the camera out in front of you several inches to a foot and sweep it across the scene in an arch, rotating your body if necessary. There should be a straight line from the horizon through the camera lens to the center of your body at all times. It is easier to do than it is to describe. 🙂

3) if your camera has guide-lines that can be turned on for framing the scene on the LCD, turn them on and use them to keep the horizon level and placed correctly as you sweep.

4) keep the speed of the sweep uniform. Your camera will generally alert you and the panorama will fail if you go too fast or too slow. A little practice makes perfect.

Tips:

Don’t limit yourself to long narrow horizontal panoramas. Most cameras will allow you to set the direction of the sweep. Try some horizontal sweep-panoramas with the camera held in portrait orientation (vertically). This will produce a pano that is wide, but also taller than normal, for some very interesting (and more natural looking) effects. Compare this to the long panorama of the same scene at the head of the post.

Tall/wide panorama with the camera held vertically and swept horizontally.

And don’t limit yourself to horizontal panoramas at all. A vertical sweep pano can capture the sky effects better than almost any other technique.

Finally, try shooting panos, especially vertical panos of things that are not, on first glance, pano subjects. Vertical panoramas of trees, for instance, can show the tree in a way you rarely see it presented…whether you are after the massive scale of forest giants, or the intimate detail of an interesting trunk.


So sweep away…but don’t get swept away. Panoramas are fun, but as you might have observed here, they are hard to display on any kind of screen or monitor. Still there are times when the landscape or the subject simply demands that you break the bounds of the conventional wide angle frame. And sweep-panorama in today’s P&S superzooms will do the trick. Give it a try.