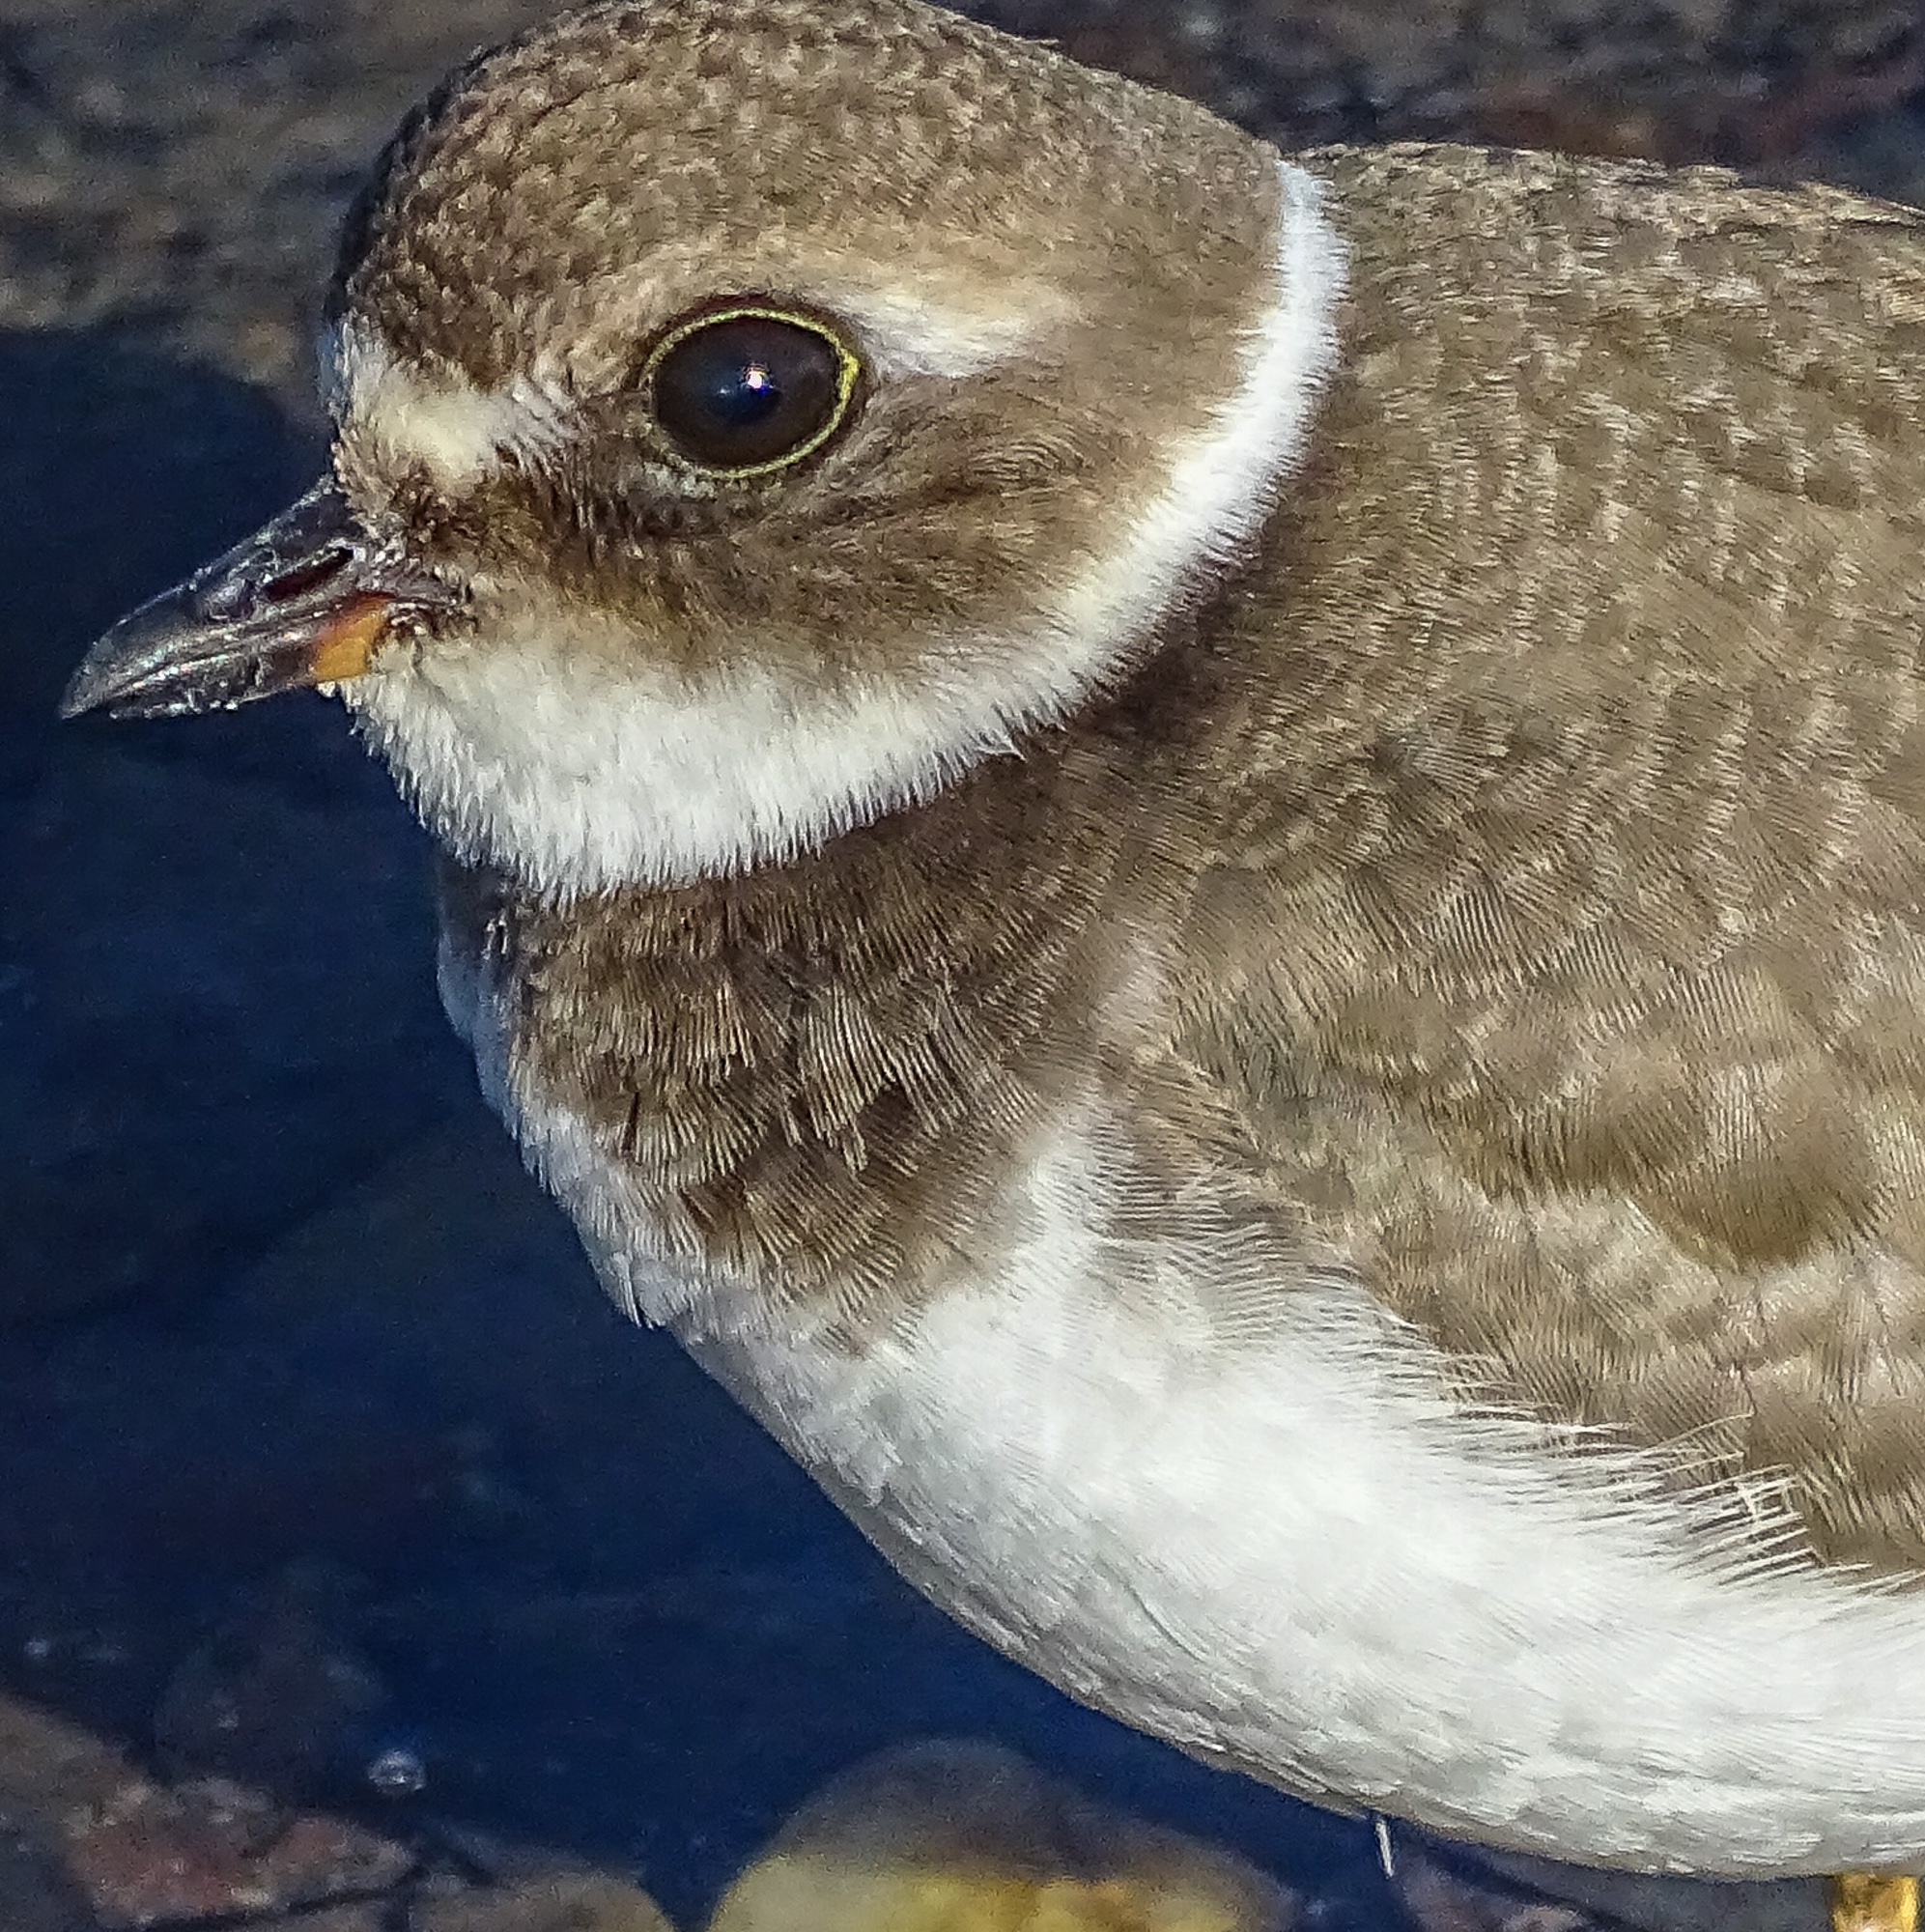
I had a wonderful few days in Cape May NJ, covering the Cape May Autumn Bird Festival for ZEISS Sports Optics, and teaching my P&S for Wildlife workshop. Lots of photo ops. Lots of great birds, relatively close. The light was not always the best, and it often stretched the limits of the Sony HX400V camera, but I am more than pleased with the results. I also, of course, did some macro work, and a bunch of in-camera HDR. I also practiced using Sports Mode for flight shots.
You can explore the results to your heart’s content by visiting my gallery at Wide Eyed In Wonder. Cape May 2014.
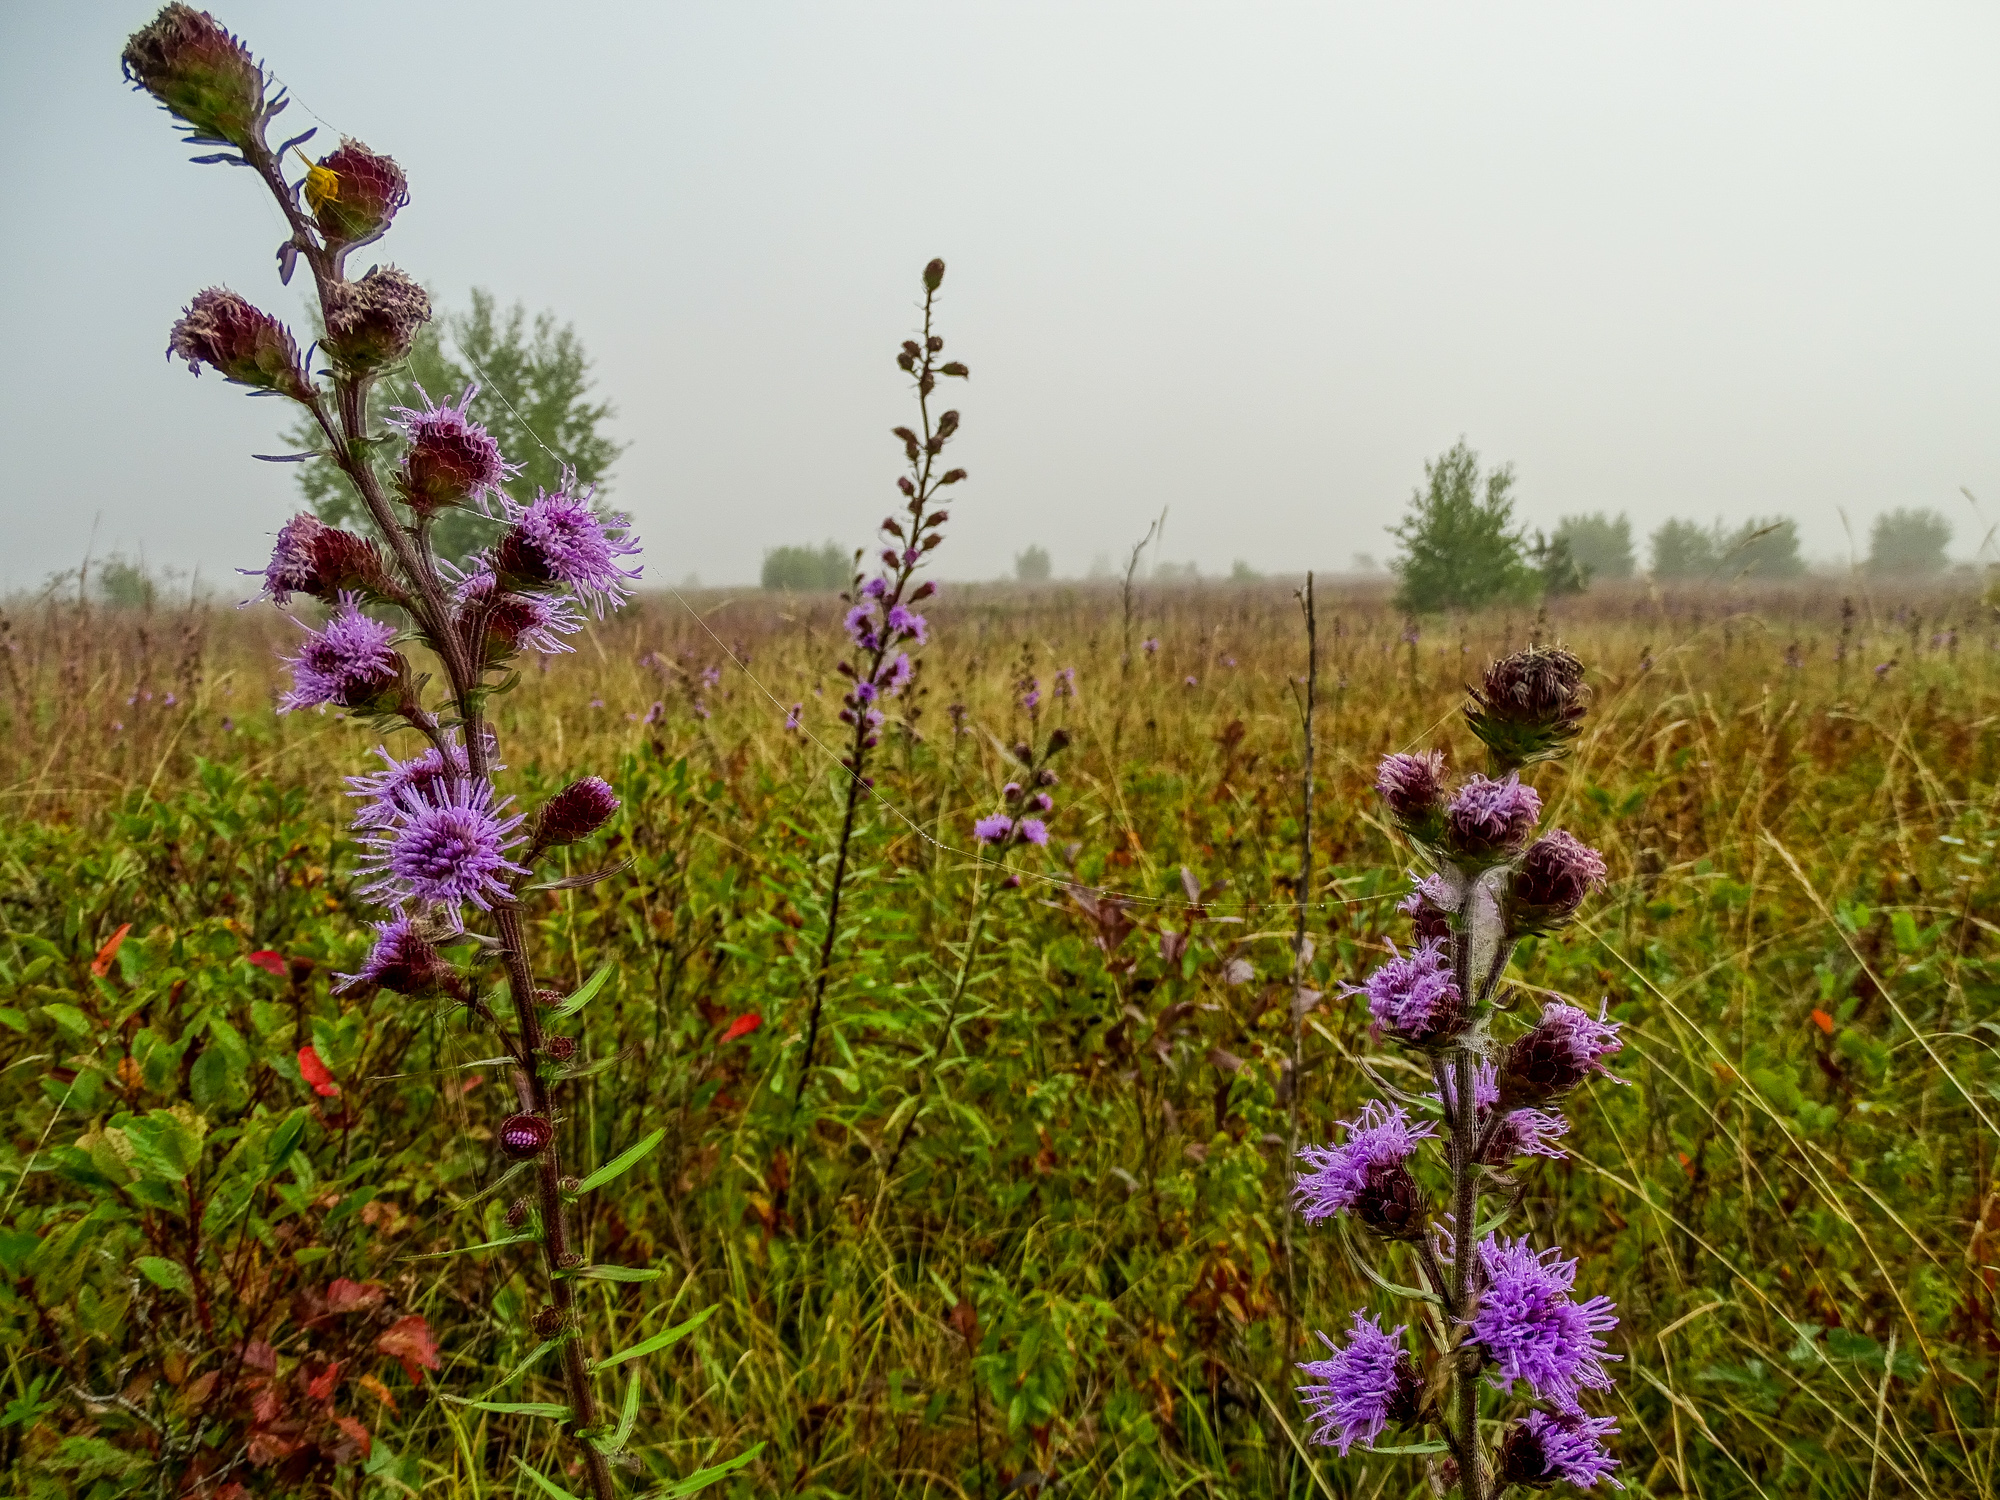
I was thinking about this while out catching images this afternoon. I have a little grid in my camera viewfinder that separates the view into thirds both ways: two horizontal lines and two vertical lines which intesect each other at the 1/3 points, and kind of float there in the view.
The rule of 3rds grid in my viewfinder.
I use them all the time. I use them to decide where to place the horizon (and to keep the horizon straight). I use them to decide where to put the strong verticals in the image. I use them to decide where to put the primary subject…where to put what I want to viewer to notice first and to keep coming back to in the image. I never turn the grid off, though I could. It is there all the time, dividing the view into thirds.
You are going to hear about the rule of thirds sooner or later, so, if you haven’t heard about it already, you might as well hear it from me. (And I will try to make this article worth your while even if you have heard all you think you want to know about the rule of thirds.)
First, let’s get the rule part out of the way. Photography is an art, right, and some people strongly object to the notion that there are, or even can be, any kind of rules that govern an art. Art is about creativity, and creativity, in the minds of some, is most often about breaking the rules.
Horizon and strong vertical element: 3rds!
In the minds of some. Others see creativity as an act that is self-defining…it may obey all the rules you can imagine for its form, but it manages to be something more than the rules could have predicted. In a real sense, truly creative acts define the rules without being defined by them…they give, by their creative example, whatever rules might exist their true meaning and only reality.
But, just to be on the safe side, let’s say there is no rule of thirds. There still might, however, be a really strong suggestion of thirds.
That little grid in my viewfinder divides the view by the rule of thirds…er…the suggestion of thirds.
What that gives me is 9 quadrants of interest, 4 power points, two horizons, and two strong verticals. Some one must have described all this before, and you can probably find similar stuff in a hundred books on composition, but what I am telling you now I am making up as I go along. All that about quadrants of interest, power points, etc. is just the way I think about the suggestion of thirds, and it provides a frame of reference that, I hope, might help you to think about composition in your images.
The theory behind the suggestion of thirds, as I understand it, is that the eye is naturally drawn to the horizontals and verticals that divide the frame into thirds, and that our minds (spirits?) are comfortable with images that fall into 1/3 and 2/3 spaces. It has to do, some say, with a kind of tension that is introduced by that division, and the fact that the eye can roam over the frame and come back to rest at those dividing lines in a way that satisfies some inner sense of harmony.
That is why you see so many landscapes with the horizon at either the bottom or the top horizontal third line. That is why you see the strongest verticals in the images…whether they are trees, people, flag-poles, cliffs, or building edges…hugging the two vertical third lines.
At the same time, our eyes are drawn first to objects that sit at the power points…the places where the horizontal and vertical lines cross. And our eyes return repeatedly to any object (or subject) that is placed there.
Placing an object or subject at a power point produces a very different effect than placing the same object at the center of the frame. Center placement says “this is an image about this object or subject”…or perhaps even “this is a portrait of this object or subject.” That’s fine.
Placing an object or subject at a power point says “this is an image about the relationship of this object or subject to the rest of the image (and, by extension, the world as a whole). It is not a straight up portrait, but a portrayal of the object or subject in context, in relationship, in tension with its surroundings.
A seemingly insignificant or relatively small object or subject at a power point can dominate the image, drawing the eye back and back, until the mind has to grapple with the “what’s this all about?” question.
Another way of thinking of it is this: placing an object or subject at the power point is like flagging it…it says “look at this”…”notice this”…”whatever else you see here, don’t miss this.”
This image is not about the shells in the foreground, though they add visual interest and depth…it is about the two tiny girls standing at the power point and their relationship to the rest of the scene.
Each of the nine quadrants of interest, to me, has a different feel to it. Placing an important image element in any of the four outer corner quadrants (1,3,7,9) produces a real tension…gives the image a tilt to that quadrant. It can work for images where you want to challenge the viewer’s perceptions of the relationship of that element to the rest of the image and to the world around it.
Placing an important image element within the the outer center quadrants (4,6) feels to me like an entrance or an exit. If the object or subject is facing into the frame, then it is an entering element and there is a feeling of expectation, and eager feeling, a feeling of things about to happen.
If the object or subject is facing out of the frame, then it is an exiting element. “Just caught on the way out.” There is a feeling rush, a feeling of impatience, a tension that can be uncomfortable or simply challenging.
This entering and exiting elements concept is useful in the four corner quadrants too, of course, as elements placed there can be entering or exiting, and that will effect the way the viewer interprets the challenge of placing the object or subject there.
The center quadrant (5), as above, is, to my eye, for portraits. Everything else in the image falls away behind, is automatically rendered secondary, placed in a supporting role. The center quadrant has “star of the show” status.
And it is exactly because of that dominant feeling that placing the real “star” of the image at a power point is often more effective. No easy assumptions about the relationship of the subject or object to the rest of the frame are possible…you have to figure it out in the moment…and that creates a visual interest that we find appealing.
Star of the show…vs…an element in tension
Placing matched, or symmetrical image elements in the outer quadrants, one on each side of center, is the classic framing technique. It can give a feeling of intimacy to what might otherwise impress as a distant landscape, or it can focus the eye powerfully on the subject of the portrait.
Classic framing technique
Of course, I don’t think about all of this while I am catching images…or I wouldn’t if I didn’t have my little grid on. Seeing that grid there reminds me that I have options…I have decisions to make…and that my decisions will effect how the viewer sees the image I catch. I can, most of the time, move around and reframe to place different image elements in different quadrants of interest. I can easily make sure there is something of interest occupying at least one of the power points…and that it is the right object or subject…the one I want there. I can easily check to see where my horizon is (and if it is straight). I may not put it right on either horizontal line, but when I don’t, that is a decision I am making about the impact of the image. If there is a tree in the foreground of the view, I can decide whether I want it at the strong vertical line so people notice it (and generally accept it) or if it is entering or exiting from an outer quadrant, or if I need to balance it with something in on the other side of the image to create a frame. That decision will, again, effect how viewers see the image I catch, the impact it has on them.
There are those, of course, who see all these decisions as too studied an approach. They suggest forgetting about formal composition and just shooting from the gut. My little suggestion of thirds grid in the viewfinder would drive them crazy and they would immediately shut it off…and they would see my having it on as somehow diminishing the immediacy and power of my gut reactions to the scene before me. To them that would be a bad thing.
Of course, I beg to differ. I see the suggestion of thirds and the composition grid as a way of more effectively capturing the gut feeling that drew me to the scene…to the photo op…in the first place. Not only that, but the suggestion of thirds continuously challenges me to attempt new visions of the scene…to catch different versions of the same scene…to try out the effects of altering the composition to see which works best. To me this is a good thing.
As an exercise, go through a photo magazine or a book of prints of the great masters (photographers or painters) and see how their images define the suggestion of thirds.
Now, you might not have a built in suggestion of thirds grid in your camera…most don’t…but that does not mean that you can’t project such a mental grid on your viewfinder while you are catching images. It is a bit more effort, and you have to remember to do it (rather than being reminded by the installed grid), but it can be done.
(Of course, to a certain extent, you can exercise the suggestion of thirds after the fact, while post-processing, through creative cropping too.)
Play with the concepts of the suggestion of thirds as I have outlined them here. I’d love to hear what you think. I’d love to see examples of the work you produce.
It’s not a rule, but that doesn’t mean it isn’t still a really good idea.
When shots like this present themselves, you need to be ready, and so does your camera. Wouldn’t it be nice if there was a Bird and Wildlife Mode that would take care of all the settings for you…leaving you free to frame the shot and shoot?
The Nikon P600 actually has a Birding Mode as one of its scene settings, and other cameras may have a Pet mode that is similar, but reviewers have pointed out that these generally are not actually the ideal combination of settings for birds and wildlife. On all other Point & Shoot superzooms, you can fairly easily create a Bird and Wildlife Mode and save it to one of you Custom or Memory settings. This is not for the faint hearted. It will require some digging around in menus and even your manual if you are going to succeed…but the rewards are worth the effort.
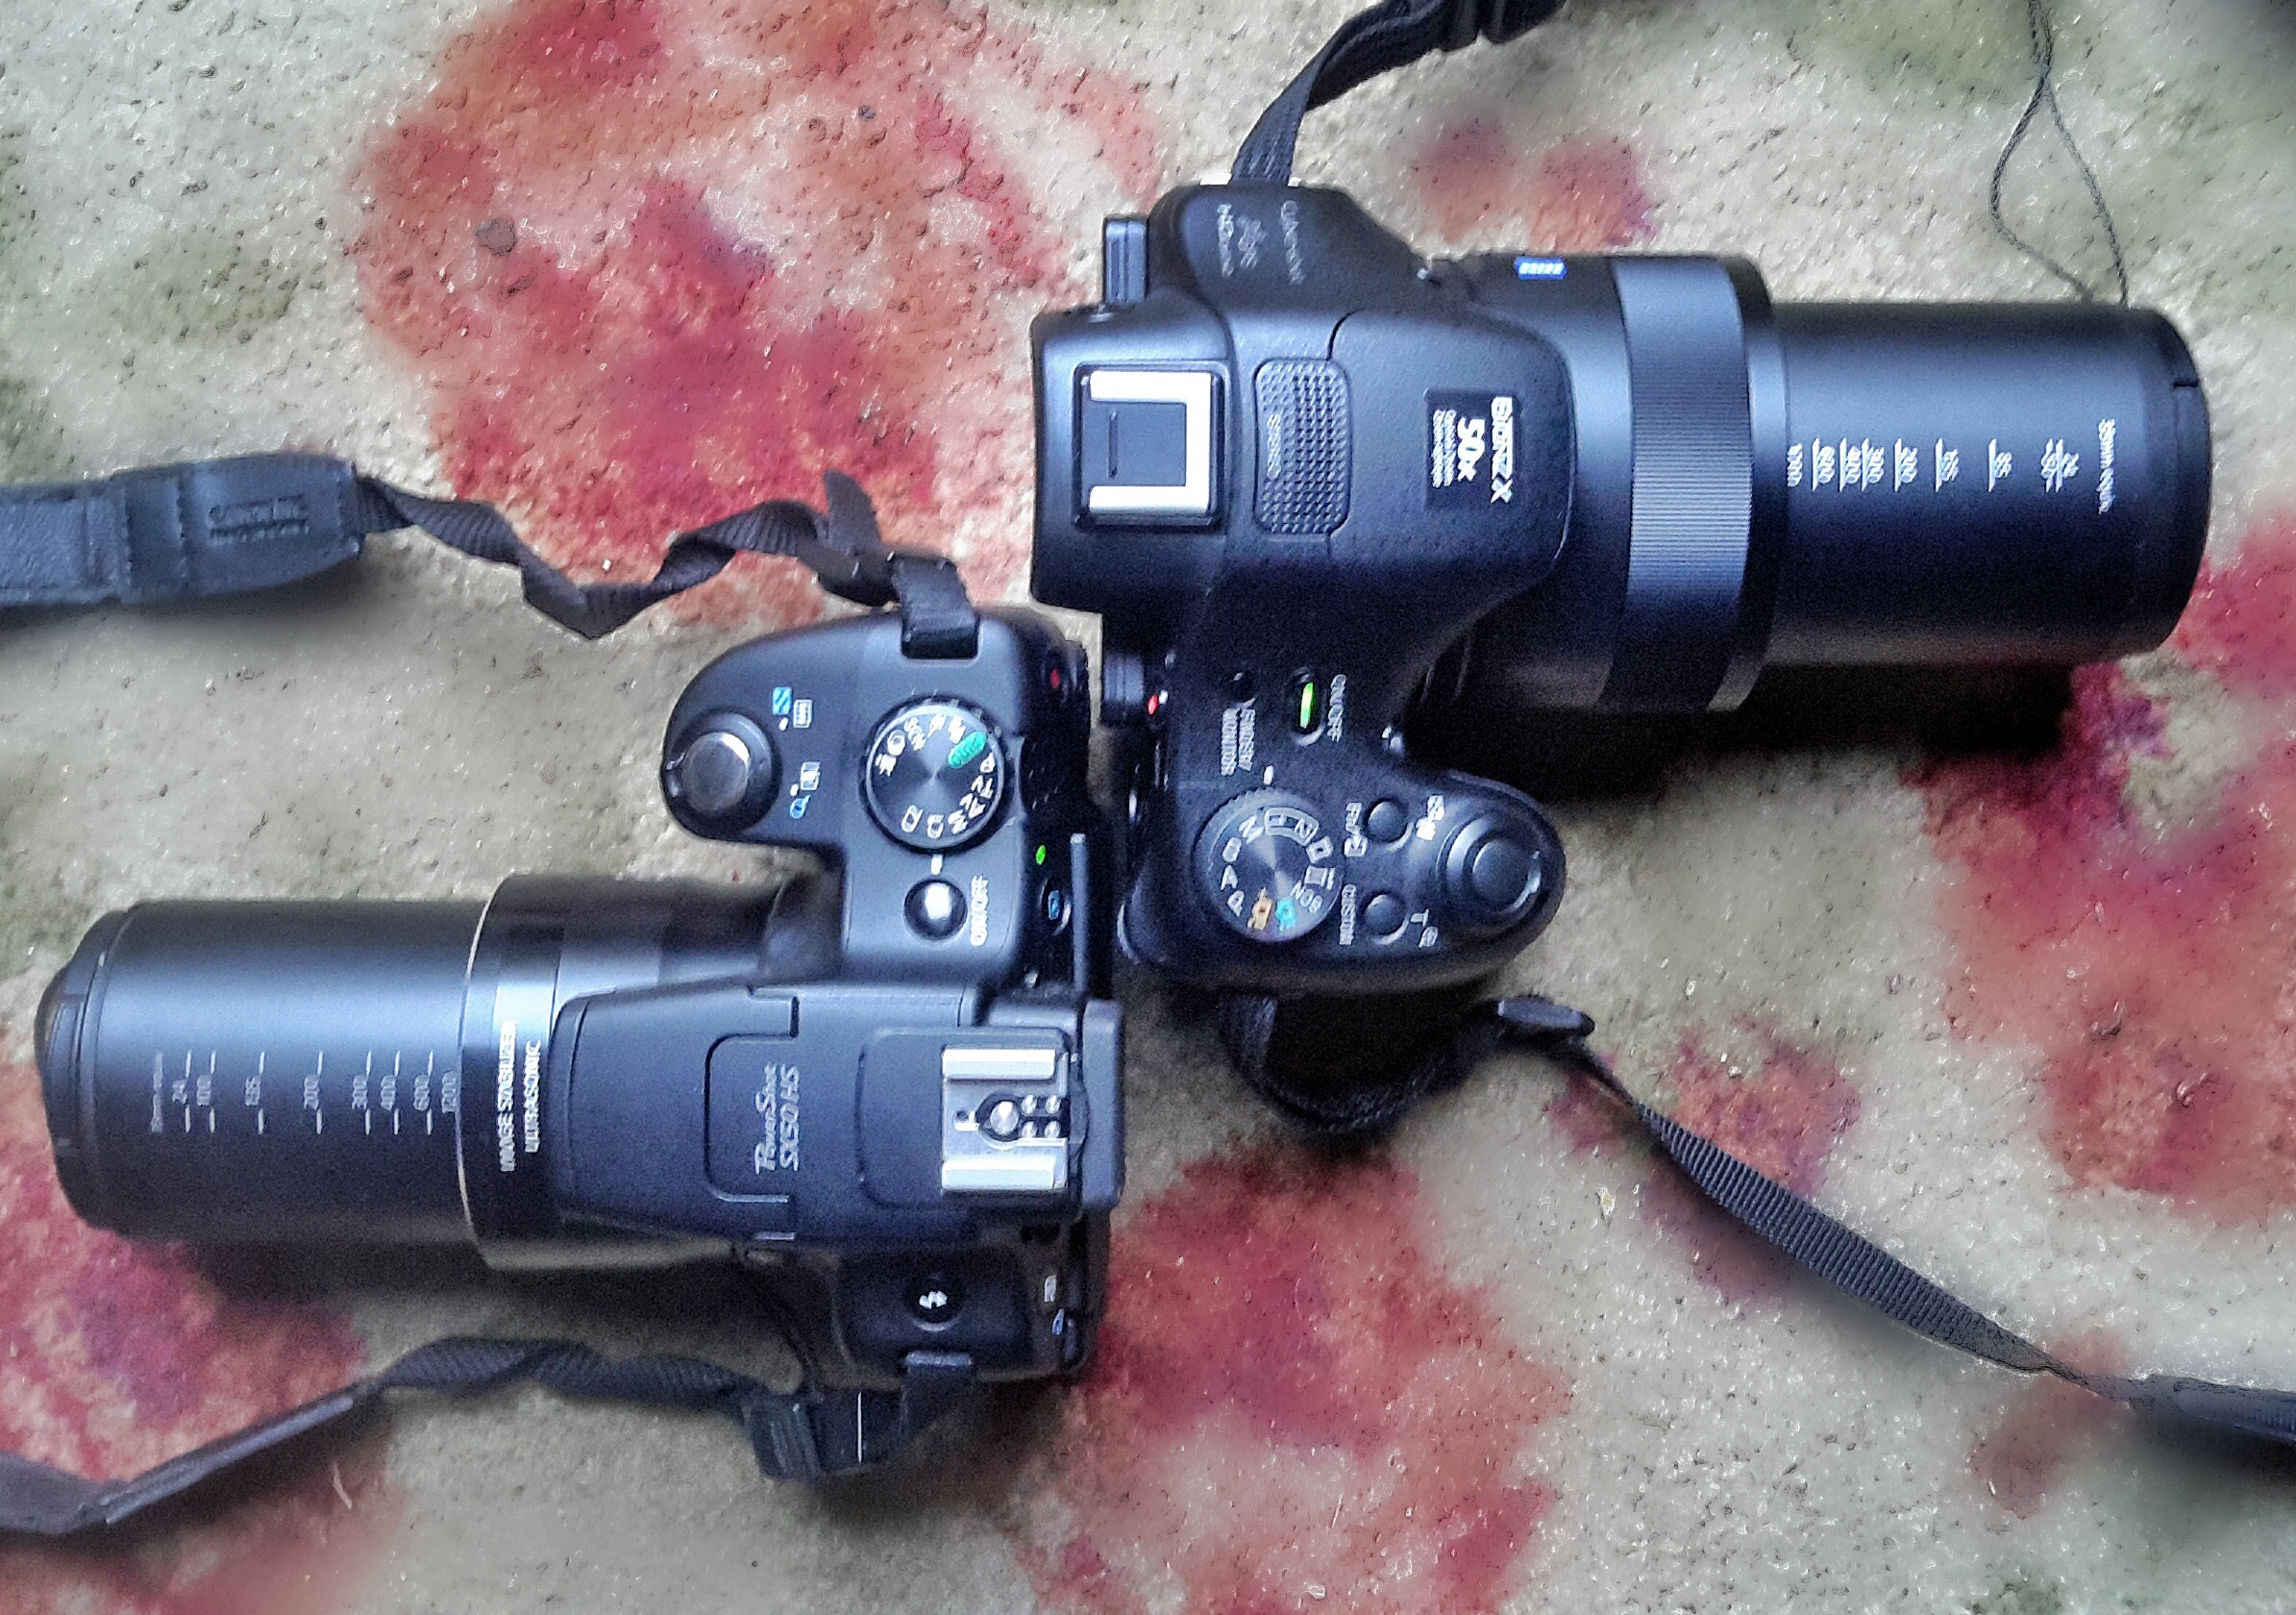
Canon SX50HS and Sony HX400V in Bird and Wildlife Mode
This I show I set up my cameras for birds and wildlife.
The base mode for birds and wildlife, since you will be using the top half of the zoom, and the full zoom most of the time, will be Shutter Preferred (labeled “T” on many control dials, “S” on others). Begin by setting your camera to T or S.
Canon SX60HS at 1365mm at 1/100th sec.
Both subject and camera motion contribute to the blur.
Either using the control wheel or the left/right rocker switches on the 5 way control on the back of the camera (rarely the up/down rocker switches) set your shutter speed to the lowest speed experience has shown your image stabilization will handle at full zoom. More telephoto shots are lost due to subject and camera motion blur than to any other cause. Even with the best IS, a high shutter speed will increase your chances of success. I use 1/640th and that is more risky than some would prefer. 1/1000th is probably safe. That means that when you switch to your saved Bird and Wildlife Mode, the shutter speed will be automatically set to no lower than your number…1/640th in my case. Once in Bird and Wildlife Mode in the field, if the light is good, and ISO at a reasonable value, you can easily bump the shutter speed up using the same control you used to set it.
Leave ISO on Auto (or set it to Auto if it is not there). You will need free ranging ISO to compensate for the higher shutter speeds, especially because the the typical superzoom only goes to f6.3-6.5 at the long end. You are going to be shooting wide open, at the lowest possible f-number, 99% of the time.
Set shooting to continuous. I prefer normal continuous to any high speed burst mode that might be available. I find that high speed burst too often gives me 10 identical images. 2-5 frames per second is fast enough, in my opinion, for most bird and wildlife action. If you have a choice, choose the continuous mode that uses auto-focus between frames. Both birds and wildlife are active, and you need all the help you can get keeping them in focus.
If you have control of the size of the focus square (check your menus and manual), set it to spot focus and the smallest area possible. Matrix or wide area focus, where the camera picks the focus point, will not work well, especially shooting birds or wildlife in deep cover. Also set Auto Focus to continuous to eliminate any lag while the camera finds focus.
Likewise, if you have control over the size and positioning of the exposure metering, set it to spot and the center of the field. You are more interested in getting the bird or animal correctly exposed than you are in the foreground or background.
Set image stabilization to full time, and the most intelligent mode your camera provides. This might be called active IS, or adaptive IS, or just super IS. Again, check the menus and manual.
A very difficult shot without manual over-ride.
If your camera has a manual focus over-ride on Auto Focus, and if it is easy to use, set it to active. Many superzooms provide the feature, but then make it so hard to use, involving rockers on the back of the camera, etc. that it is really useless. One of the best things about the Sony HX400V is the focus collar around the lens that can be used to fine-tune auto focus…or, more often, to quickly get the focus system in the right range so auto focus can lock without a lot of seeking.
If there is some kind of intelligent digital telephoto extender built in to your camera…most have some kind or other…make sure it is set so you have quick access to it. I am not talking about digital zoom. Most superzooms today have a mode that applies extra processing up to 2X beyond the optical zoom setting to produce very satisfying images at great magnifications. If yours works well, you will find yourself using it on occasion, even if you have over 1200mm optical equivalent to work with…especially on birds, butterflies, and dragonflies.
Sony HX400V at 2400mm equivalent
The final setting is zoom position. I keep mine set to full zoom.
Last, and most important, navigate to the menu area that allows you to memorize the the whole set of settings you just made. It might be called save settings, or custom mode, or something similar. Some cameras will allow you to save one set of settings, some will allow for two or more. Save your settings.
Now, rotate the control dial to P or A. Zoom all the way back in to wide angle. When you move the control dial to M1, or C2 or whatever the memory setting is called on your camera, just like magic, all of the Bird and Wildlife Mode settings will be restored…you will be in shutter preferred, continuous shooting, spot focus and metering, etc…and the zoom will automatically extend to full zoom. Within a second or less, you will be ready for birds and wildlife. 🙂
Depending on the features and capabilities of you particular P&S superzoom, you will want to fine tune my formula as you gain experience…or add features that I have not mentioned. For instance, Sony provides adjustable Creative Styles to control the way the image is processed from RAW to Jpeg in the camera. I have a custom designed Creative Style for birds and wildlife that is also programmed into my Birds and Wildlife mode. (It is Memory 1 on my dial, of course! 🙂
By the way, using a similar technique, I set my Memory 2 to the HDR settings I prefer, and I have my P set up (it automatically remembers the last set of settings you used, with the possible exception of zoom length) for normal and macro shooting. With Sports set as my Scene Mode, I than spend 90% of my time at one of 4 settings on the control dial. And that is worth the effort with menus and manuals.
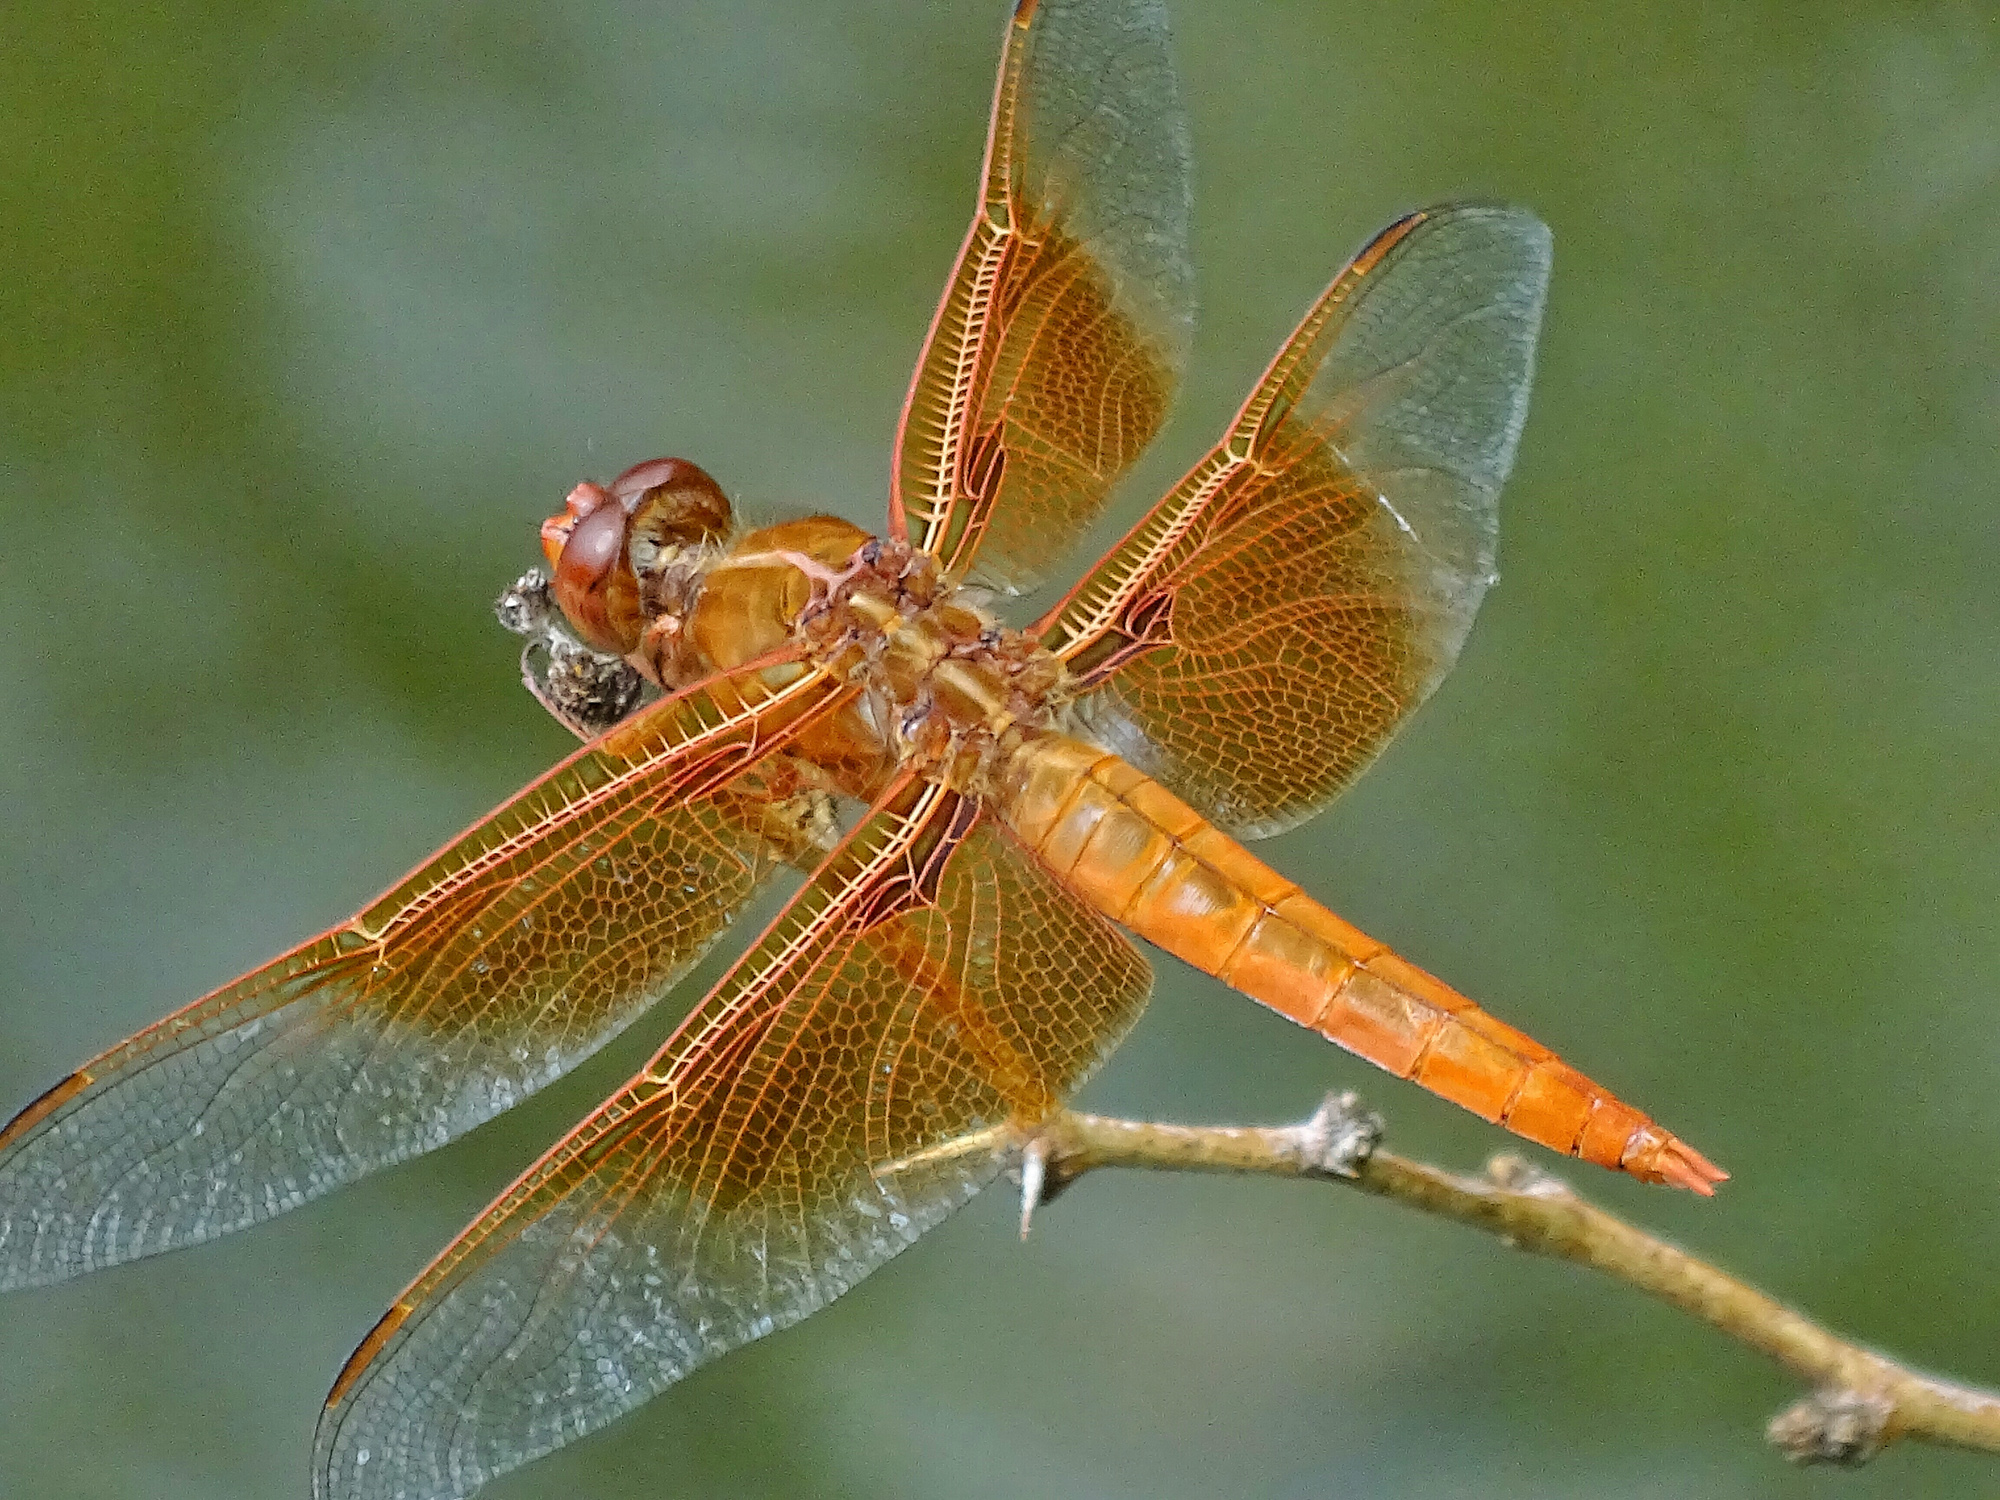
Flame Skimmer: wildlife certainly includes dragonflies!
When the Canon SX50HS came out, two years ago next month, it was a significant upgrade from the SX40HS, which was already a great Point and Shoot superzoom for wildlife, macro, and landscape photography. The SX40HS had impressive image quality, a long zoom with enough reach for even small birds and bugs, great optical image stabilization, and a wonderful macro ability both at wide angle and at full telephoto.
The SX50HS added a 50x zoom reaching 1200mm equivalent (2400mm with a very usable 2x digital tel-converter), fast precise focus, faster continuous shooting, a great Sports Mode for birds in flight, and, for those who wanted it, RAW. It quickly became, if you measure such things by the number of users and the chatter on the forums, the de facto standard for P&Ss for nature photography.
However, in the two years since its introduction a whole new group of features began to appear in competing models and in P&Ss in general. Wifi connectivity, GPS tagging, sweep panorama (see the post), in-camera HDR that does not require a tripod (post)…not to mention ever increasing pixel counts. Unfortunately none of the newer models seemed able to match the image quality of the SX50HS, and, honestly, for the P&S nature photographer, it is all about image quality…or at least it is about image quality first.
When last October rolled around, a lot of P&S nature photographers were disappointed that Canon did not update the SX50HS. Rumors came and went, and the fate of the SX60HS became a hot topic on the forums. It came up every time there was any kind of opportunity for an introduction from Canon all through 2014.
A few months ago I decided not to wait any longer, and purchased the Sony HX400V. It has all the modern features, a 20mp sensor, and, to my eye, image quality as good as the SX50HS…better in some situations…different certainly, but still very satisfying.
This month, of course, Canon finally introduced the SX60HS. It is not supposed to ship until October 20th, but I was able to get one direct from Canon this past week.
In many ways, it is everything a P&S nature photographer could have hoped for in an upgrade.
The Eye-level Electronic View Finder has been improved dramatically! It is bright, and detailed…the best I have seen in a P&S camera. The LCD panel is also high resolution and very easy to use.
The zoom is slightly longer (65x or 21mm – 1365mm, and still with usable 1.6x and 2x digital tel-converters to get you out to 2730mm when needed).
The pixel count has been increased to 16mp, considerably less than the Sony’s 20, but considerably more than the SX50HS’ 12mp.
Continuous shooting mode has been revised to 6.4 frames per second with viewfinder refresh between frames (the blacked-out view during high speed shooting was a major criticism of the SX50HS), 4.5 frames per second with auto-focus between frames. Contrast this with the Sony HX400V which only manages 2 frames per second with focus (or without focus…though it does have a 10 fps fast mode, see below), buffers all the images, and takes a much longer time to process and write the images to the card.
Macro mode has been extended so that you can still focus to 0 inches (touching the front lens element) at wide angle, but now focus to 1.1 inches all the way out to 200mm equivalent! Wonderful!
There is built in, no tripod needed, HDR.
Wi-fi connectivity is built in and apps are available for Apple and Windows laptops, tablets, and phones.
They also claim faster focus, but, personally, I don’t see a lot of difference between this and the SX50HS.
Sony HX400V 20mp
Canon SX60HS 16mp
Canon SX50HS 12mp
All thumbnails here are linked to much larger files for close viewing. Click and the original will load. You will need to use the back button on your browser to return here. (if you close the window with the large scale image, you will have to navigate back to this page manually 🙂
Center crop: HX400V
Center crop. SX60HS
Center crop. SX50HS
Unfortunately, at least in my early sample, Canon has not managed to maintain quite the same level of image quality from this 16mp sensor as they got from the 12mp sensor in the SX50HS. In fact, in every test I have tried, straight out of the camera, the SX50HS shows more detail and slightly better color than the SX60HS, and when looking for fine detail, the SX60HS comes no where near the Sony HX400V. The Canon images from the SX series have always been very clean at the pixel level…showing very few digital artifacts (pixelization and blocking), noticeably fewer than the the Sony, but at sizes up to 2:1 magnification, both the SX50HS and the HX400V clearly show finer detail and less digital “smudging” than the SX60HS. Digital smudging used to be a huge issue in Sony P&S superzooms. The fine details in browns, tans, flesh color, and all shades of green would just turn to mush, as though someone had dragged a wet brush across a water color painting. In fact, it was often called the water color effect. The Sony HX400V shows very little smudging and the SX50HS shows practically none. The SX60HS, again, straight out of the camera, shows a lot…as much as or more than earlier Sony H series cameras. Even without the smudging, the detail is just somewhat soft overall in the SX60HS when compared to the SX50HS or HX400V.
SX60HS at full zoom. Center crop.
HX400V at full zoom. Center crop.
To compound the matter the SX60HS images at full wide angle and full telephoto zoom appear the most soft…and this time I think it is a lens or focus issue. Interestingly the images at full zoom look fine in the wonderful high resolution EVF, but as soon as you press the shutter release all the way down, you can see the image go soft even in the EVF. ??? And once up on the computer at home, the softness is evident, especially when compared directly to SX50HS and HX400V images taken in the same spot of the same subjects.
It is, of course possible to process the SX60HS images after the fact to improve apparent sharpness and detail at screen resolution. One of the differences between Canon and Sony is that Sony always applies more aggressive in-camera processing to their jpegs. Some people feel this gives Sony images a painterly look, lacking subtly, but there is no doubt in my mind that the images have eye-appeal at normal viewing sizes. I have experimented with more aggressive processing for the SX60HS images in Lightroom, but honestly, there is only so much you can do without introducing so much noise that it becomes noticeable even at screen resolution. And I have also been experimenting with turning down the in-camera sharpening on the Sony.
SX60HS, Unprocessed left, processed in Lightroom on right.
Even with much lighter processing in Lightroom, the Sony has better apparent detail, and this is with the in-camera sharpening turned down one notch. 🙁
HX400V. Sharpening turned down one. Processed in Lightroom.
Post-processing to the rescue is not a motto I believe in. I want a camera that has excellent, or at lease acceptable, Image Quality straight out of the camera, so that I can make it even better in post-processing. The SX50HS and the Sony HX400V give me that. The SX60HS, at least in my early sample, does not! It is not a camera I could trust in the field on a day to day basis.
HX400V left, SX60HS right. In-camera HDR processed in Lightroom.
One mode where the HX400V clearly outperforms the SX60HS is in-camera HDR (High Dynamic Range. The camera combines three exposures taken automatically at different exposures to produce a single image with better highlights and shadows than any normal exposure). The Sony allows much more control over the process, and produces consistently better results, especially when shooting without a tripod. I find the SX60HS HDR images to be mushy and messy compared to the highly detailed HX400V images. If HDR is important to you, you might not be happy with the SX60HS.
And then too, for whatever mysterious reason, the SX60HS totally lacks a Panorama mode???? What’s up with that?
tall/wide sweep panorama HX400V
And I am sorry, the Wi-fi connectivity to a computer in the SX60HS is simply too difficult to set up. It to me three days to work it out, and I am considerably computer handy. Good luck to anyone who is not. The process is unnecessarily complex, involving several trips to the Control Panel, adding devices, installing drivers, etc. Once connected the Canon Camera Window software works well. Connection to an Android tablet is somewhat easier and again, the Camera Window software works. Still, the Sony was much easier to set up.
And, for another omission that is hard to understand…the SX60HS has no GPS for tagging images.
So, you would probably not upgrade to the Canon SX60HS because of the modern features, or for image quality, as such. Though the modern features are all there (except sweep panorama and GPS), they simply are not particularly well implemented. And the SX50HS still has marginally better image quality…though the SX60HS might show slightly finer detail (as others have reported from their own samples). You still might what to upgrade to the SX60HS for the very fine EVF and LCD, longer zoom, the amazing macro mode, and the continuous shooting ability, if those are more important to you than image quality.
If you are choosing your first P&S superzoom for nature photography, the SX50HS is still available and is an excellent P&S for nature photography…especially if you do not need or want the modern features. The Nikon P600 gets very good reviews and I have seen some excellent images from it. I would love to be able to test the Fuji S1, which looks like it might be worthy camera. If post-processing is already part of your work-flow and style, you are not adverse to a little extra work, you shoot much macro or active wildlife, and want the best EVF in a P&S, then the SX60HS has a lot to recommend it…but only if you can live with its lower image quality. The Sony HX400V, of the three cameras compared here, gives you the highest level of control over how your image is processed in the camera, delivers great images straight out of the camera, and has all the modern features (and well implemented at that). Despite its somewhat awkward continuous mode, I can highly recommend it.
As I have said, my SX60HS is an early production sample. Things may change for the better when they get production ramped up. Mine is going back to Canon, and I will be shooting with the HX400V, with some additional tweaks I have developed during this test. I may reorder the SX60HS after a few months and give it another try. If I do, and it performs better, I will certainly let you know.
What follows is a somewhat detailed comparison of the features and characteristics of the three cameras…at least the features and characteristics that I think are important for Point and Shoot nature photography. That I think! For instance, you will not find mention of RAW capability, since I don’t use it. You will not find mention of “face mode” or “creative filters”, since again, I have not found a use for them in nature photography.
Image Quality:
SX50HS: excellent, very clean overall, with good detail and color.
SX60HS: perhaps acceptable, but requires considerable post-processing. Perhaps more subtle than the Sony.
HX400V: excellent. More digital artifacts than the SX50HS or SX60HS, but very little to no detail smudging, great fine detail rendition, and vibrant colors. Not as subtle as the Canons.
At the pixel level, the SX50HS looks best…for general viewing sizes I would give a slight edge to the HX400V. Some find the SX50HS images more natural looking. I tend to prefer the look of the more vibrant and apparently more detailed Sony images. At this point, unless Canon has a major firmware update that addresses the IQ issues, it is simply not in the IQ race at all.
Zoom range:
SX50HS: 50x, 24mm-1200mm equivalent field of view. The built in Digital Tel-converters at 1.5 and 2x provide acceptable results (especially for tel-macro where detail floods the sensor) out to 1800 and 2400mm equivalent. DTC can be applied anywhere in the zoom range, and is actually useful in macros to give large scale at reasonable working distances.
SX60HS: 65x, 21-1365mm equivalent. The Digital Tel-Converters here are 1.6x and 2x, but, since base IQ is less, they do not produce as satisfying results.
HX400V: 50x, 24mm-1200mm equivalent. Clear Image Zoom extends the range at the long end of the zoom out to 2400mm and provides very good results.
Though the Sony is the fastest (brightest) lens, it is not by much. None of these cameras are low-light specialists. Still they are adequate for most outdoor work, and all have special digital trickery built in to handle low light and indoor settings. And honestly, where are you going to find a faster 1200-1365mm lens for any camera? f6.3-f6.5 at those focal lengths is actually pretty fast, especially considering the light efficiency of the small P&S sensors.
Focus Speed and accuracy:
SX50HS: quite fast, and quite positive. Seeks in low light and sometimes does not find focus. Seeks in macro, and sometimes focuses on background.
SX60HS: as fast as the SX50HS, but not, perhaps, as accurate. Lots of shots are just a little off. More testing is needed.
HX400V: fast and accurate. Some seeking in low light and macro, but the hybrid focus (auto with manual assist using the excellent fly by wire collar on the lens) makes it easy to acquire correct focus in even the most difficult situations.
Both Canons also have a manual focus mode, but it is so difficult to use that it is pretty much useless.
Image Stabilization:
SX50HS: great! Allows for sharp shots, handheld, at full telephoto and even using the digital tel-converter…as well as in low light.
SX60HS: much the same.
HX400V: excellent, even better than the SX50HS, especially while framing the shot at full telephoto.
I have total confidence in the IS on the Sony HX400V. There is no situation where I feel a tripod is needed.
Macro:
Both the Canon’s have a dedicated Macro Mode. The Sony has macro focusing as part of its normal focus range. (In Auto and Program, the Canons will behave just as the Sony does and focus at macro distances without turning on Macro Mode. Macro mode is intentionally biased for close subjects…so focus may be quicker.)
SX50HS: focus to 0 in. at 24mm equivalent. Goes immediately to 1.1 in. as soon as you touch the zoom lever, and stays there until about 35mm equivalent. Goes to 1.9 in. until you reach 100mm, then jumps to 11.8 inches. You can only focus to 19.6 inches below 200mm where it jumps to 27 inches to Infinity. It quickly goes to 3.2 ft., 4.5 ft., 6.5ft. It drops back to 4.9 ft. at about 1000mm, and reaches 4.2 ft. again at 1200mm.
SX60HS: focus to 0 in. at 21mm equivalent. Jump immediately to 1.1 to 19.6 in. but stays there until you reach 200mm equivalent, where it goes to 3.9 in. At just beyond 300mm equivalent it jumps to 27 in. to infinity. From there it increases steadily to 6.2 feet just short of 1200mm and then drops back to 5.9 ft. at full zoom.
HX400V: focus to .4 in at 24mm equivalent. 1.2 in. at 50mm, 2 in. at 85mm, 6 in. at 135mm, 11.4 in. at 200mm, 27.6 in. at 400mm, 5.2 ft. at 600mm and 7.9 ft. at full zoom.
As you can clearly see, if you are into macro, the SX60HS is a great camera. Macros flood the sensor with detail, and you will get amazing results from 1.1 inches at 200mm equivalent field of view. The tel-macros on the SX50HS from 4.2 feet at 1200mm (or even 1800mm using the DTC) are totally amazing. The Sony makes up somewhat for lacking a true tel-macro with its higher pixel count and good IQ, both of which allow for pretty heavy cropping when you need it. On the other hand, the macros from 2 inches at 85mm are simply stunning!
High Speed Continuous Shooting:
SX50HS: 13 fps in dedicated High Speed mode for 10 shots. 3+ frames per second in regular continuous mode, with focus locked on the first frame, up to 24 shots. Less than 1 fps with focus between frames. Sports mode seems to break the rules and gives something over 3 fps with focus between frames, bot only in Standard resolution (not Fine).
SX60HS: as above, 6.4 fps continuous until the buffer fills, then progressively slower. Focus locked on first shot. Slower in low light. Moving the camera (as in panning to follow a moving subject) seems to fill the buffer faster. The finders is refreshed after each shot, beginning with about the 3rd shot, so you can see what you are following. 3.4 fps is set to focus between frames. There is evidently a third mode at 4.3 fps (LV: but I have not found what LV means in the manual yet).
HX400V: High speed: 10 fps for 10 frames. One press of the shutter shoots all 10 frames. Low: 2 fps. It is difficult to shoot less than 3 frames. The camera focuses between frames and the viewfinder is refreshed. However all shots are held in a buffer, then displayed to the LCD or finder as a group, then written to the card. It takes a few seconds between bursts for the buffer to clear. Sports mode on the Sony does not break any rules, and you are limited to the Low setting for continuous shooting.
In practice, I find that 13 fps, or 10, is simply too fast. You end up with 10 essentially identical images, and since focus locks on the first frame, if the first one is out of focus, they all are. 🙁 2-3 fps is fine for most bird and wildlife action, and focus between frames is essential. Of course. your needs may differ. All in all, the SX60HS is pretty clearly the winner here.
Electronic View Finder:
SX50HS: adequate (but just)
SX60HS: quite good. Higher resolution and contrast than either of the others. Colors a bit off, well on the warm side, but a real pleasure to use.
HX400V: adequate (but just). I have slightly more difficulty with this EVF in critical situations (like finding a bird in a bush or tree) than I do with the SX50HS.
For wildlife photography, a good EVF is essential. None of these match the EVF on the Olympus Mirrorless Compact DSLRs, but they get the job done. And the EVF on the SX60HS comes very close to the Mirrorless standard.
LCD:
All three are sharp and bright enough for daylight use. The SX60HS is the brightest and sharpest.
SX50 and 60HS: fully articulated, swings out and around to the side and rotates 180 degrees.
HX400V: semi-articulated. Pulls out and rotates about 90 degrees, 45 up and 45 down.
For me an articulated LCD is essential for macro and low angle landscape work. Both designs work here, but the Canon design is superior.
Controls and layout:
SX50HS: I have used this camera for two years so I am well used to where things are. There is a button for almost everything you might want quick access to, and one programmable custom button that you can reach with your left thumb. The controls are large enough for average hands. The thumb wheel surrounding the 5 way rocker control on the back of the camera can be awkward but is usable.
SX60HS: The 5 way rocker control on the back is very difficult to use without looking and the rockers are very small and too flush with the surface for my fingers. I may get used to it, but it is awkward. There is no ISO control button and the exposure compensation button has been moved off the rockers to a separate button above and to the left. The programmable shortcut button has been moved to the top where it is reached by your shutter finger. The thumb wheel has been moved from surrounding the 5 way rocker to an actual wheel immediately behind the shutter release. This means that you can NOT operate it with your finger on the shutter release as it requires that finger to turn it. Awkward! On the other hand, it is very handy for changing the primary settings in each Mode. For instance in Shutter Preferred Mode it controls shutter speed. Canon missed, in my opinion two good options for this wheel in standard Program mode. It ought to either control manual focus (ideally a manual focus assist for Auto), or Program Shift.
HX400V: Controls are well placed and large enough for most fingers. The rocker buttons on the 5 way control have a raised edge and are very easy to use. There is one programmable custom button immediately behind the shutter release and a function button to the left of it. The function button pulls up a programmable on-screen menu of the most used settings for the mode you are in. Selections are made using the center button on the 5 way rocker and adjustments are made using the excellent thumb wheel, which is ideally placed under your right thumb. (It is possible to turn this wheel unintentionally while handling the camera, but a little care solves the problem). All in all, excellent controls and layout.
The one thing all these cameras lack is touch screen control. This is surprising in cameras at this price level. An intelligent touch screen would improve usability.
In-camera HDR:
SX50HS: three exposures, adjustable for exposure spread and center, with “creative filters” (oops, I made a lair of myself…but I don’t use them). The three exposures take significant time, so a tripod is absolutely necessary. Results are good if you set it up right. Any movement at all results in ghosting or misaligned images.
SX60HS: three exposures, not adjustable, with creative filters. Results: not so great. The range is extended, but all fine detail is lost, and detail over all is smudged. Useless.
HX400V: excellent three exposures, adjustable for spread and center. Creative filters (Picture effects) available, as well as the full range of Sony Creative Styles (Vivid, Portrait, Landscape, Sunset, etc. (By the way, each of these Creative Styles has separate settings to adjust the Contrast, Saturation, and Sharpness of the image, giving you a lot of control over how the jpeg is rendered in the camera, not only in HDR mode, but in standard Program as well 🙂 I plan to “tune” my settings on the HX400V to see if I can achieve a more subtle rendering of color tones. )
I find in-camera HDR to be a big help with dramatic landscapes…big skies, etc. Of these three, only the Sony has a really effective in-camera HDR mode, and it produces files that can be easily tweaked in Lightroom for natural look I prefer. Post.
Panorama
SX50HS: Stitch assist panorama in any direction. Display allows you to overlap three or more separate exposures or stitching later in software.
SX60HS: NONE!
HX400V: two different (wide and standard) sweep panorama modes. Images are created seamlessly as you sweep the camera across the scene in any direction, in either portrait or landscape orientation. Such fun! And don’t forget to try vertical panoramas with the camera sweeping down. Post.
Considering that Sweep Panorama is built into $200 Point & Shoots these days (phones even), it is, in my opinion, inexcusable that Canon did not implement it in the SX60HS. Sony was the first to implement sweep panorama in a P&S, and their mode is still the best!
Sports Mode:
If you shoot birds or bugs in flight, you are going to be interested in the Sports Mode on these cameras. Sports Mode is optimized for rapidly moving subjects.
SX50HS: excellent. Locks on to moving subjects and tracks them, even after the shutter is pressed. Follow focus as long as the subject is near the center of the finder. Only focuses to 49 feet at the long end of the zoom, closer in at below 600mm. About 4 fps.
SX60HS: the same.
HX400V: large center focus rectangle picks up whatever is moving closest to center and tracks focus. 2 fps or 10 fps.
I have shot dragonflies in the air with the Sports Mode on the Sony, and many many birds in flight with the SX50HS. It is amazing that you can do either with a P&S! I plan a post of birds in flight in November when I next visit Bosque Del Apache National Wildlife Refuge and have lots of cooperative subjects. 🙂
Processing Customization:
Both the SX50HS and SX60HS shoot in both RAW and jpeg, or RAW and jpeg. That gives you a lot of control over how the image is processed after the fact. The Sony only shoots in jpeg, but gives you a lot of control over how the image is processed in camera. The Sony Creative Styles, as noted above under HDR, provide 7 different processing programs, each of which can be individually adjusted for Contrast, Saturation, and Sharpness. Your adjustment are remembered so in Program, you can have 7 individually tailored processing options. Changing Creative Style on the fly is easy, using the function button for quick access. You can also set a customized Creative Style in both of the Memory Modes. I am just beginning to play with customizing my Creative Styles, but I believe that this kind of control in-camera makes not having RAW much less of an issue.
To finish, I will give you my likes and dislikes for the Canon SX60HS and the Sony HX400V.
Canon SX60HS:
Like
excellent EVF
great macro
usable continuous shot
sports mode for birds in flight
Dislike
Image Quality overall
Poor HDR
No panorama
Difficult wifi setup
Sony HX400V
Like:
good to excellent image quality
great HDR mode
great sweep panorama
auto focus with manual assist using focusing collar on lens!
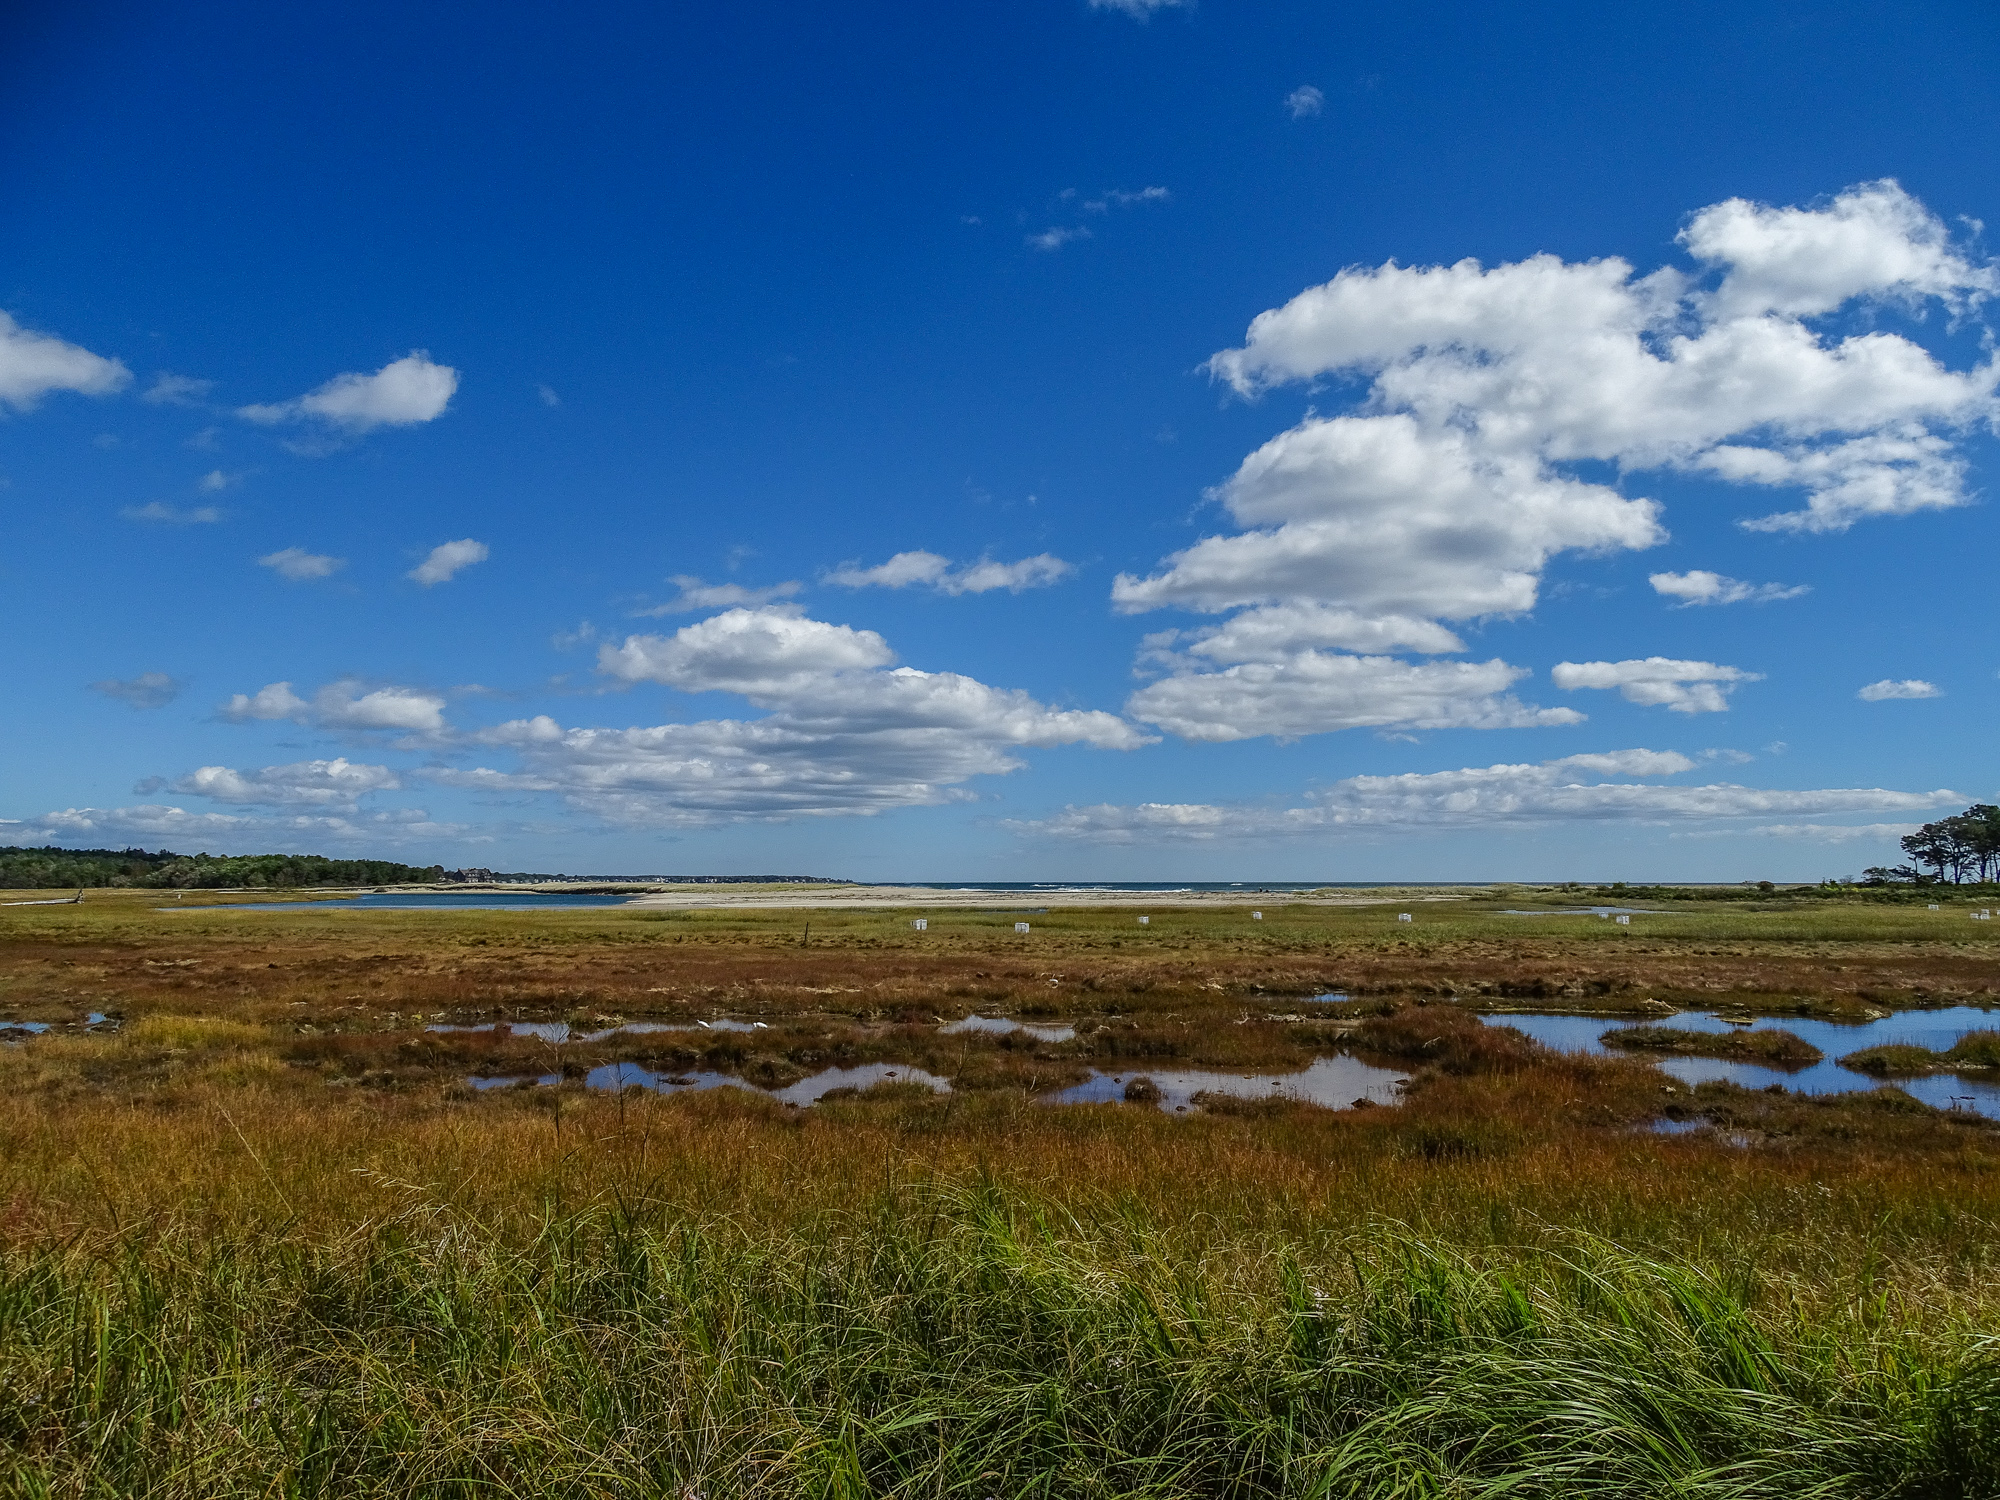
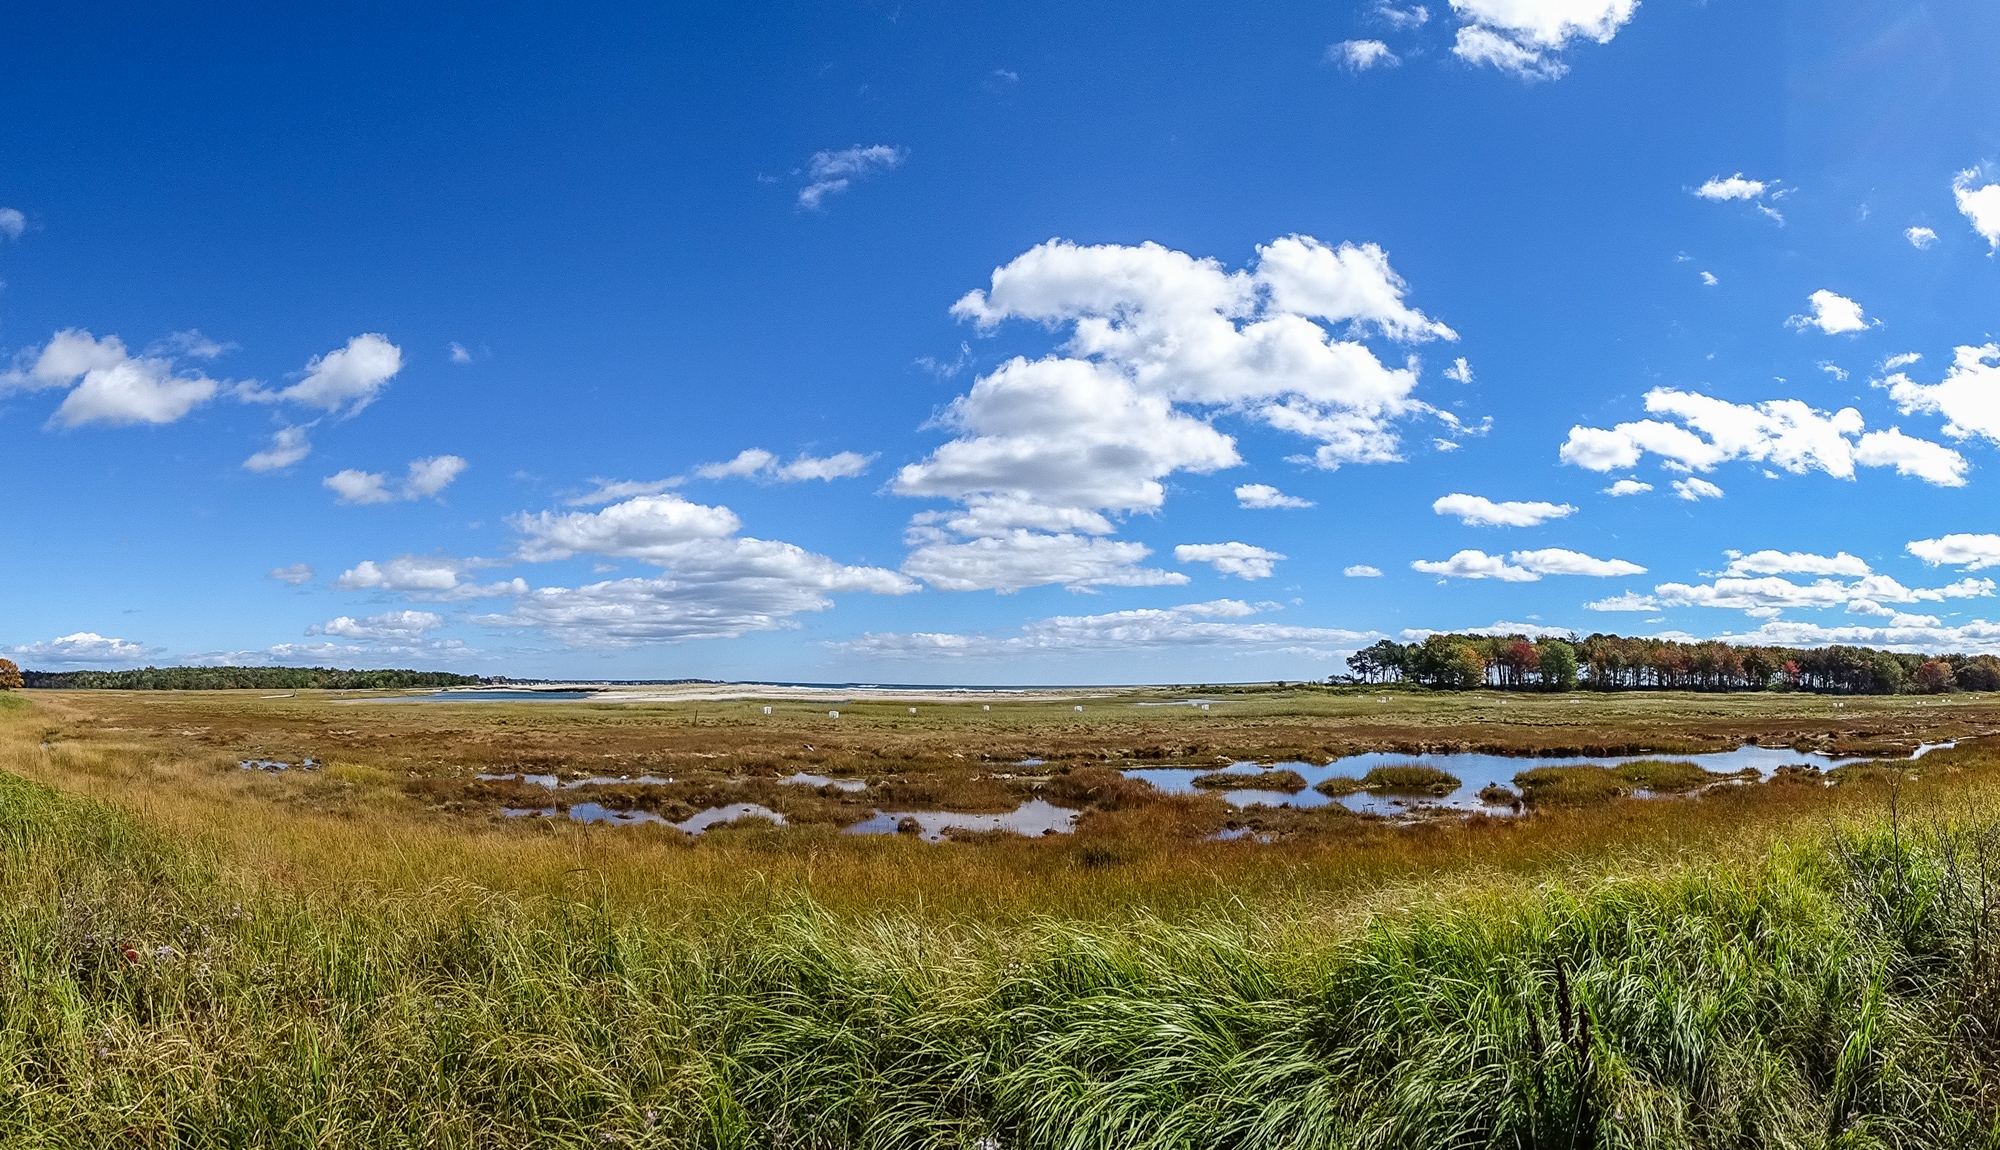
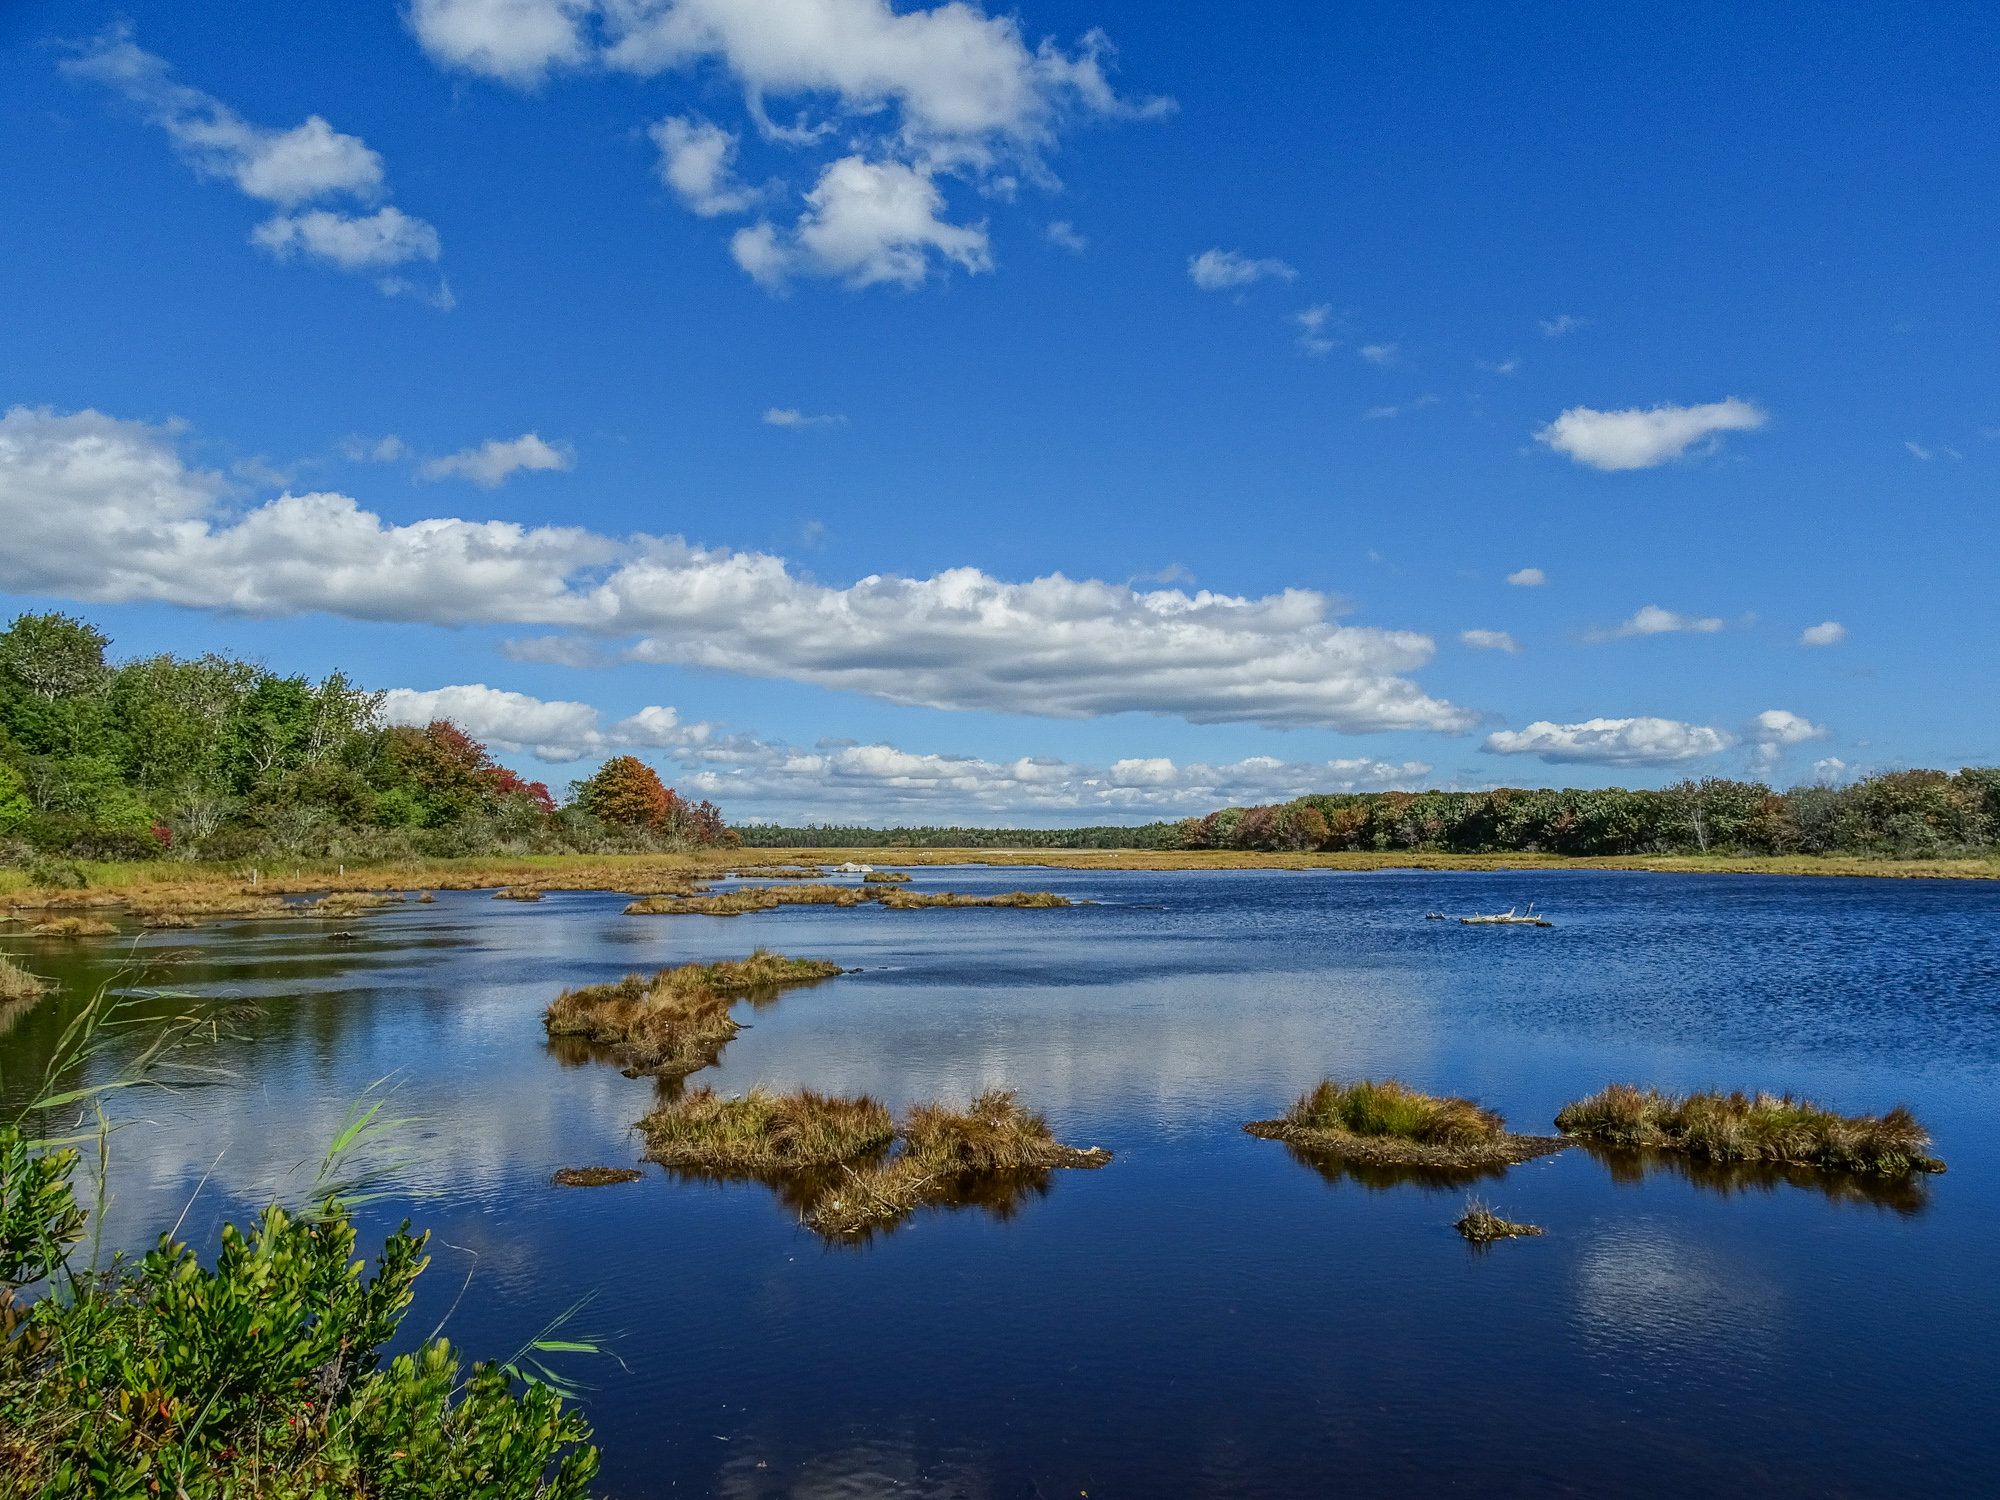
Approaching an 180 degree sweep. Wells National Estuarine Research Center at Laudholm Farm. Sony HX400V.
Sometimes, when faced with a grand landscape, wide-angle, no matter how wide the wide end of your zoom is, is simply not wide enough. Most of the recent P&S superzooms reach 24mm equivalent field of view…and a few reach 21mm. Both will embrace a generous expanse of land and sky, as you see in this conventional wide angle shot.
24mm equivalent field of view of the same scene.
But is that enough? When faced with a landscape and sky like this one, I am always tempted to try a panorama shot.
There were, back in film days, specialized panorama cameras that featured rotating lenses that painted a panorama on a long strip of film on a curved film-plain. In the digital era, panoramas were created by taking several overlapping frames and stitching them together in software after the fact. The software started out as single purpose, stand-alone programs that you used before or after whatever photo editing program you used. The challenge was to match the edges of the frames perfectly and then blend the exposures at the edges to create a seamless image. Not easy, even with the help of a computer. Eventually the math behind the problem became well enough established so that main-steam photo editing software, even inexpensive software like Photoshop Elements, had a panorama function built in. They did a decent job, as long as your exposures were relatively consistent, and you did not use a lens with too much distortion at the edge of the field where the images had to blend. And, if the perspective of the three shots worked. Shooting from a tripod might keep the images aligned, but, ideally, rather than rotating about a fixed point, the camera should sweep through an arch so that the lens, essentially, rotates as it did in a dedicated panorama camera to embrace the scene. Specialized tripod heads were developed to accomplish that, but panoramas were still not easy to do. Which is why we saw so few.
A sweep-panorama with buildings. Note that the perspective remains relatively accurate.
I seem to remember that Sweep-panorama was first introduced in phone cameras. The tiny fast CMOS sensors in phones were able to essentially paint the image to a file one narrow band at a time as the phone was swept across the extent of the landscape, almost as though you were panning a video camera. Nice trick. And, since you were framing the image on the LCD of the phone, it was natural to hold the camera out from your face and sweep it in an arch by rotating your whole body. Ideal! Suddenly panoramas were a lot more common.
I believe it was Sony who first introduced sweep-panorama to the P&S world, along about the time the first fast back-illuminated CMOS sensors found their way into P&Ss. The other makers lagged somewhat…building in conventional multiple scene stitch together assist panorama assist…but with this last generation of P&S superzooms, I am pretty sure they all feature sweep-panorama.
Keys to success:
1) Meter off the area of the scene you want to be best exposed. Do no simply point at one edge and press the shutter. Pick the area of the scene with the average brightness, or the area, as above, that is most important to you, point at it, half press the shutter to lock exposure (that works on most cameras, some may have a separate exposure lock button), rotate back to one edge of the scene and fully press the shutter button to start exposure.
2) as above, hold the camera out in front of you several inches to a foot and sweep it across the scene in an arch, rotating your body if necessary. There should be a straight line from the horizon through the camera lens to the center of your body at all times. It is easier to do than it is to describe. 🙂
3) if your camera has guide-lines that can be turned on for framing the scene on the LCD, turn them on and use them to keep the horizon level and placed correctly as you sweep.
4) keep the speed of the sweep uniform. Your camera will generally alert you and the panorama will fail if you go too fast or too slow. A little practice makes perfect.
Tips:
Don’t limit yourself to long narrow horizontal panoramas. Most cameras will allow you to set the direction of the sweep. Try some horizontal sweep-panoramas with the camera held in portrait orientation (vertically). This will produce a pano that is wide, but also taller than normal, for some very interesting (and more natural looking) effects. Compare this to the long panorama of the same scene at the head of the post.
Tall/wide panorama with the camera held vertically and swept horizontally.
And don’t limit yourself to horizontal panoramas at all. A vertical sweep pano can capture the sky effects better than almost any other technique.
Finally, try shooting panos, especially vertical panos of things that are not, on first glance, pano subjects. Vertical panoramas of trees, for instance, can show the tree in a way you rarely see it presented…whether you are after the massive scale of forest giants, or the intimate detail of an interesting trunk.
So sweep away…but don’t get swept away. Panoramas are fun, but as you might have observed here, they are hard to display on any kind of screen or monitor. Still there are times when the landscape or the subject simply demands that you break the bounds of the conventional wide angle frame. And sweep-panorama in today’s P&S superzooms will do the trick. Give it a try.
Perhaps the most difficult exposure problem is a scene with a high dynamic range like this. You need detail in the shadows, and yet you do not want the highlights of sun on water to burn out. In-camera HDR to the rescue.
It is hard to resist a colorful landscape with big white clouds against a bright blue sky. Might be, those clouds are casting a pattern of moving shadows on the land that only adds interest. Or maybe your eye is caught by the tumbling water of a stream in deep forest, with sun breaking through, bringing out the peat brown highlights in the water. Or are you in a ferny glade under the tall canopy of maples or redwoods, reaching for that cathedral quiet and calm. Or you are out at sunset, confronted by the wonder of red and orange over the darkening (but not yet dark) landscape.
Too bad! Each of these represents one of the primary challenges that has faced the photographer since the beginning of the craft: the inability of any photo-sensitive material to capture the full range of light and dark…all the subtle shades of color…that the human eye can see.
Drama in the sky and in the foreground. Again, in-camera HDR, with further processing in Lightroom.
If your landscapes have a sky that is way too pale and clouds that are simply white blobs without detail; or they have wonderful skies, full of drama, but the land and foreground are full of unnatural inky black shadows and dark dull colors…if your stream in the forest has blinding white highlights where the sun struck it, and little detail in the shadow and that lovely peaty water is simply dirty dishrag brown…if the cathedral forest is a dark den haunted by bright specters where a sun shaft came through…if your sunset hangs above a landscape from a horror movie, all dark threatening shapes; or the reds and oranges are not the living flame you remember, but a dull wash across a grey sky…
…well then you have experienced first hand just how bad even the most modern senors are at catching what the eye sees…just how much trouble photo-sensitive materials have with the wide range of light and dark.
Yes, but we have all seen photographs, other people’s photographs, that do capture what we remember we saw, that scene that caught our eye in the first place. Like a painting. Like these images here. You have to wonder how it is done.
The cathedral forest effect. Another candidate for HDR.
The only way to do it is to somehow compress the full range of light and shadow…the full range of color…so that it fits in the limited range of the photo-sensitive material, or rather, to be accurate, in the limited range of whatever material is used to display the image…print paper, ink in the page of a magazine, the monitor on your computer or LCD screen on your laptop or tablet…but to do it so effectively that the eye is fooled into thinking it really sees that full range in the resulting image. It is a trick. It is always a trick, no matter how it is done.
Once upon a time, in the bad old days of film and wet processing, photographers put graduated filters in front of their landscape lenses that artificially darkened the sky so that landscape could be properly exposed. They would then, during processing, doge and burn sections of the print to bring up detail in the dark areas and subdue highlights in the bright areas. (I can remember putting my bare hands into the developer tray to hand rub shadows to bring them up.) If shooting slide film, where post-processing options were limited. they would intentionally underexpose the film and then push-process it in the darkroom, using a combination of higher temperatures and non-standard time to bring up the shadows. It was an art. It was a trick.
The first digital sensors where even worse at capturing the range of light and color than film. If you could go back and look at images from the digital cameras of 10 years ago, especially the P&Ss, you would immediately see how cartoony they look…how poster-like. It was one of the factors that convinced many dedicated film photographers that digital would never displace film.
In-camera HDR is not only for scenes that scream High Dynamic Range…it can bring out subtle detail in fog shots and on dull days.
Of course, with each new generation of digital sensors, and each new generation of on-board (in-camera) image processing software and hardware, the tonal range of digital images increased. We call that range, the range of light and dark and color that a sensor can capture: Dynamic Range. The Dynamic Range of digital sensors, especially the most modern back-illuminated CMOS sensors, surpassed the Dynamic Range of conventional film several years ago.
In addition, with the advent of digital post-processing, and the ever increasing sophistication of digital editing software, it has become possible to enhance the dynamic range of images. Photographers can take the RAW file that the sensor captures, and digitally manipulate shadows and highlights to produce the illusion of an extended range. Or they can take 3-6 separate exposures, each exposed for a different shadow/highlight balance, and them combine them in software so that something resembling the full range of light and shadow are displayed in the final image. Deep trickery! If done well, these techniques can produce a very natural looking dramatic landscape. (If done, in my opinion, badly, they can produce the kind of surreal, over-baked, hard images that give HDR a bad name among many landscape and nature photographers)
Three exposure HDR is about the only way to get a sunset with a natural looking foreground.
Unless you have access to those kinds of post-processing tricks, you probably continue to be disappointed in your attempts to capture the most dramatic scenes that confront you.
Or not.
If you are a Point and Shoot photographer and using Smart Auto (or Intelligent Auto, or Superior Auto, or whatever your camera maker calls it), then you are seeing just how good the modern on-board digital image processing software and hardware are at maximizing the Dynamic Range of today’s back-illuminated CMOS sensors. During jpeg conversion, today’s P&S superzooms apply the same trickery that photographers developed to deal with Dynamic Range in post-processing…automatically, before you ever see the image. Almost all recent P&Ss have some kind of Dynamic Range Compensation, or Dynamic Range Enhancement, built in, and Auto is the default mode in any of the Auto/Smart Auto programs. Some of the most recent P&Ss even allow you to control the degree of DRC when you use the Program Mode.
Sweep panorama mode uses Auto Dynamic Range Optimization on the Sony HX400V. Further processing in Lightroom yields a very natural looking image.
My experiments with DRC on superzooms has shown that the best implementations are very good indeed…providing a noticeable and useful increase in apparent Dynamic Range without producing an unnatural looking image. They keep the drama in dramatic landscapes without overdoing, or over-cooking, it. For general photography, keeping DRC on Auto works very well. And on those cameras that give you control of the feature, you can produce good results in even the most challenging situations (as in the stream in deep forest, or the cathedral in the pines).
What is more, camera makes started to build in on-board automated three exposure HDR a generation of cameras back. The first attempts were not very successful. Sensors and processing engines were not fast enough. The three exposures took a few seconds so a tripod was required, and they were separated in time by long enough so that any motion in the scene destroyed the illusion…and often the camera failed to get the three images lined up perfectly, leaving ghosts around even stationary objects. Or, worse in my opinion, the resulting image was overly flat, with so little variation in tone that it looked like an etching on metal. Not very satisfying at all.
Then came, as I mentioned, the back-illuminated CMOS sensors and truly fast image processing engines. The best of today’s P&S superzooms will do automatic in-camera, three exposure, HDR without a tripod. Some will let you control the exposure steps between the exposures to fine tune for different scenes. Almost all will produce a fairly natural looking image…an image that with just a little bit of work in any editing program, can make a very satisfying dramatic landscape, even in the most difficult situations.
Auto Dynamic Range Optimization in a macro shot, plus tweaking in Lighrtoom is quite successful here.
It is impossible for me to tell you exactly how to use these features on you particular camera, since every maker implements them differently. It is safe to say though, that if your camera is less than a year old, it has both Dynamic Range Compensation (whatever your maker calls it) and in-camera automatic three exposure HDR built in. Dig into the manual and the menus. Once you find it, experiment.
I keep 3 exposure HDR set up as one of my Custom Modes, so I can shift to it by simply turning the Mode Dial. I use it a lot…because I love dramatic landscape, and because it really does produce files that are easy to manipulate into very satisfying images.
In lieu of detailed instructions, I will simply outline how I use the features on my Sony HX400V superzoom.
I keep Dynamic Range Compensation (which Sony calls Dynamic Range Optimization) on Auto for Program mode, which covers my wildlife telephoto shots and macros. It is the default mode in Sweep Panorama and Sports mode, so I am covered for panos and flight shots.
High drama landscape! In-camera HDR is set on one of my Custom modes.
I have a Custom mode set to Auto HDR with exposures separated by a total of 6EV, and Exposure Compensation set to -7EV (to protect those white clouds in dramatic skies and the bright highlights in the forest). Because the exposures are so fast and so close together I do not use a tripod, but I am careful to steady the camera as much as is possible. I know better (from experience) than to to try HDR with close foreground elements in motion, as in a high wind…or sea shots with heavy surf where the water detail matters. On the other hand, the three exposures produce a satisfying blur, similar to the silky long exposure blur that is the current fashion in water shots, in rapidly moving water of streams.
Finally, all my HDR work (all my work for that matter) receives post-processing in Lightoom (or, when using an Android tablet, in Snapseed). My processing for 3 exposure HDR shots is essentially the same as it is for normal shots, but I find that shots taken with Auto Dynamic Range Optimization require a bit of extra work…some extra shadow and highlight control, etc…to produce the best results.
So there it is. Dynamic Range Compensation and auto HDR are powerful tools in today’s P&S superzooms. Give them a try. You will not regret it.
Natural without being over-cooked. That is my personal goal.
On a complex macro shot like this, having control of where the camera focuses, where exposure is determined, and depth of field can be critical. Program mode to the rescue.
As good as Smart Auto is on most modern P&S superzooms, there are a few things it does not do that the aspiring nature photographer will, eventually, want to do. I still recommend that the beginning P&S nature photographer start with Smart Auto, and, if your main interest is landscape, you can probably get satisfying results 99% of the time with Smart Auto pretty much forever.
However, if you shoot wildlife or macro, or even high dynamic range landscapes, you will want to temper exposure slightly to protect the whites and hot-highlights in your images from burning out (losing all detail and going pure white or pure red, or pure green, etc.). And that is easier if you control the way the automation determines exposure…which areas of the image it is reading. You will also, from time to time, even if you shoot only landscapes, want to control depth of field…or how much of the image is in focus, front to back. Finally you will definitely want to be able to control what the auto-focus system locks on to when it determines focus.
A few of the more sophisticated Smart Auto systems now allow you to tweak the brightness of the image. Recent Sony cameras have Smart Auto controls for brightness, color, and vividness that allow you to override the auto settings. However I know of no Smart Auto system that allows you to control how the scene is metered to determine exposure, or to bias the exposure for depth of field, or to determine the focus point. By default, Smart Auto uses Multi-pattern metering for the scene and multi-point auto focus…that means it looks at a up to a dozen points in the scene and decides what you are most likely to be interested in. The system is very good at analyzing the scene for the content…but it generally fails when the subject of the image is small in relationship to the whole frame…as it is likely to be if it is a bird, beast, or wildflower.
If you put the camera in Program (generally the P on the control dial), you gain control over all these factors…plus the ability to bias the exposure for greater depth of field or faster shutter speeds.
This shot from a few years, and a few generations of P&S superzooms, ago demonstrates the limits of dynamic range. Note the loss of detail in the brightest whites in the clouds, even though the exposure was clearly biased for the sky at the expense of the land in the foreground.You see the same burn-out here in the brightest whites, even though there have been advances in dynamic range compensation and this was taken at -1/3 EV Exposure Compensation.
To tame the highlights in the image, you use the Exposure Compensation settings. There is generally a button on the camera that gives you direct control of this setting. Most often it is one of the buttons on the 5 way Control Wheel on the back of the camera (center button surrounded by four buttons: top, bottom, and sides. On some cameras (Canon) there is also a wheel that rotates on the outside of all these buttons.). It will be marked with a +/- symbol, and sometimes with the letters EV. It might be an isolated button further up and to the right as well. Pressing it will bring up a scale on the LCD or in the viewfinder, which generally runs from -2 to +2 in 1/3 EV steps (EV is Exposure Value and it is a standardized scale that defines how much lighter or darker a scene will be than the measured value). When you first press the button, a pointer should be centered on the scale. Pressing the control wheel button that corresponds to the minus side (generally the button on the left, closest to the LCD) or rotating the outer wheel or the separate control wheel counter-clockwise, will move the pointer 1/3 of the way toward -1. Press again,or turn again, to move it further, etc.)
Most P&S superzooms that I have used require a setting of -1/3 or -2/3s EV to protect the highlights in the scene from burning out. If you go much more negative than that, the blacks and dark colors in the scene will block up...which is the equivalent term and the opposite effect to the highlights burning out…you lose all detail in the dark areas of the scene.
If you set the Exposure Compensation, the camera will remember it until you reset it, so, once you have determined how much -EV your camera and sensor (and your eye) likes you can just leave it set that way.
This shot of an American Avocet uses Auto Dynamic Range Compensation and -1/3 EV Exposure Compensation to hold the whites within range and maintain detail.
There may be times when you want to change it. For instance, if you have a bird or beast silhouetted against a bright background (sky, etc.) it might be helpful to set the Exposure Compensation to the plus side, so that you get more detail in the shadowed subject. In my experience this rarely works…and always leaves the background completely burnt out or way too bright. But you can try. 🙂 Generally I get better results through shadow processing in software after the fact.
Here is a case where you might be tempted to use plus EV exposure compensation. It rarely works. Images like this, with the bird backlighted against a bright sky are unlikely to be satisfying whatever you do.
Of course -1/3EV might be ideal for birds and wildlife, and even macros, where the subject is smaller than the frame, but you may find that more or less compensation is needed for landscapes…particularly landscapes with bright clouds in the sky. Today’s P&S automation systems all have some kind of Dynamic Range compensation built in…the image processing computer attempts to adjust for wide variations in the brightness in the scene in the processing of the jpeg image in the camera…but in my experience they still can’t handle the brightest whites in sun-lit clouds. For high Dynamic Range images I use the built in Dynamic Range compensation, special techniques like HDR (more in a future article on that) and even so, generally dial to the Exposure Compensation down to at least -2/3s EV.
Most cameras will allow you to create custom setting sets, so that you can create a wildlife and macro Custom set, and a Landscape custom set. More on that in another article as well.
For birds, wildlife, and macro, you will want to set the metering pattern to either Center (sometimes called Center-weighted) or Spot. This will be a menu setting and you will have to dig through the menu system (or the manual 🙂 to find it. (On Sony Cameras and Canon cameras, at least, it is also accessible in Program mode by pressing the Function button). Your choices are generally Mulit-pattern, Center, or Movable Spot.
As mentioned above, Multi-pattern reads a number of areas in the image, and creates a balanced exposure for the whole scene (or in Smart Auto it uses the multiple points to analyze the scene for the correct Smart Mode to apply). This works fine for landscapes and most of the subjects the engineers anticipated you would be taking photos of. However when you are photographing a bird or a bear or a bug from any distance, you want the bird etc. to be correctly exposed and you don’t care much about the surrounding foliage or landscape. Likewise when shooting macro, you want the flower or the insect correctly exposed, not the background. Multi-pattern metering may or may not get it right.
Center metering limits the area measured to a rough rectangle in the center of the viewfinder or LCD, while Movable Spot limits the area to the a very small circle or square that must be carefully placed over the exact object or subject you want to expose for. Generally in Spot, you can move the spot around the frame using the up/down/left/right buttons on the Control Wheel. This is handy for when you have the camera mounted on a tripod and need to meter off something that is not in the center of the frame…but generally too slow for anything but macro photography for the nature photographer. It is easier for the nature photographer, working without a tripod, to center on the subject, half press the shutter release to lock the exposure, and then move the camera to put the subject where you want it in the frame.
I generally use Center metering, as a good compromise, and one that I do not constantly have to think about.
Center metering was used here to make sure the fruit, which is the subject, is correctly exposed.
A final exposure tweak possible in Program is Program Shift. The the camera is programmed to respond to different light levels by choosing what the engineers feel is the best compromise between aperture (the size of the hole that passes light to the sensor) and shutter speed (which controls how long light falls on the sensor). Most P&S zooms are optimized for optical performance at wider (larger) apertures, so that the exposure system can keep the shutter speed high enough to avoid unnecessary camera shake fuzziness or blur from moving subjects. However, there are times…landscapes with a lot of depth and busy foregrounds, and almost all macro work…where you want greater depth of field than a wide aperture can provide. (Depth of field varies directly with the the size of the aperture…larger equals shallow depth…smaller equals greater depth. It is just physics. 🙂 Therefore you might want to shift the Program to a smaller aperture and a slower shutter speed…which is still reasonable given the excellent image stabilization in most P&S superzooms.
Traditionally the way to do that is to shift out of Program altogether and use Aperture Preferred metering…where you pick the aperture and the camera picks the shutter speed…but if your camera has Program Shift, and it is easy to access, there is no need to do that. Program shift gives you a range of choices for the correct exposure…balancing smaller apertures by automatically decreasing shutter speed, and vice versa, as you turn a control wheel (either the one surrounding the 5 way rocker Control on the back of the camera or a second dedicated wheel) or press the direction buttons on the 5 way rocker. On Sony cameras it is really easy as the Program Shift control wheel falls right under your right thumb. On Canons it involves pressing two buttons at once to being up the control, and then using the wheel surrounding the 5 way control. Not so easy, but doable when you need it.
For a deep landscape like this, I use Program Shift for a smaller aperture and greater depth of field than the camera would give me on standard program. The same technique was used for the macro that heads up this article.
Last but not least, we come to focus placement. In Auto or Smart Auto, as I mentioned above, the camera checks focus on several areas of the scene. It either picks the most likely spot for focus, or picks a spot between what it judges to be the most important elements of the scene. It does tell you what it is doing. When you half press the shutter release, you get green (generally) boxes around the areas that it is planning to put into focus. You do have the option of letting off on the shutter release and giving it another chance to focus…or moving the frame slightly and trying again. All multi-pattern auto focus is biased toward the closest object to the camera.
A better way for the nature and wildlife photographer, as in exposure metering, is to switch the focus to a smaller area…either center focus or movable spot focus. Both work for focus the same way as they do for metering…directing the focus to objects and subjects near the center of the frame, or exactly under the spot. This is especially critical for telephoto work, where your depth of field is restricted by the focal length, and where the camera’s bias toward the closest subject is very likely to put focus on something in the foreground (grasses, leaves, twigs, etc.) instead of on the bird or beast you are attempting to photograph. In macro work, especially on a camera without a dedicated Macro mode, the focus is likely to fall on background objects instead of what you want…especially if you are a little too close to the subject for the camera to focus comfortably.
Again you will have to dig into the menu system to change the focus area…or, in Program, use the Function button on Canon or Sony cameras.
Center or spot focus allows you to place the focus where you want it for complex shots like this one of Cedar Waxwing in a field of Goldenrod.Center or spot focus is also handy in macro work where you want to carefully control what is in focus. This shot uses both center focus and program shift, to achieve the desired effect.
I do about 60% of my shooting in Program mode, using one of my Custom setting memories. The rest of the time I use one of the specialized Modes…Sports, Macro, or In-camera HDR, depending on what I am shooting (once more, more on specialized modes in a future article). All of my birds and wildlife are shot in Program, except for birds in flight. All my Macro on the Sony cameras, and most of it on the Canon superzooms, is shot in Program.
Once you have graduated from Smart Auto (if and when you do :), Program is your smart choice. 🙂
Blackburnian Warbler, Magee Marsh, OH. Canon SX50HS. Program with a slight tweak.
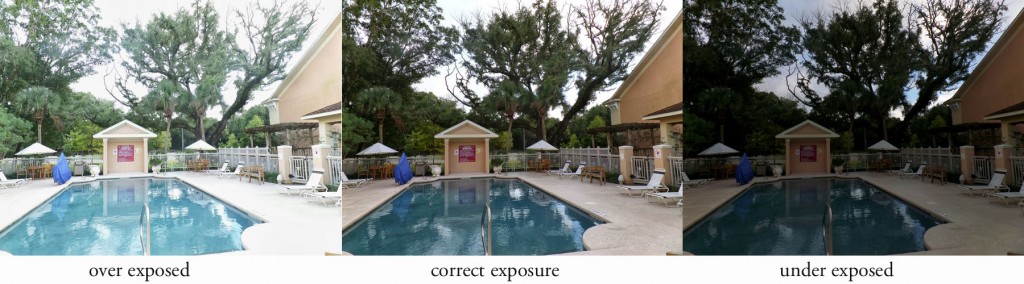
Exposure is the art of controlling the amount of light that reaches the film or sensor in a camera, so that you get a natural looking image of the scene in front of the lens…with a full range of lights and darks, and colors in a pleasing balance. Not too light, with no detail or texture in the washed out whites and bright colors in the scene…and not to dark, with inky black shadows and dingy grays instead of white, and muddy, unsatisfying colors overall.
difficult exposure
It is more difficult that it sounds because no recording medium, neither film in the old days, or the light sensors in today’s digital cameras, can actually capture the full range of light and color that the human eye sees. There is always a compromise…a set of choices that have to be made…so that you can compress the scene before you into, today, a digital file which can then be reconstituted to present an image…whether it is printed, or displayed on an LCD panel…that comes close to what you saw at the time you pressed the shutter.
Tricky business. And, until recently, getting the exposure right was way more than half the art of photography. When I started seriously taking pictures with slide film SLRs, if more than 1/3 of your images were pleasingly exposed, you were doing very well indeed.
It is far different today. Today we expect 90% of our images from any outing to be correctly exposed. Even if we use full Auto!
Back in the day, no serious photographer would have been caught dead using Auto exposure. Auto was a crude thing, a matter of averages and a limited number of brightness steps, that, at its best, only produced an approximation of correct exposure, and that only rarely…maybe one in ten images. Putting your camera on auto all but guaranteed that the number of satisfying images you took would be very limited. After all, what camera meter and electronic circuit could ever hope to match the experience and skill of the human eye and brain? Only rank amateurs…and those too lazy to learn a little photography for pete’s sake…used Auto.
Auto mode on a Samsung Point and Shoot
Those were the days…and, happily, those days are long past. The automated exposure systems in today’s Point & Shoot cameras have gotten so sophisticated that it is a rare instance when any photographer’s personal experience or skill can produce a better exposure than the camera would choose on auto. In fact, today’s auto exposure systems represent a distillation of the experience and skills of hundreds of photographers and photographic engineers mapped onto a computer chip so that it is applied, in real time, instantly, every time you press the shutter. Think of that. Hundred’s of photographers’ and photographic engineers’ experiences and skills are yours to command, right there in the tip of your finger. 🙂
Almost all Point & Shoot cameras today have some sort of smart auto system. Different makes might call it different things, but Smart Auto reads the information from the sensor, does a first level mathematicalanalysis to see which of up to 20 different scene types it most closely matches, applies the exposure settings from the chosen Smart mode, and then, based on a second analysis of the sensor data which looks for anomalies, fine tunes the exposure for the individual scene.
In essence the camera does automatically, and all but instantly, what the photographer would do if he or she were determining exposure manually. Exposure is more art than science, in that the choices you make, if your are making them yourself, are based on your experience with light and shadow, form and texture…your memory of similar scenes…and your experience of how your particular camera responds to light and shadow. When confronted with a scene, you mentally access your own experiences, and pick the settings that have worked in the past for you in similar scenes, then, based on a closer analysis, generally involving metering or at least consideration of particular tonal problems of this particular scene, you tweak the setting in a way you hope will improve the exposure.
A full range image using the camera’s Rich Tone (HDR) mode.
Yes, like I said, that is exactly what Smart Auto does in the Point & Shoot camera. Only, instead of drawing on just your experience of light and shadow, form and texture, and your limited experience with how the camera responds, the engineer/artists who design the exposure system draw on a mathematical analysis of of thousands of scenes and direct knowledge of how the camera sensor responds to light.
It is still art, or at least more art than science. The engineers who design the system still have program it to make choices that produce what are, to their eyes, pleasing results when the image is finally displayed as a print or on an LCD screen. Choices. Artistic choices.
And, to be honest, some camera makers, to my eye, are better at this than others. They all manage correctly exposed images 90% of the time…it is just that some cameras consistently produce images that are pleasing to my eye…that approach most closely the way I remember the scene, or the way I want to remember the scene. And some camera makers don’t.
(Full disclosure: I have not used all the makes of digital cameras. I like the way Canon and Samsung render images. I do not like the way Nikon and Fuji render images. The Olympus and Sony cameras I have owned have been between the extremes. I could live with them but they are not my choice. Remember. More art than science. You could have a completely different opinion!)
Anyway. What all this means is that there should be absolutely no shame involved, no matter your level of photographic experience or skill, in putting your Point & Shoot camera on Smart Auto and just going out and taking pictures.
Certainly, as a beginner, that is should be your setting of choice. You will have to take a lot of images before you even begin to learn where Smart Auto is letting you down, and, when you eventually do (and you will)…well that is plenty of time to begin learning what to do about your, or the camera’s, failures. In the meantime, take a lot of pictures. Don’t share the ones that don’t satisfy you, but save them to study when you get to the point where you want to learn a little photography, for pete’s, and your own, sake.
A very tricky exposure problem, handled with the Sony HX400V’s built in auto HDR program.
When reading reviews of new cameras, the reviewers generally take the availability of manual settings, or, failing that, the degree to which the user can control otherwise automated functions as an indication of how suited the camera is for advanced or even professional use. The assumption seems to be that any serious photographer is going to want, at least from time to time, to take direct control over the photographic process: kind of like the pilot of a 747 taking the plane off auto-pilot in the middle of a storm, or for a tricky landing, or in any situation where he doubts the ability of the automation to handle the unusual demands of the situation.
People are sometimes shocked when I tell them that I never take the camera off automatic (well, to be honest I keep it on program all the time…which is slightly different than auto…read on). I don’t even use aperture preferred or shutter preferred. I seldom use any of the scene-specific modes, unless the camera has an excellent macro or sports mode. I use the custom modes, or memory options if available, but I have them set to the program modes I most often use. I am not sure I could find the white balance controls on the camera I’m using now. I haven’t taken any digital camera I have ever owned off auto-focus, ever (though I do use manual focus assist if the camera offers it).
I am, pretty much, a point and shoot guy all the way. In fact, in the time since I have been using P&S digital cameras, the makers have built more and more effective automation into the cameras. I used to adjust exposure for difficult scenes..scenes with both deep shadow and bright areas (high dynamic range scenes)…using Exposure Compensation and careful selective metering of the scene. Today, with high dynamic range processing available on most sophisticated P&Ss (and even in-camera, multiple exposure HDR), I set the basic hdr program to auto and it handles 95% of even the most difficult exposure challenges without any intervention on my part. For scenes where I want extra drama, I use the auto three exposure HDR.
I shoot exclusively in jpeg. Most of the advanced automation is only available in jpeg mode, and I see no real advantage to shooting in raw and having to do what the camera does in software after the fact.
Does that make me a bad photographer? Does that make me less of a real photographer than the guy or girl who is always fussing with the settings, who shoots only raw, and who considers auto as the resort of the weak minded, the lazy, and the totally clueless?
It is not like I don’t understand how to use the manual settings. I have paid my dues. I am a card carrying member of the do-it-the-hard-way photography guild, because, when I was learning photography, the hard-way was the only way to do anything. I cut my teeth on the sunny 16 rule and carried a hand-held exposure meter…two meters in fact…one standard reflective/incidence and a spot meter. I studied Ansel Adam’s Zone system. My first SLRs had match-needle metering. When auto-focus came out, I was among the many serious photographers who swore it would never do for real work…passing fad! no future!
So, what am I doing these days, extolling the virtues of P&S?
Perhaps it is because I do understand the advantages (and the limits) of manual control of the photographic process that I have become such a staunch convert to automation. The fact is, twelve years of working with digital cameras…twelve years of looking at the results, of studying the images these cameras produce…has convinced me that, in 95% of situations, when it comes to exposure, the camera is smarter than I am. More…in something close to 90% of the remaining situations where manual control might have produced a better image, five minutes in Photoshop or Lightroom will do the same thing. That doesn’t leave much room for me to better the exposure automation.
I can still remember my very first day of using a digital camera. I was teaching at the time and it happened that the day the camera arrived we were going on a field trip to a local college. While there I took pictures of the kids in all kinds of situations…including inside the athletic complex. The pool was housed in a large open well in the building, two stories high, with a balcony around the second story and a huge skylight for a ceiling. Under the balcony there were florescent lights, and they had incandescent spots on the pool itself. The kids were on the balcony. I happily snapped away, knowing that I probably wasn’t getting anything good. I mean, three different light sources, bright light over pool and the kids semi-shadowed by the balcony overhang…what chance?
When I got home and put the images up on the computer I was simply amazed. The camera had balanced all those light sources perfectly, read the lights and shadows better than I could, and produced very good images…from a technical standpoint, excellent images. That made an impression on me that has not faded, and that has been confirmed again and again in the field, and has been reinforced as each new generation of sensors and processing engines has expanded and refined the automated abilities of these amazing digital cameras.
Which brings us to the difference between Auto and Program. Almost all P&S cameras have both an Auto and a Program setting. Some today have more than one Auto mode…it might be Auto, Superior Auto, and Intelligent Auto. Auto is really what it says. The camera does everything. It analyzes the scene and decides which program mode best fits the exposure challenge. It sets the exposure. It selects the focus mode. It decides what you are most likely to want to focus on. It sets the focus. I can only assume it is also selecting white-balance and sharpening and color space and all the other things that can be set on a digital camera. It does not tell you what it is doing. It just does it. And 95% of the time it will get it right, or close enough to not matter. Honestly, today you could put your camera on Intelligent Auto and come back with 95% acceptably exposed images.
As a wildlife and nature photographer though the one thing I need control over is where the camera will focus. I do not want the camera to decide what I am most likely to be focused on. I need control of that.
Here we want focus on the owl, and on its eyes in particular. Multi-point focus would likely have focused on the branch in front of the owl.
Program is Auto with control. First off, it allows me to set the focus point to the center of the field or even a movable spot focus. My most recent P&S have allowed me to override the selected focus point with a manual control…for those situations where you are focusing through brush, without taking the camera off auto focus.
Many cameras will allow you to shift the program…that is, to change the balance between shutter speed and aperture…while still maintaining the selected exposure. this is useful for controlling depth of field on the one hand, and stopping motion for action shots on the other.
For action you want a high shutter speed. Program shift to the rescue.
For macro you want to increase depth of field. Program shift makes it easy.
Many cameras will allow you to choose between wide-area, multi-spot exposure metering (sometimes called average metering), center weighted metering (average metering with more consideration given to the center of the frame where the subject is likely to be), and spot metering (which meters only on a spot in the center of the frame…sometimes you can even move the spot around in the frame.
All P&Ss allow you to change the ISO setting in Program mode, which is another way of controlling both shutter speed and aperture.
Most allow you to override the selected exposure by a factor of 2 in either direction (over or under exposure) using the EV control. I have yet to use a digital P&S that did not overexpose the highlights of the scene in auto or program. A touch of negative EV compensation will cure that.
Even at telephoto reach, a little exposure compensation keeps the highlights in check
White clouds need taming or they become featureless blobs of white.
And all of this without leaving Program mode. All of this while still letting the camera do the hard work of determining correct exposure and focus. You might call Program controlled automation. Combine it with some old tricks of framing from the do-it-the-hard-way days, and you are well on your way to getting the most out of automation, by letting the camera do the work. Within reason.
You do have to pay attention. It does you no good to know what the camera is doing and to have the options to change the choices the program makes unless…unless you are paying attention! Automation does not mean that you let the camera make all the decisions…just that you let the camera make all the adjustments.
So, use Program mode and pay attention. In Part Two of this article I will detail the things you want to pay attention to, and the ways you can control them in program mode on most cameras. Read on, and you will be well on your way to technically correct exposure and focus on the vast majority of your shots.
And that is the bottom line. That is the reason for this article. I have limited time to pursue photography. While I am in the field, I want my creative self completely engaged in imagining every possible composition in any given setting, in seeing every image that might be there. I don’t want to have to deal with exposure and focus, except as elements of the possible images. Therefore I let the camera do everything it is able to do for me. I am confident it can, withing reason, if I am paying attention, do an excellent job of computing the correct exposure…better than I could using manual controls. I am confident that it can quickly and easily, if I am paying attention, establish correct focus…just as fast or faster than I could manually.
If you develop the habit of looking closely at nature you will find all kinds of interesting and wonderful photo opportunities…moss, lichen, flowers, mushrooms and other fungi, bugs and even the intricate textures of rock and tree bark.
With a standard full sized DSLR camera with interchangeable lenses you would need a dedicated macro lens, add-on macro lens/filters, or extension tubes between the camera body and a fixed focal length normal lens to take advantage of the macro world…and, most likely a tripod rigged to get down and close. Many also use a special flash called a ring-flash for close up work. Macro is somewhat of a specialty among serious photographers, requiring special equipment and techniques as well as the eye to see small.
Today’s P&S superzooms almost all have excellent macro ability. Many will focus to 1 to 2 centimeters from the front lens element at wide angle. Some, like the Canon SXxxHS series, will focus on something touching the front element. Many have dedicated Macro Modes, which not only bias the focus system for close focus, but often add some digital trickery to defocus the background to simulate (for better or worse, see below) the effect of a longer focal length macro lens on a full sized DSLR.
Wide angle macro. Sony HX400V.
P&S macro does have its disadvantages…so called. Both of the often sited disadvantages have a positive side that you can use to your advantage.
Characteristically P&S superzooms focus closest at their widest angle. This makes the kind of macros that show a close up view of you subject in its environment…with background or surroundings…easy and natural. And because the wide angle on a P&S is, in reality, a very short focal length lens (the actual focal length of a 24mm equivalent lens on a P&S is 4.3mm), and because the shorter the focal length of the lens the greater the depth of field, much of at background or surrounding will be in relatively good focus. This produces an interesting effect of its own, as the image above demonstrates, but it does not produce what most photographers and photo enthusiasts think of, or recognize as, the macro effect. Because most macro work is done with full sized DSLRs and specialty lenses that have real focal lengths of between 60-100mm, or with add-on lens/filters or extension tubes that restrict the depth of field, we are used to seeing macros with the subject isolated against an out of focus background. In fact, the challenge for folks who shoot with real macro equipment is to get the whole subject in focus at the same time. That is much easier, though some care is still needed, with a P&S macro. Those cameras with a dedicated Macro mode often use special in-camera processing to mimic the full sized DSLR macro effect.
The other disadvantage of P&S macro is that with close focus at the wide angle end of the zoom and focus under 5mm you have to be really close to your subject…often too close for practical work. You get pollen on your lens. You spook the bug. Worse, you get in your own way…the shadow of the camera covers the subject in any kind of sun or strong daylight.
Let me say right here that one of the real advantages of P&S macro is that you almost never need a tripod. The image stabilization on today’s P&S superzooms is amazingly good. If you take a number of shots…or use the continuous shooting mode on your camera…you will get at least one sharp photo in almost any light. It is easy to do, since, with the exception of bugs, most macro subjects will not be moving much if at all.
Both of the disadvantages above can be overcome, at least in part, by using a slightly longer focal length on the zoom. This is not possible with all P&Ss, but it is with the three I am most familiar with.
Conventional macro with a 100mm equivalent macro lens on a APS-C mirror-less compact DSLR. ZEISS Touit 50mm Macro on Sony NEX 3N. Notice the fully out of focus background. Contrast that with the image above, taken a the wide end of a P&S zoom with an equivalent focal length of 24mm and a real focal length of 4.3mm.
The Nikon superzooms have (or had, last time I checked) a Macro Mode that sets the zoom at about 34mm equivalent. This is a good compromise…allowing a more comfortable working distance, and a bit more separation between subject and background. Nikon emphasizes that separation with special background processing. At the same time, 34mm equivalent still has enough depth of field to make it possible to keep the whole of most macro subjects in focus at the same time.
Canon SXxxHS series cameras will focus, as above, on the front surface of the lens at wide angle…but if you move the zoom off wide angle you loose close focus all together. To overcome that, I always use the digital zoom…on the Canons there is a special processing mode that provides a 1.5 and 2x digital tel-extender that has remarkably good performance, especially with macro subjects where the sensor is flooded with detail. That puts me out at 36 and 48mm for good working distance, and still gives me the depth of field of the 24mm equivalent. Best of both worlds.
On the Sony, closest focus is also at full wide angle, where you can get to 1cm. However, you can zoom out to 50mm, or even 85mm, and still focus under 5cm. Again, that gives you a good working distance, good scale, and, with care, enough depth of field.
Both the Canon and the Sony allow for Program Shift while shooting macros. It is kind of difficult to access on current Canons as it involves simultaneously pushing two buttons, but on the Sony it is dead easy as Program Shift is the default action of the real control wheel under your thumb as you grip the camera. Program Shift on any camera allows you to increase or decrease the depth of field by adjusting the size of the aperture (f-stop) without upsetting the basic exposure (it automatically compensates by adjusting the shutter speed to keep exposure balanced). You don’t really need to understand shutter speeds and f-stops and exposure to use Program Shift for macros. All you need to know for well focused P&S macros is that you want a larger f-stop number (which corresponds to a smaller aperture). Most P&Ss will automatically select a larger aperture over a smaller one, so your basic exposure is going to be something like f3. You want to dial it up to f5.6 or f6.3. That will give you enough depth of field, on a P&S, for most subjects. The shutter speed will go down, making it harder to hold the camera still long enough to get your picture, but between the excellent image stabilization and taking a few shots of every subject, you should still get at least a few sharp images in almost any light.
Sony HX400V at about 80mm equivalent, using program shift for a smaller aperture, comes close to matching the macro effect of the dedicated 50mm macro on the Sony Mirror-less Compact DSLR.
Lighting on macros, and especially avoiding the shadow of the camera, can be very tricky. All I can say is that if I take the time to try all the angles I can generally find one that works. Sometimes you still get camera shadow in the image, but as along as it does not distract from or obscure the subject it might be okay.
Circling the plant with the bee allowed me to get the camera’s shadow out of the frame. Sony HX400V at about 90mm.
Some of the best macros are taken in the indirect light of the forest floor. Again, the superior image stabilization of the P&S superzoom comes into play to allow these kinds of shots hand held.
At the same time there is nothing like the detail of a shot in full sun. I used all the tricks here, with the Sony HX400V.
Finally, don’t ignore the other end of the zoom, or anything in between when shooting macros. Many P&Ss will focus closely enough at the long end for a true macro effect, especially if you use digital zoom or one of the specialized processing modes that give an expanded zoom range. The Canon SXxxHS series focus (based on current models at the time of this writing) to under 5 feet at full telephoto. At 1800mm or 2400mm equivalent field of view (using the digital tel-extender) that can produce stunning macro results.
2400mm on the Canon SX50HS. Bordered Patch at the National Butterfly CenterFlame Skimmer. Tucson Sonoran Desert Museum. Sony HX400V at 2400mm equivalent using Perfect Image Zoom.
So, are you ready to make macro with your P&S superzoom?

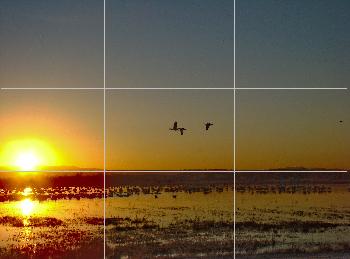

![compgrid[1]](https://psnp.info/psnp_/wp-content/uploads/2008/01/compgrid1.jpg)
![2156162498_64d6f9e913_m[1]](https://i0.wp.com/psnp.info/psnp_/wp-content/uploads/2008/01/2156162498_64d6f9e913_m1.jpg?ssl=1 "2156162498_64d6f9e913_m[1]")
![2053278956_62b7886338_m[1]](https://i0.wp.com/psnp.info/psnp_/wp-content/uploads/2008/01/2053278956_62b7886338_m1.jpg?ssl=1 "2053278956_62b7886338_m[1]")
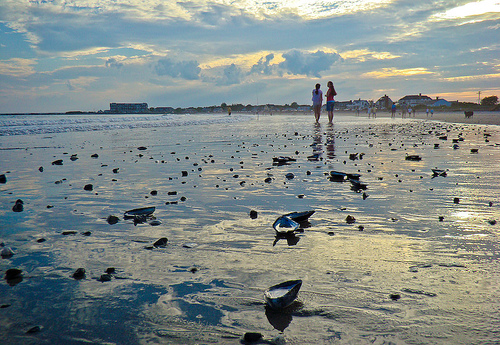
![557235674_f1f770e6ce_m[1]](https://i0.wp.com/psnp.info/psnp_/wp-content/uploads/2008/01/557235674_f1f770e6ce_m1.jpg?ssl=1 "557235674_f1f770e6ce_m[1]")
![557376619_644891c1ab_m[1]](https://i0.wp.com/psnp.info/psnp_/wp-content/uploads/2008/01/557376619_644891c1ab_m1.jpg?ssl=1 "557376619_644891c1ab_m[1]")