Just a bare bones download site for now. 🙂

Point and Shoot Nature Photography with the Sony RX10 V: Will it get the job done? The Video.
Here you can download the extended review of the RX10 V and a comparison with the Sony a6700 with two different lenses as an alternative Everyday, All Day Carry solution.
And here you can download the Beginner’s Guide to Point and Shoot Nature Photography with the Sony RX10 V: shooting in Auto (we adapt Auto, Landscape, and Macro to nature photography).
Here you can download the Intermediate Guide to Point and Shoot Nature Photography with the Sony RX10 V: Memory and Star Modes (we create a dedicated Birds and Wildlife Mode and save it to memory while still using the Scene Modes for Fight and Action (Sports) and Landxcape and Macro—mostly without opening the menus).
Here you can download Steve Ingraham’s Advanced Guide to Point and Shoot Nature Photography with the Sony RX10 V, part one: Birds and Wildlife, Flight and Action (we create sophisticated dedicated shooting modes for birds and wildlife going about normal business, and for birds in flight and action, and extensively customize the botton and dial layout. Extensive deep menu work.)
Here you can download Steve Ingraham’s Advanced Guide to Point and Shoot Nature Photography with the Sony RX10 V, part two: Landscape and Macro (we create our Landscape and Macro modes)
Here you can download Point and Shoot Nature Photography with the Sony RX10 V: In the Field, tips and tricks.
CAMSET for Advanced Point and Shoot Nature Photography with the Sony RX10 V
Below you can download a zip file containing the CAMSET for Point and Shoot Nature Photography with the RX10 V. Unzip it and follow these instructions.
Warning! Installing this CAMSET will change the function of the buttons, dials, and lens rings on your camera. Be sure to download the Birds and wildlife section of my guide above, and study the section on Custom Buttons to understand what your buttons, dials, and rings now do.
I have created a CAMSET file that can be loaded into your RX10 V that includes all my modifications, including button customizations. Download it below. Save it to your device Files App, and unzip it. You should have a file called CAMSTSI3.dat. To install it, unless you already have a CAMSET card, it you have to put a card in your camera and format it. You will need to recreate the exact file structure below on your card. The easiest way to do that is to put the Main Mode Dial in the P position. Go to Toolbox, Reset/Save Settings. In the next menu choose Load/Save and then Save. Accept the current name CAMSET01, or give it a name of your own. Save it. (This will give you a complete backup of your current settings in case you want to go back to them.) Now place the card in your device and move or copy the CAMSETPS file to CAMSET folder on the card. See the screen shot for where it is.
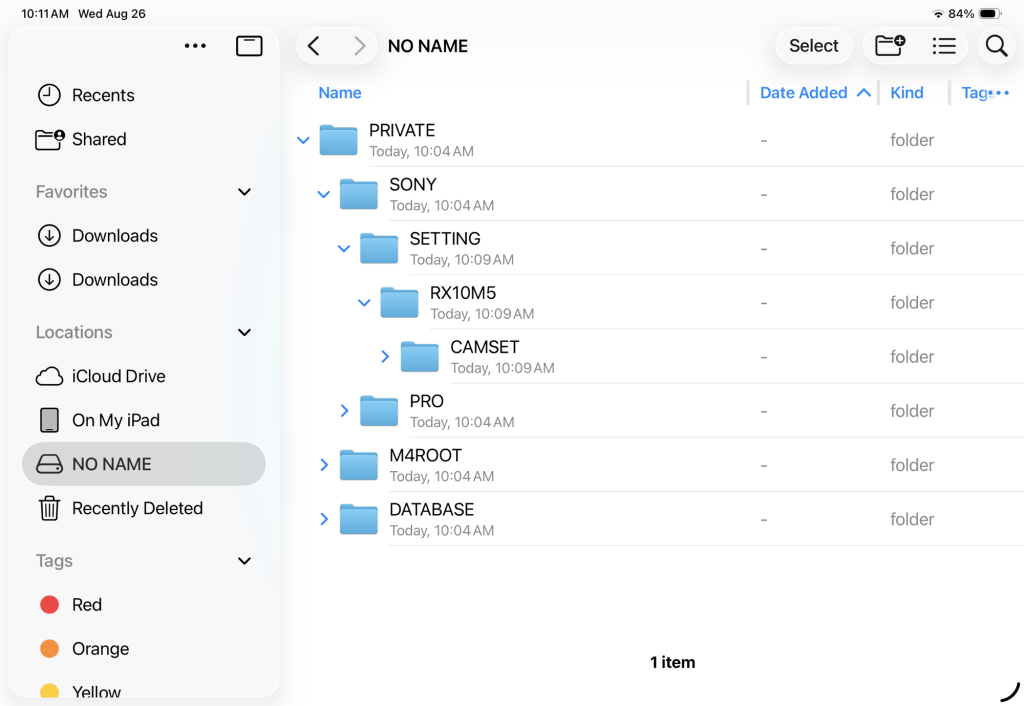
(If you already have a CAMSET card, skip all that and just move or copy CAMSTSI3.dat to the CAMSET folder on you existing card). Put the card in your camera. Go to Toolbox, Reset/Save Settings, Load/Save, and Load. The CAMSETs will show up. Chose CAMSETPS and Load. The camera will do some stuff and then reboot. (turn of and on). Put the Main Control Dial in the Star position and test Custom button Top 1. If it switches between MR3 and M4, you are good to go. If anything goes wrong, and it should not, you can reset the camera to factory in the same menu you used to load the CAMSET, or simply reload your own saved settings (CAMSET01). Is that easier than making all the settings yourself? Yes, probably, but you will not learn as much 🙂