Masked Tityra, from the deck at Tranquilo Bay Lodge. Nikon P900
Honestly, I have never been anywhere as photographically engaging as Tranquilo Bay Lodge on Bastimentos Island in the Bocas del Toro archipelago on the Caribbean side of northern Panama. The lodge itself, situated 35 minutes by boat from the the Bocas Town airport on Colon Island, is surrounded by Caribbean rain-forest with all the usual suspects: Boat-billed Flycatchers, bright Blue Dacnis, Manakins, Tityras, Honeycreepers, Sloths, Bird-eating Tree Snakes and White-faced Capuchin Monkeys to name a few…and there are a host of unique habitats, from rocky islands with colonies of nesting sea-birds (Frigate Birds, Boobies, and Red-billed Tropicbirds), to tiny red and blue and yellow and black Poison Dart frog infested lowland jungle, to Coco plantations with Trogons and Toucans and Howler Monkeys, bigger green and black Poison Dart Frogs and Yellow-headed Geckos (and Purple-throated Fruit Crows!), to the mainland with abandoned banana canals threading though forest where Blue Morpho butterflies float, and high mountain passes with cloud forest: orchids, Motmots, White Hawks, a host of Plumbeous Kites, Squirrel Cuckoos, Lineated Woodpeckers, and more Toucans and sloths. There can not be many places in the world to equal the easy accessible tropical variety of Tranquilo Bay Lodge.
I was there for an atypically rainy week in April, and, despite the rain, it was one of the best weeks of photography I have ever experienced.
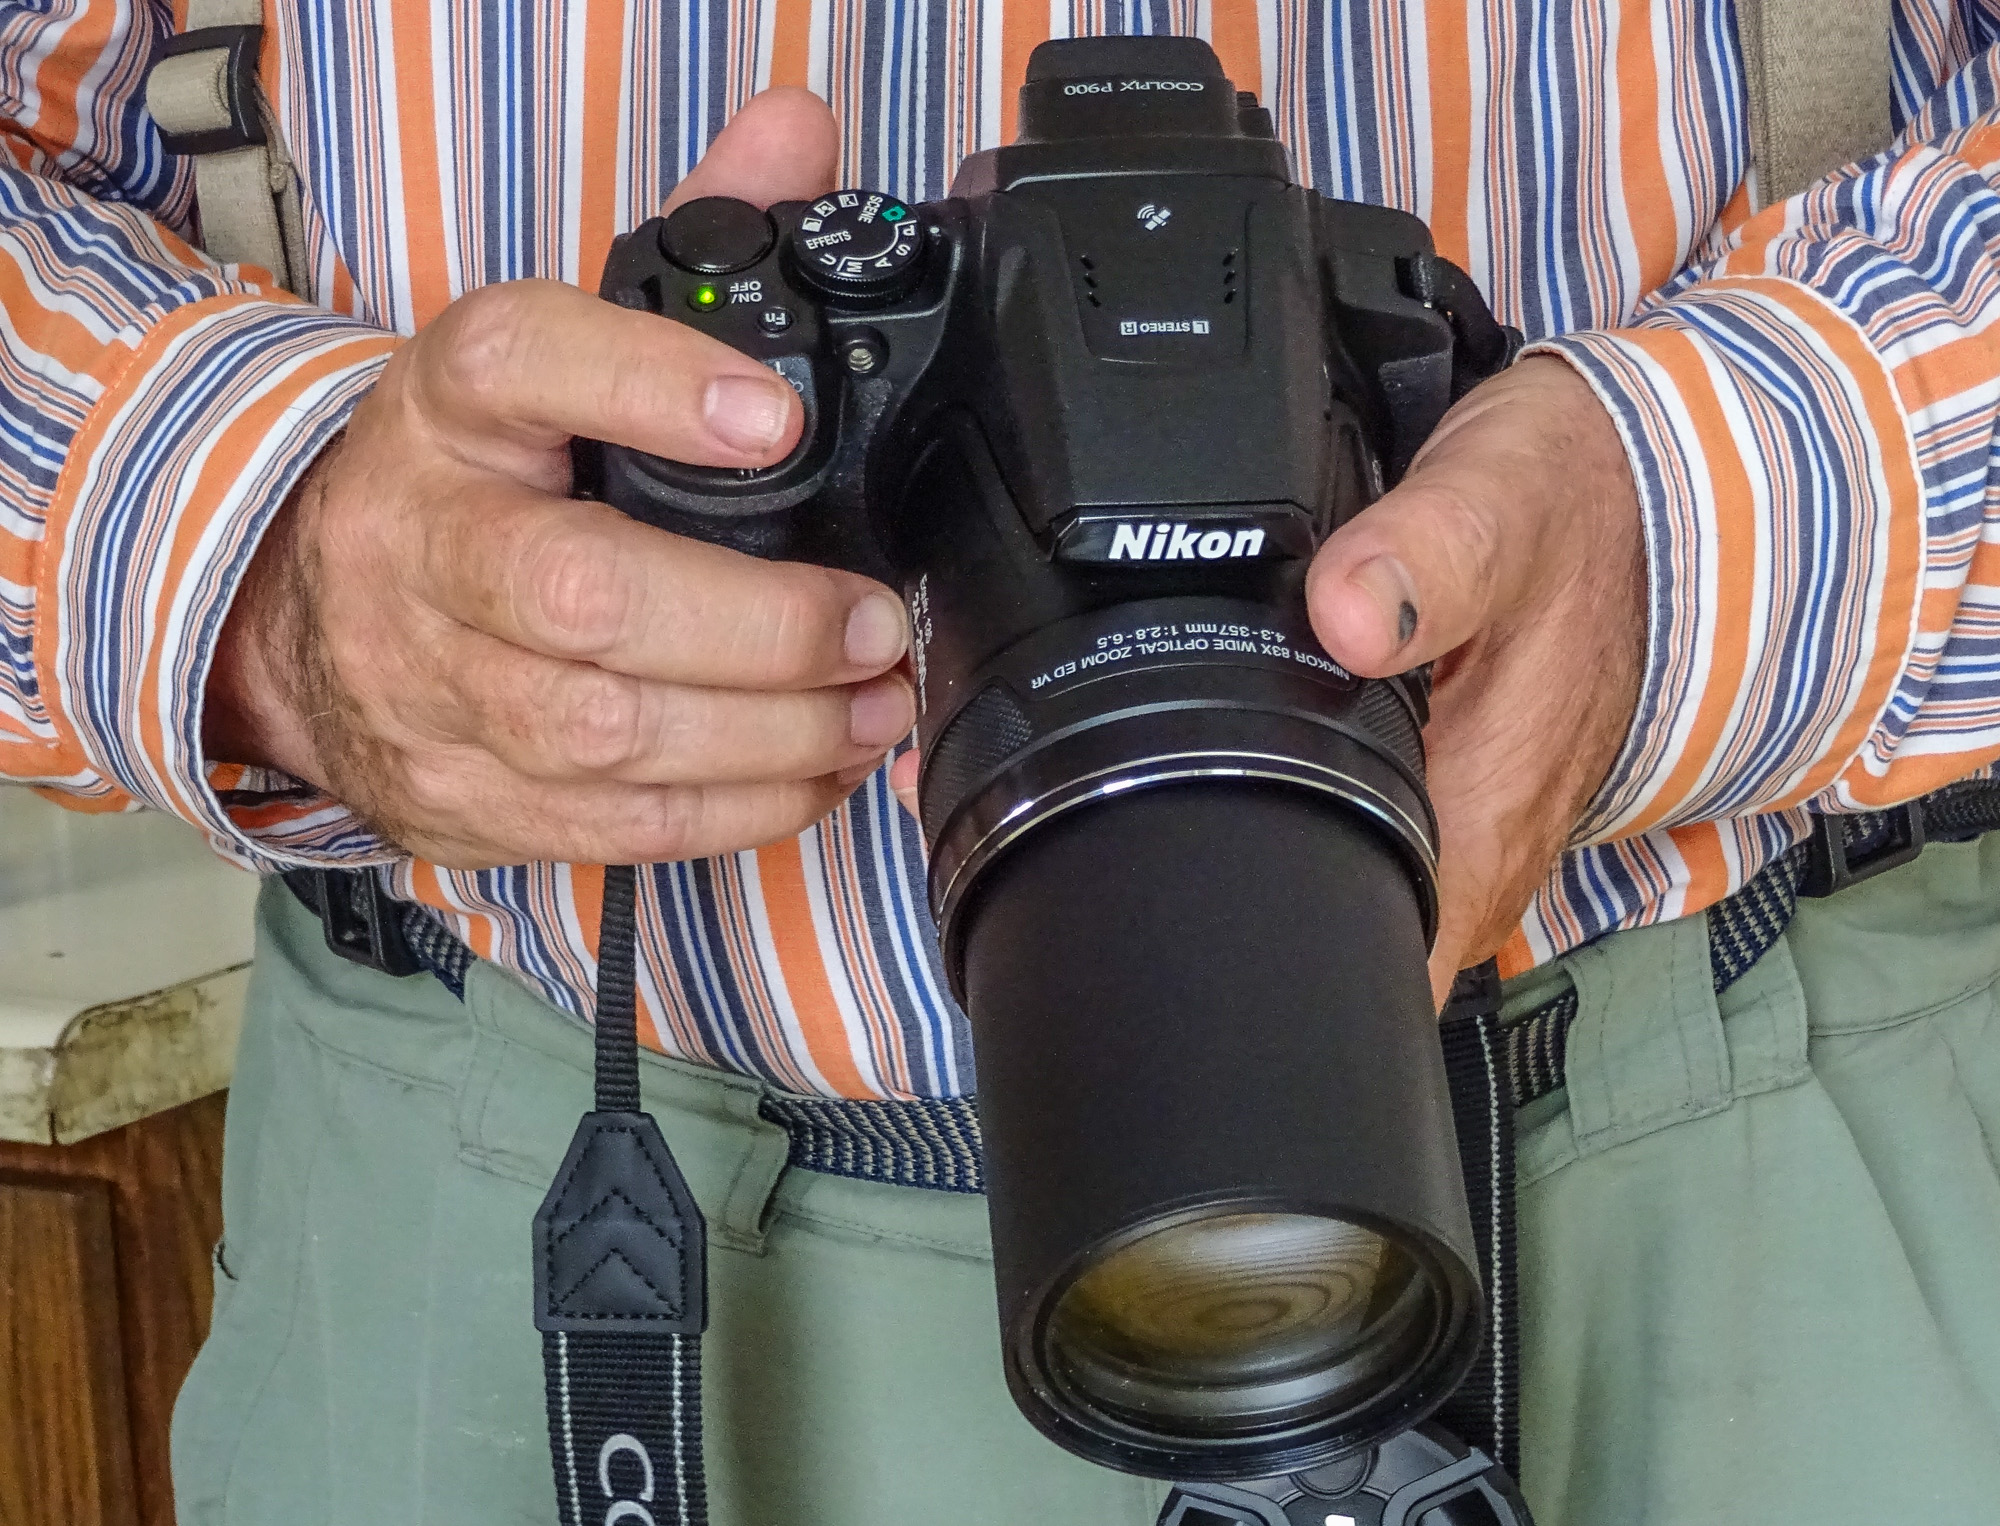
As noted before (P&S in the Tropics) the tropics might just be the ultimate test for any P&S camera and many P&S photographers. I had a new camera for Tranquilo Bay, the Nikon P900 I reviewed here, and I am happy to say that it was more than up to the challenge. I packed my Canon SX50HS for back-up, but it never left my suitcase. Based on my previous experience in the tropics of Honduras, I also packed my super-light-weight MeFoto Roadmate carbon fiber travel tripod…and that too never made it out of the suitcase. I shot, and got satisfying images of everything from flash aided macros of Poison Dart frogs, to Canopy Tower panoramas, to dark under-canopy lecking Manakins, to frame filling Blue Dacnis and Shiny Honeycreepers from the Lodge deck, to distant Toucans and Snowy Cotingas from moving boats…all of it hand held with the P900. As far as I am concerned, no camera could have done a better job in the tropics than the P900 did, and few could even have come close. Impressive.
I used Sports Mode a lot in Panama. In the low light under the canopy and on rainy days it seemed to lock on focus more quickly and more accurately than standard modes. The downside is that it is fixed to High Speed Continuous shooting and I sometimes did not want to shoot 7 frames and wait for the buffer to clear before I could take another burst. For those situations I used my custom bird and wildlife mode: manual focus square set to normal (it seems faster than small at higher magnifications where there might not be much in the smaller square), Low Speed Continuous, Low Noise Reduction, Standard Picture Control, -1/3 EV exposure compensation, Auto ISO and Color Balance.
Neither mode gave me shutter speeds in the dim light that I was comfortable with…but…and this is huge!…the 5 Stop Vibration Reduction image stabilization in the Nikon enabled me to shoot satisfying images down to 1/125 on a regular basis…and I even got some excellent results at 1/30 of a second when the ISO went up to 1600. Once I saw those on my Surface Pro screen in my daily review of images, I gave up worrying about shutter speed and just let the camera do its thing! The alternative would have been going to Shutter Preferred, but that would have driven the ISO up even higher, or resulted in underexposed images like the ones I brought back from Honduras. All in all I am more than pleased with the P900’s performance in auto modes. I am convinced I could not have gotten the images I did with any other camera (especially without one of those projection fill flashes the pros use).
I will post a few galleries of images from various locations, or you can see the whole set at my WideEyedInWonder site. Here.
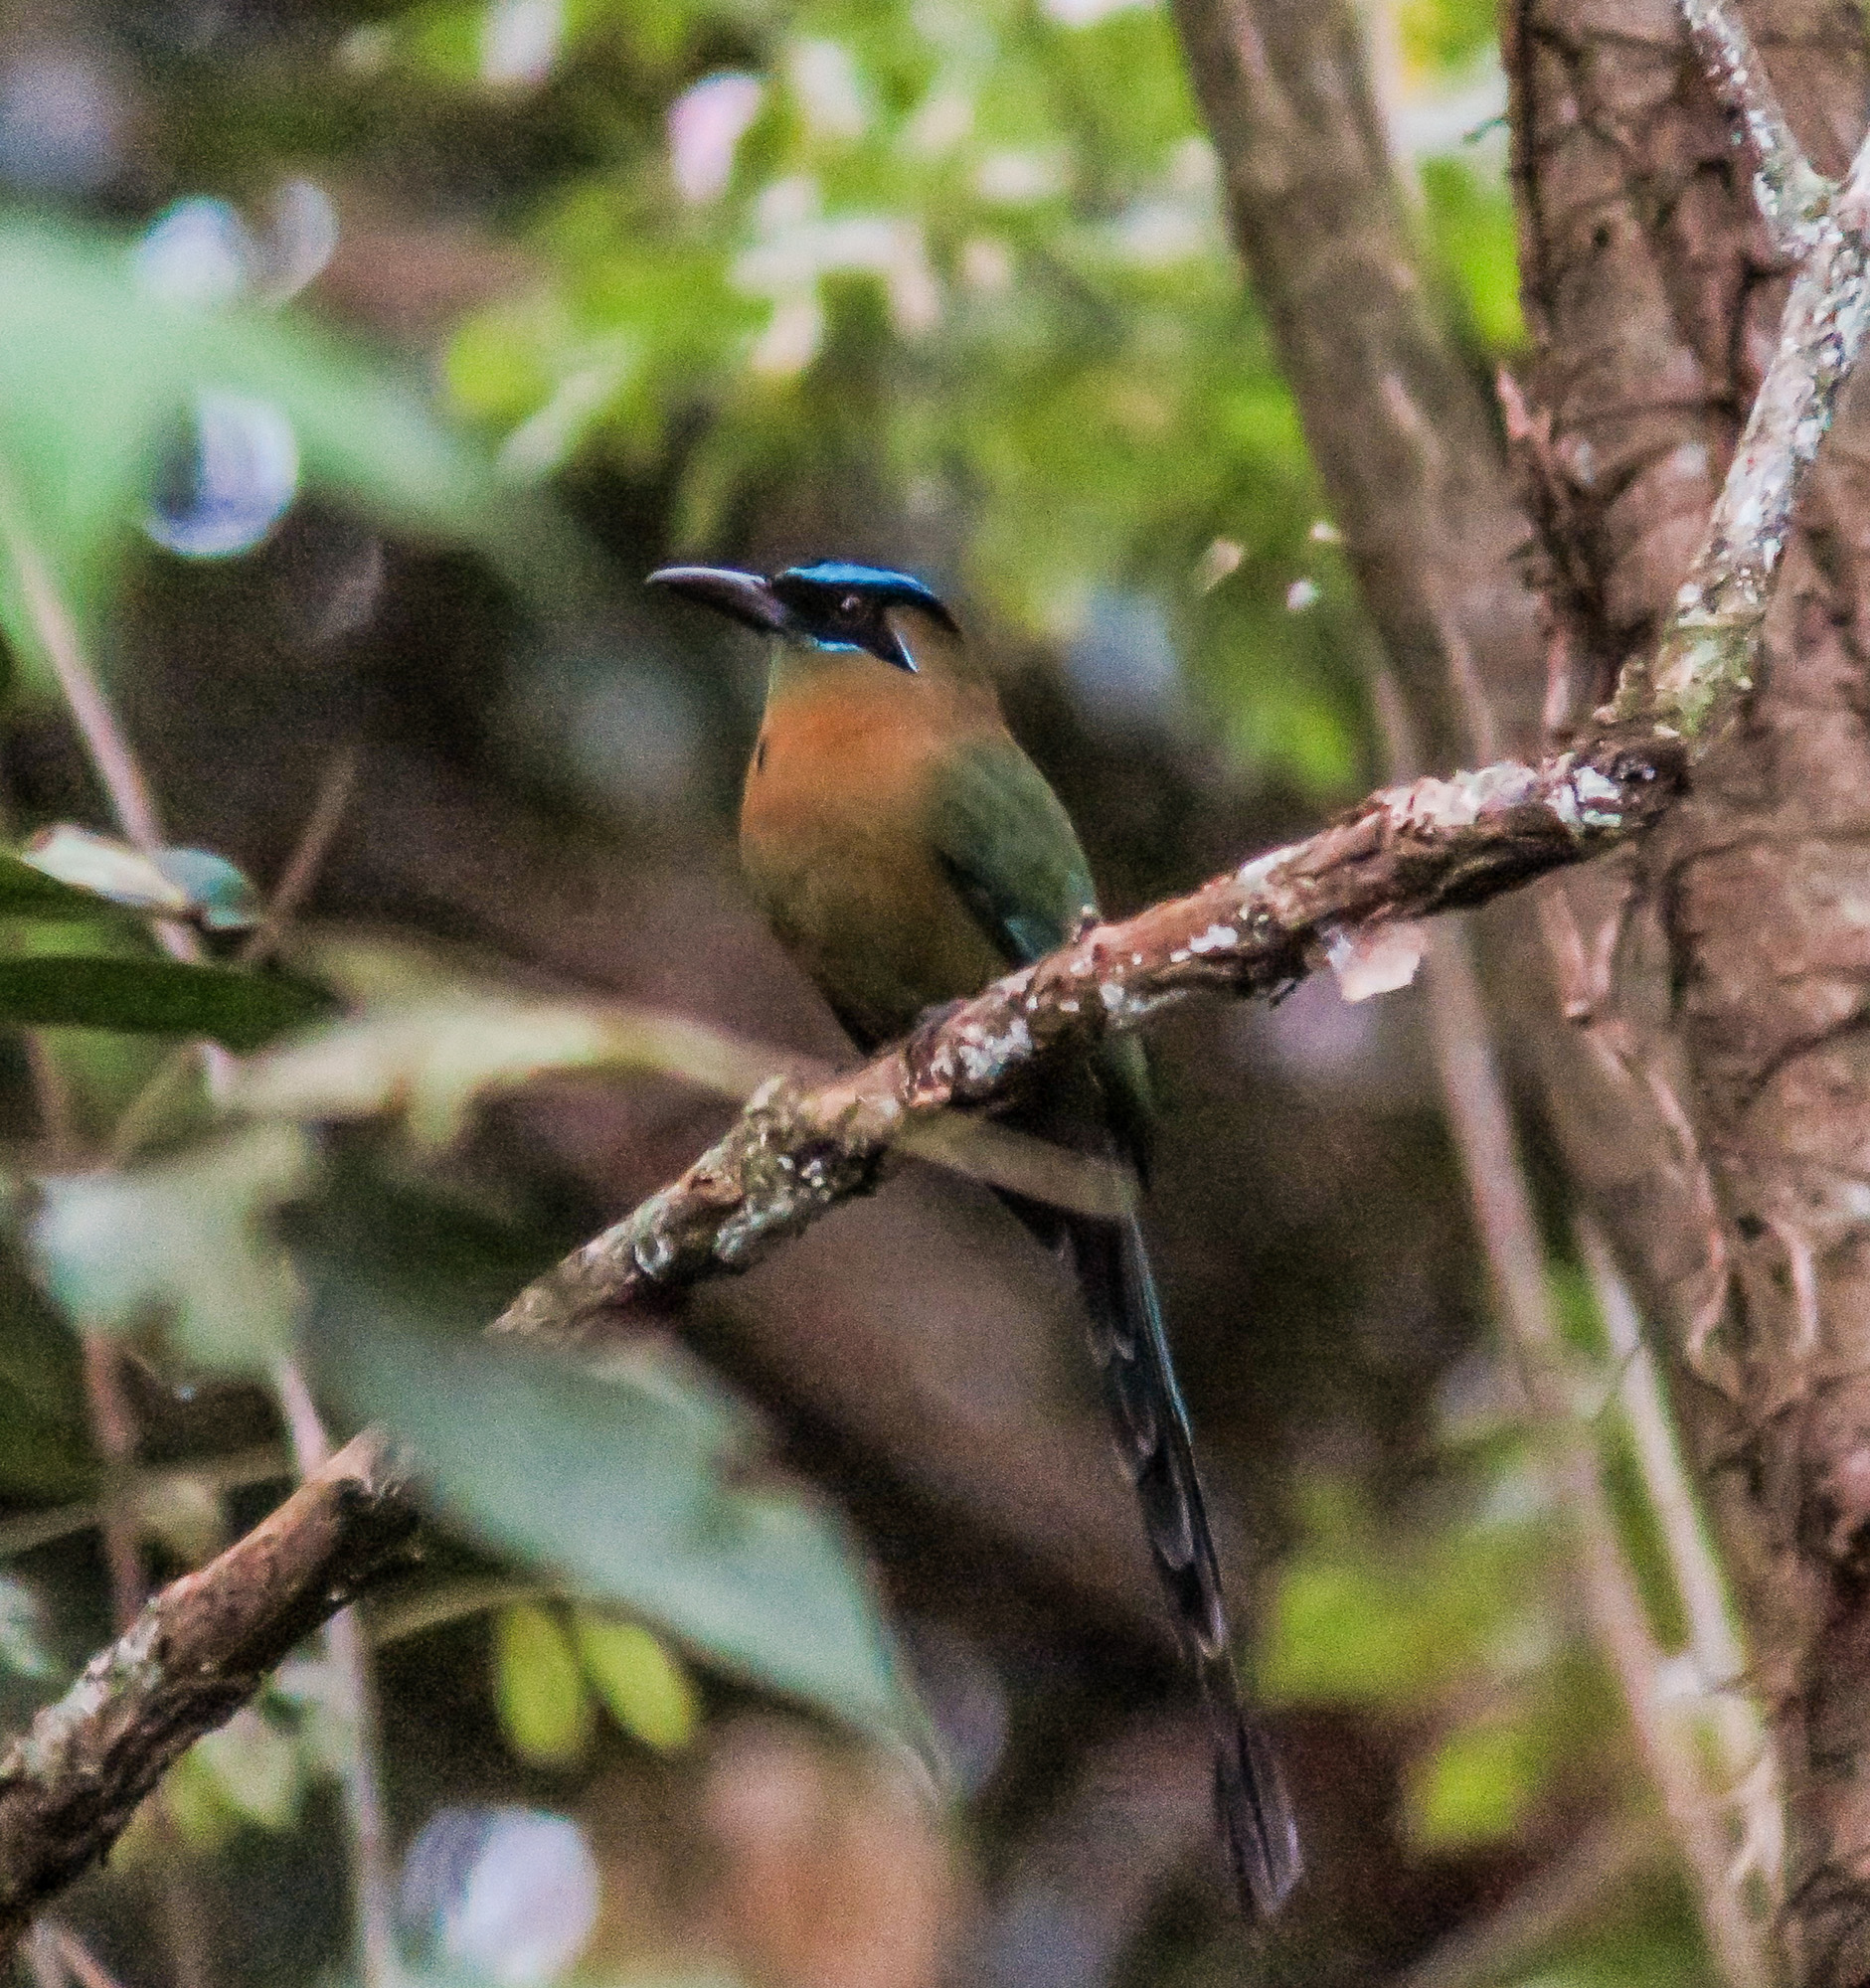
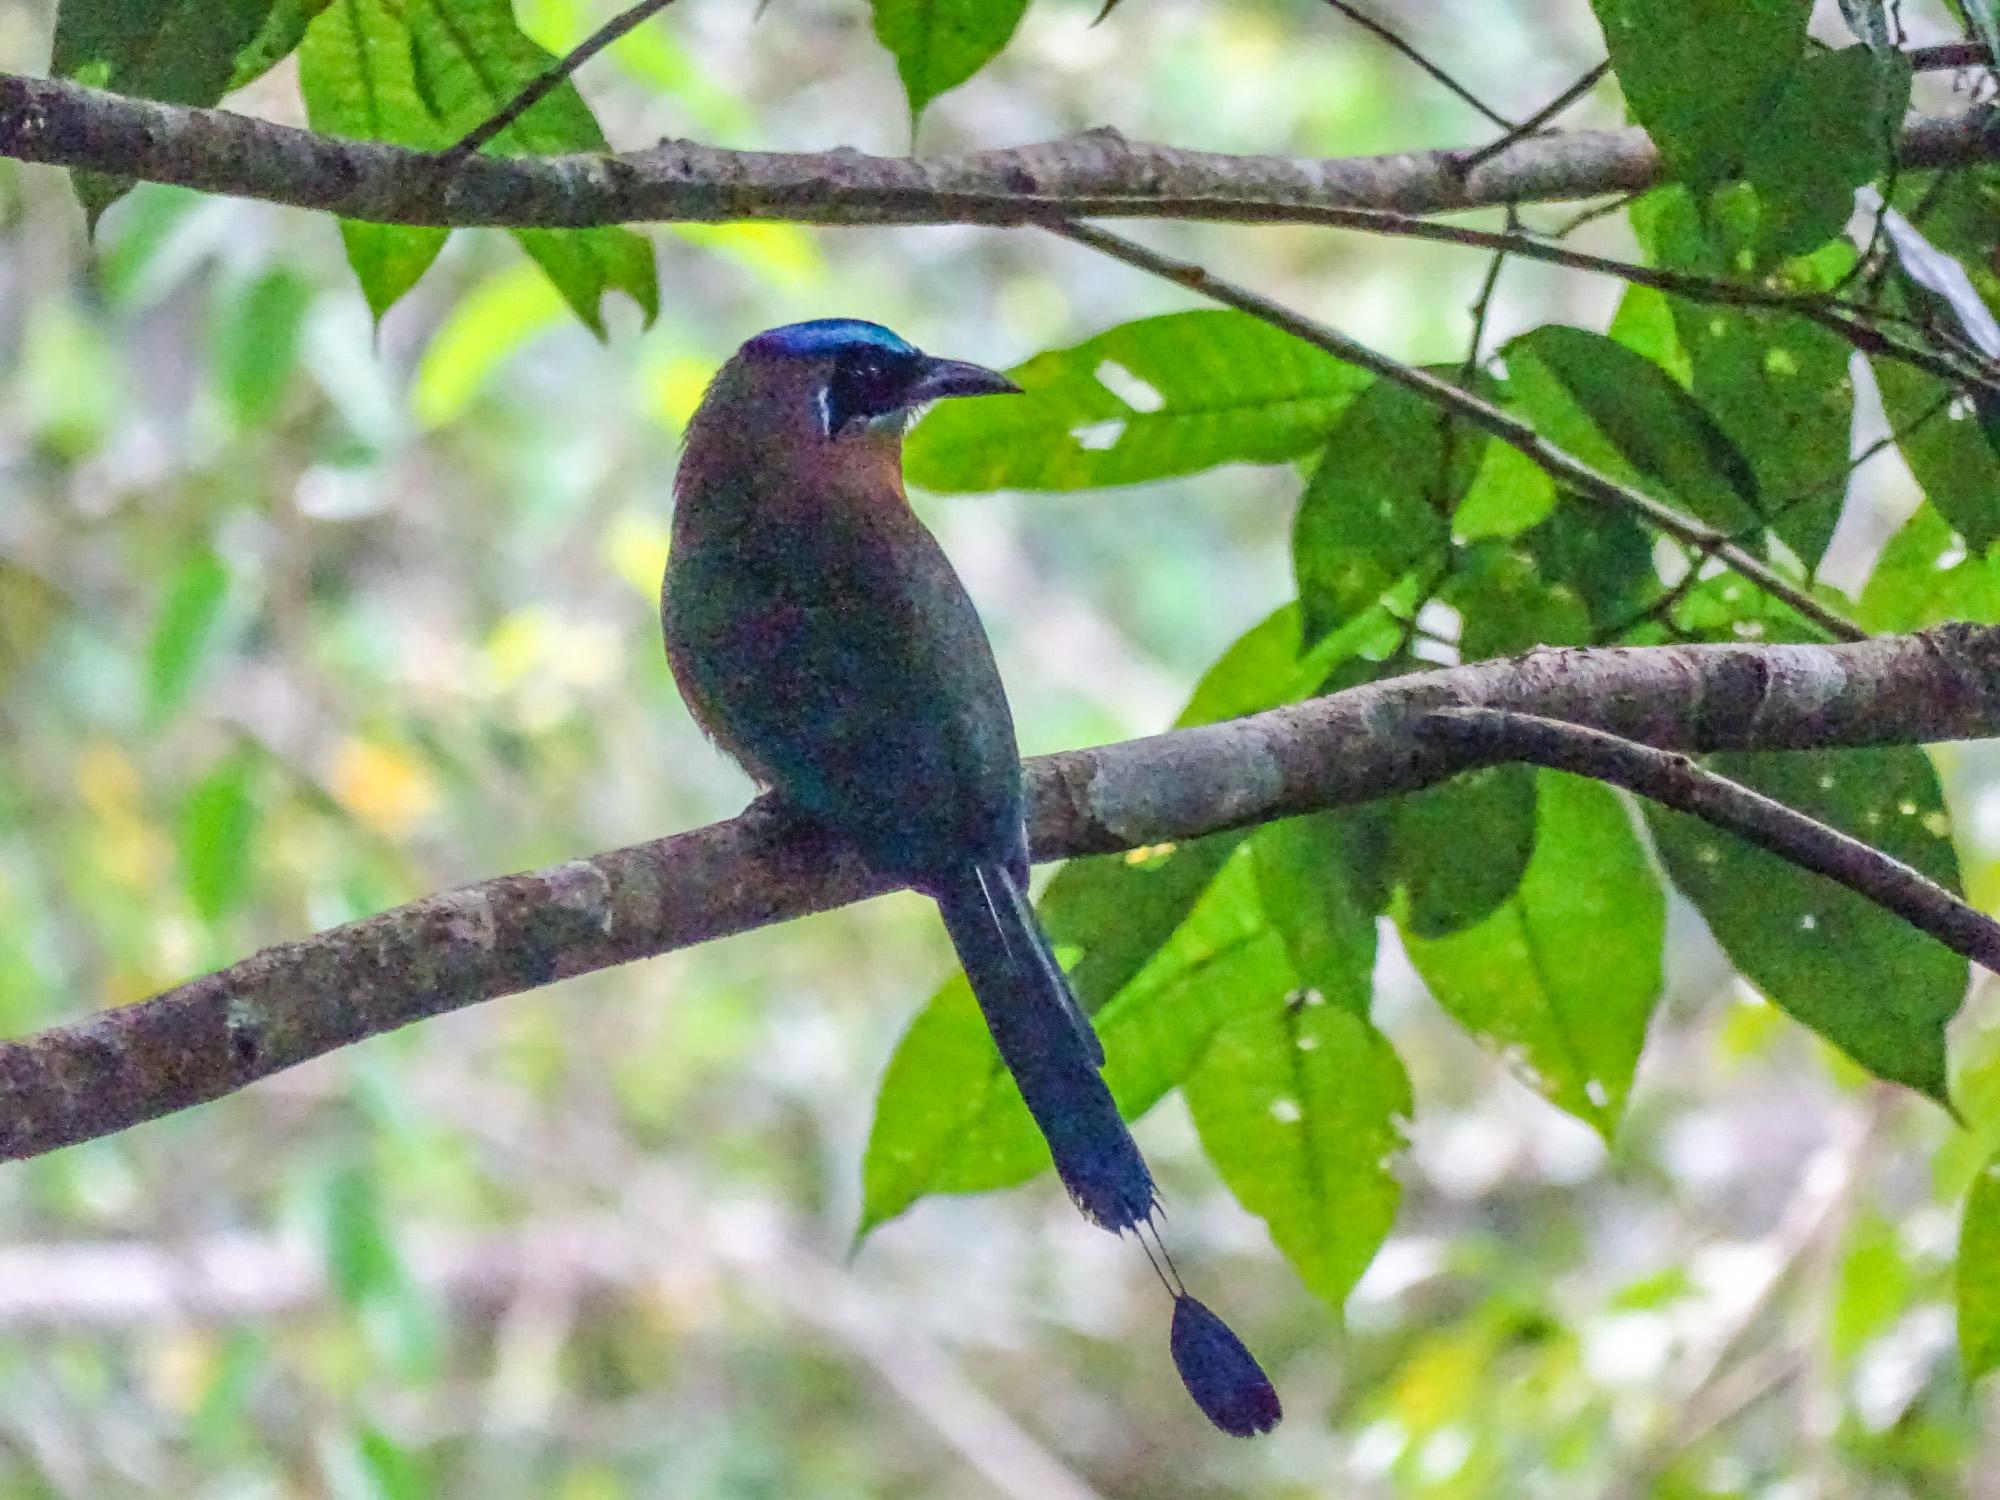
These shots are all from the deck surrounding the community/dining room at the Lodge.
Great-crested Flycatcher, Tranquilo Bay Lodge, Panama
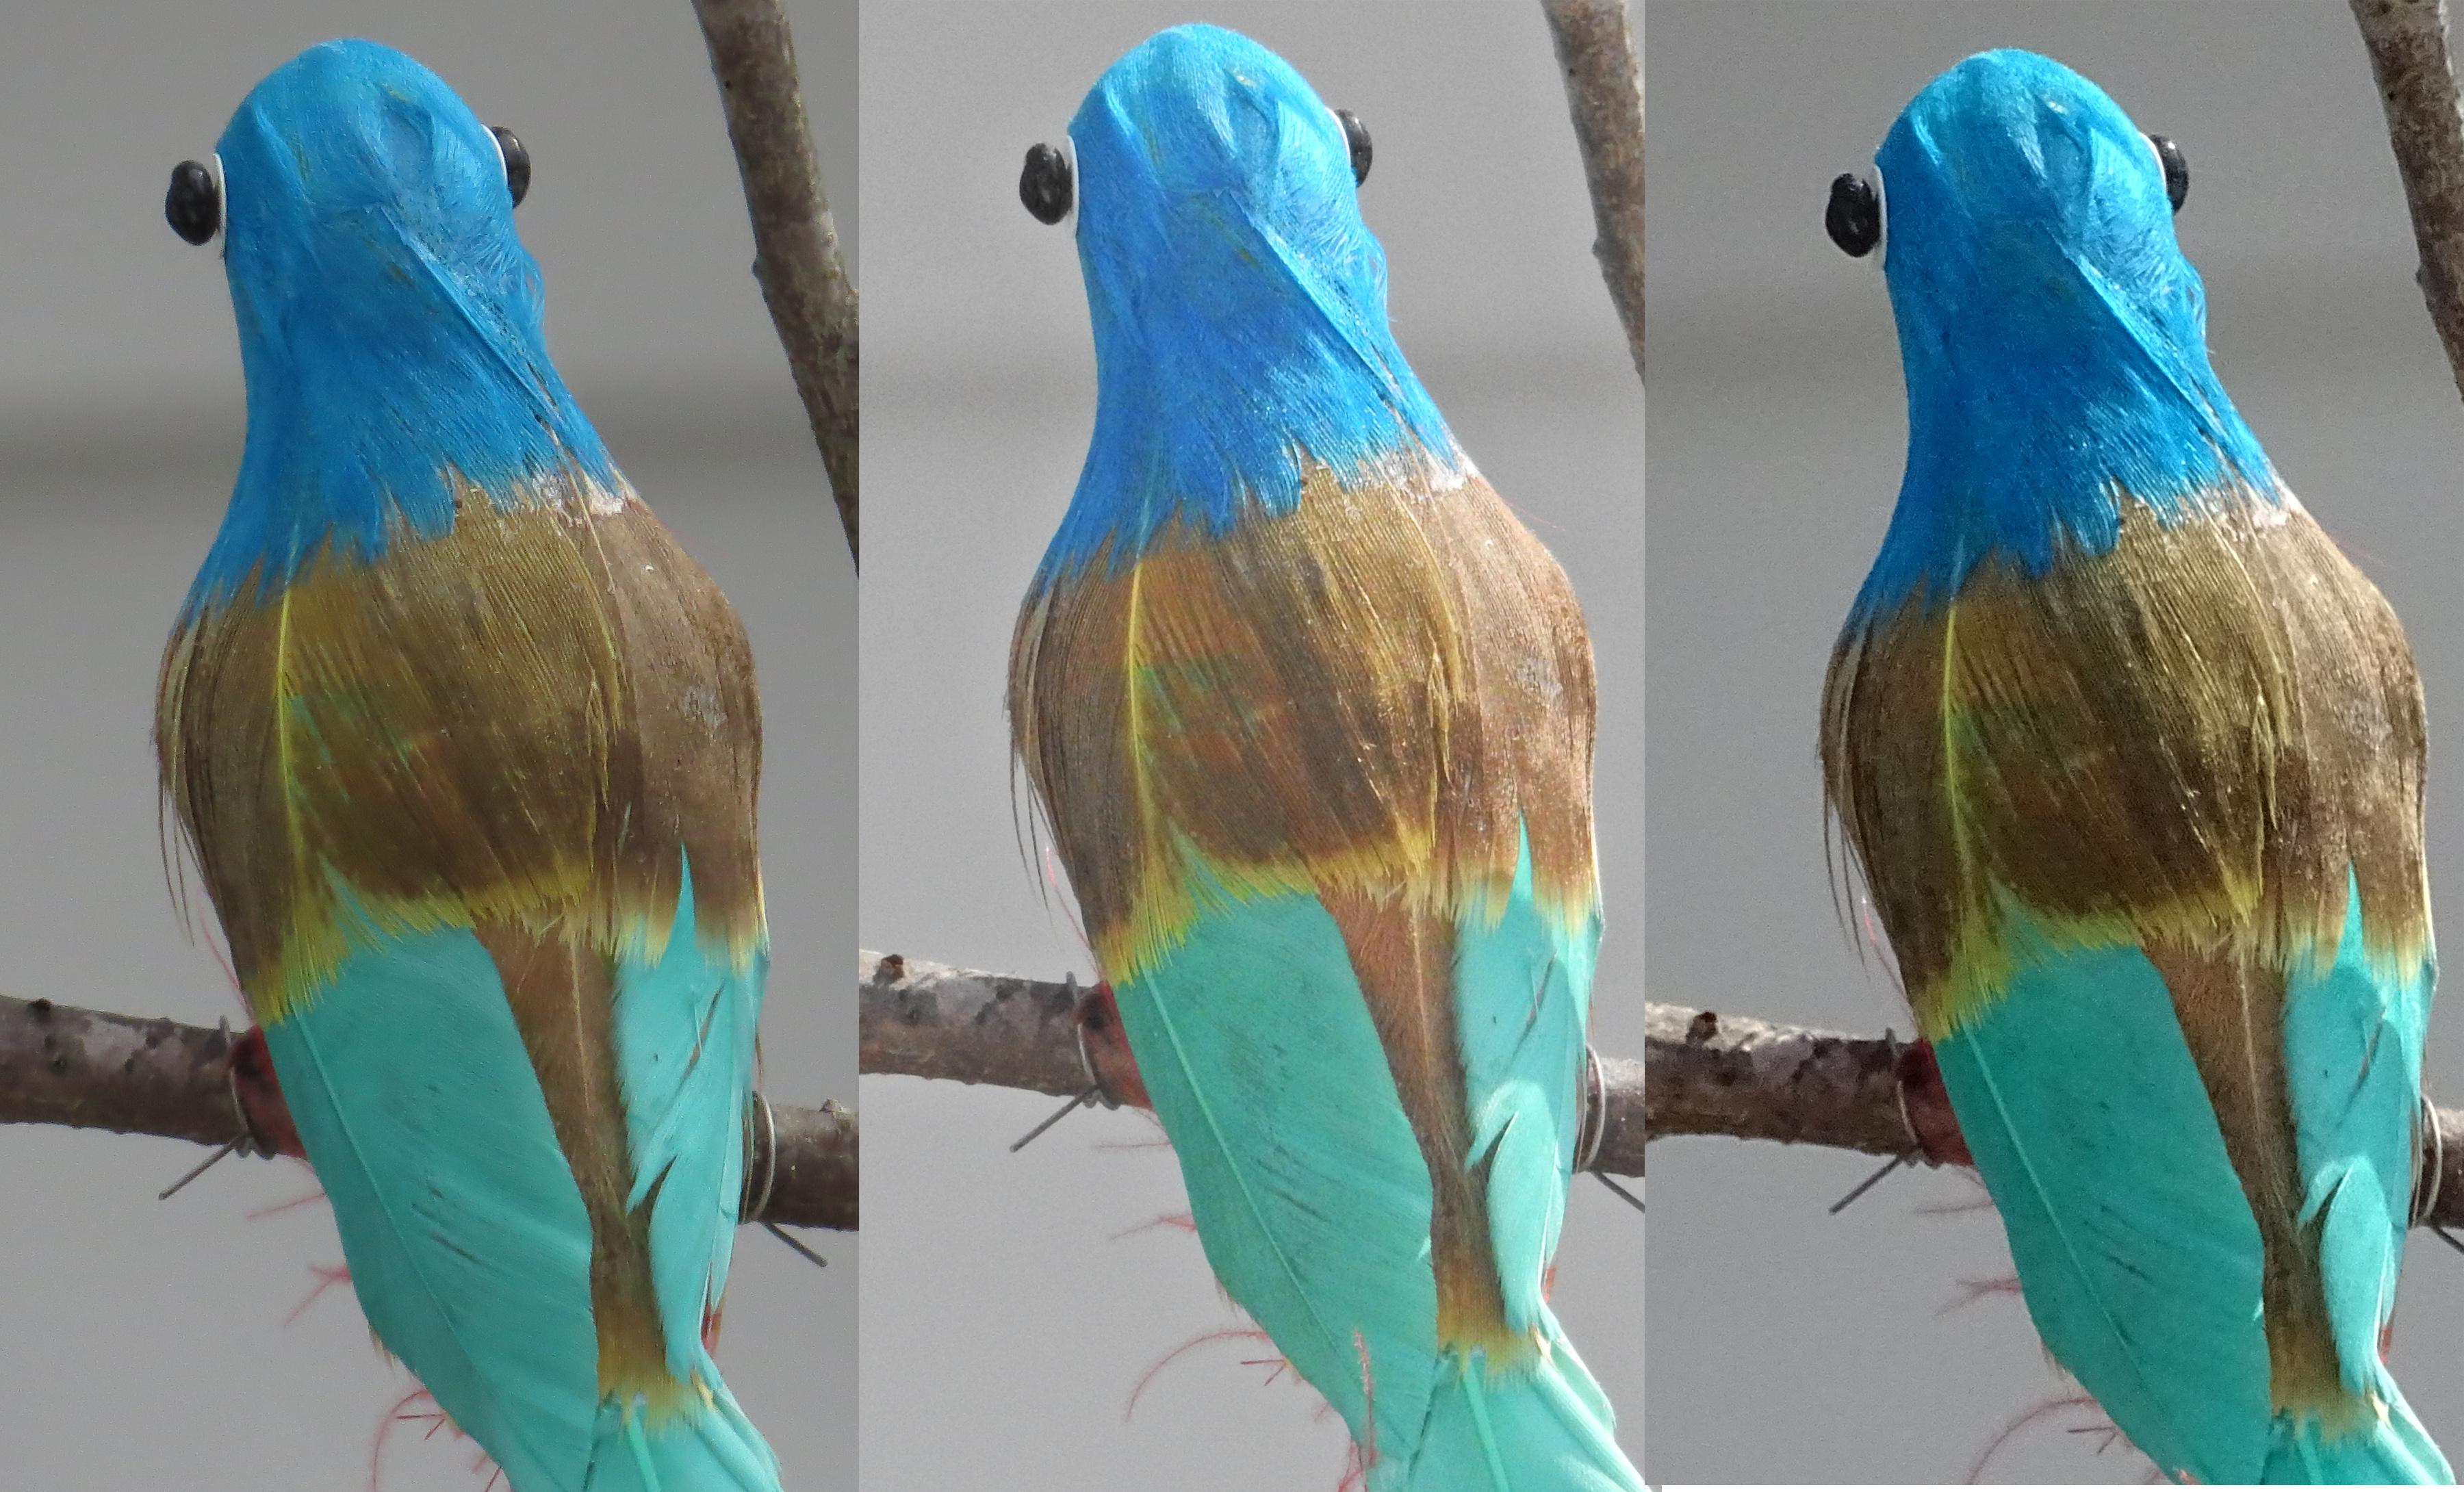
Im M Blue Dacnis, Tranquilo Bay Lodge, Panama
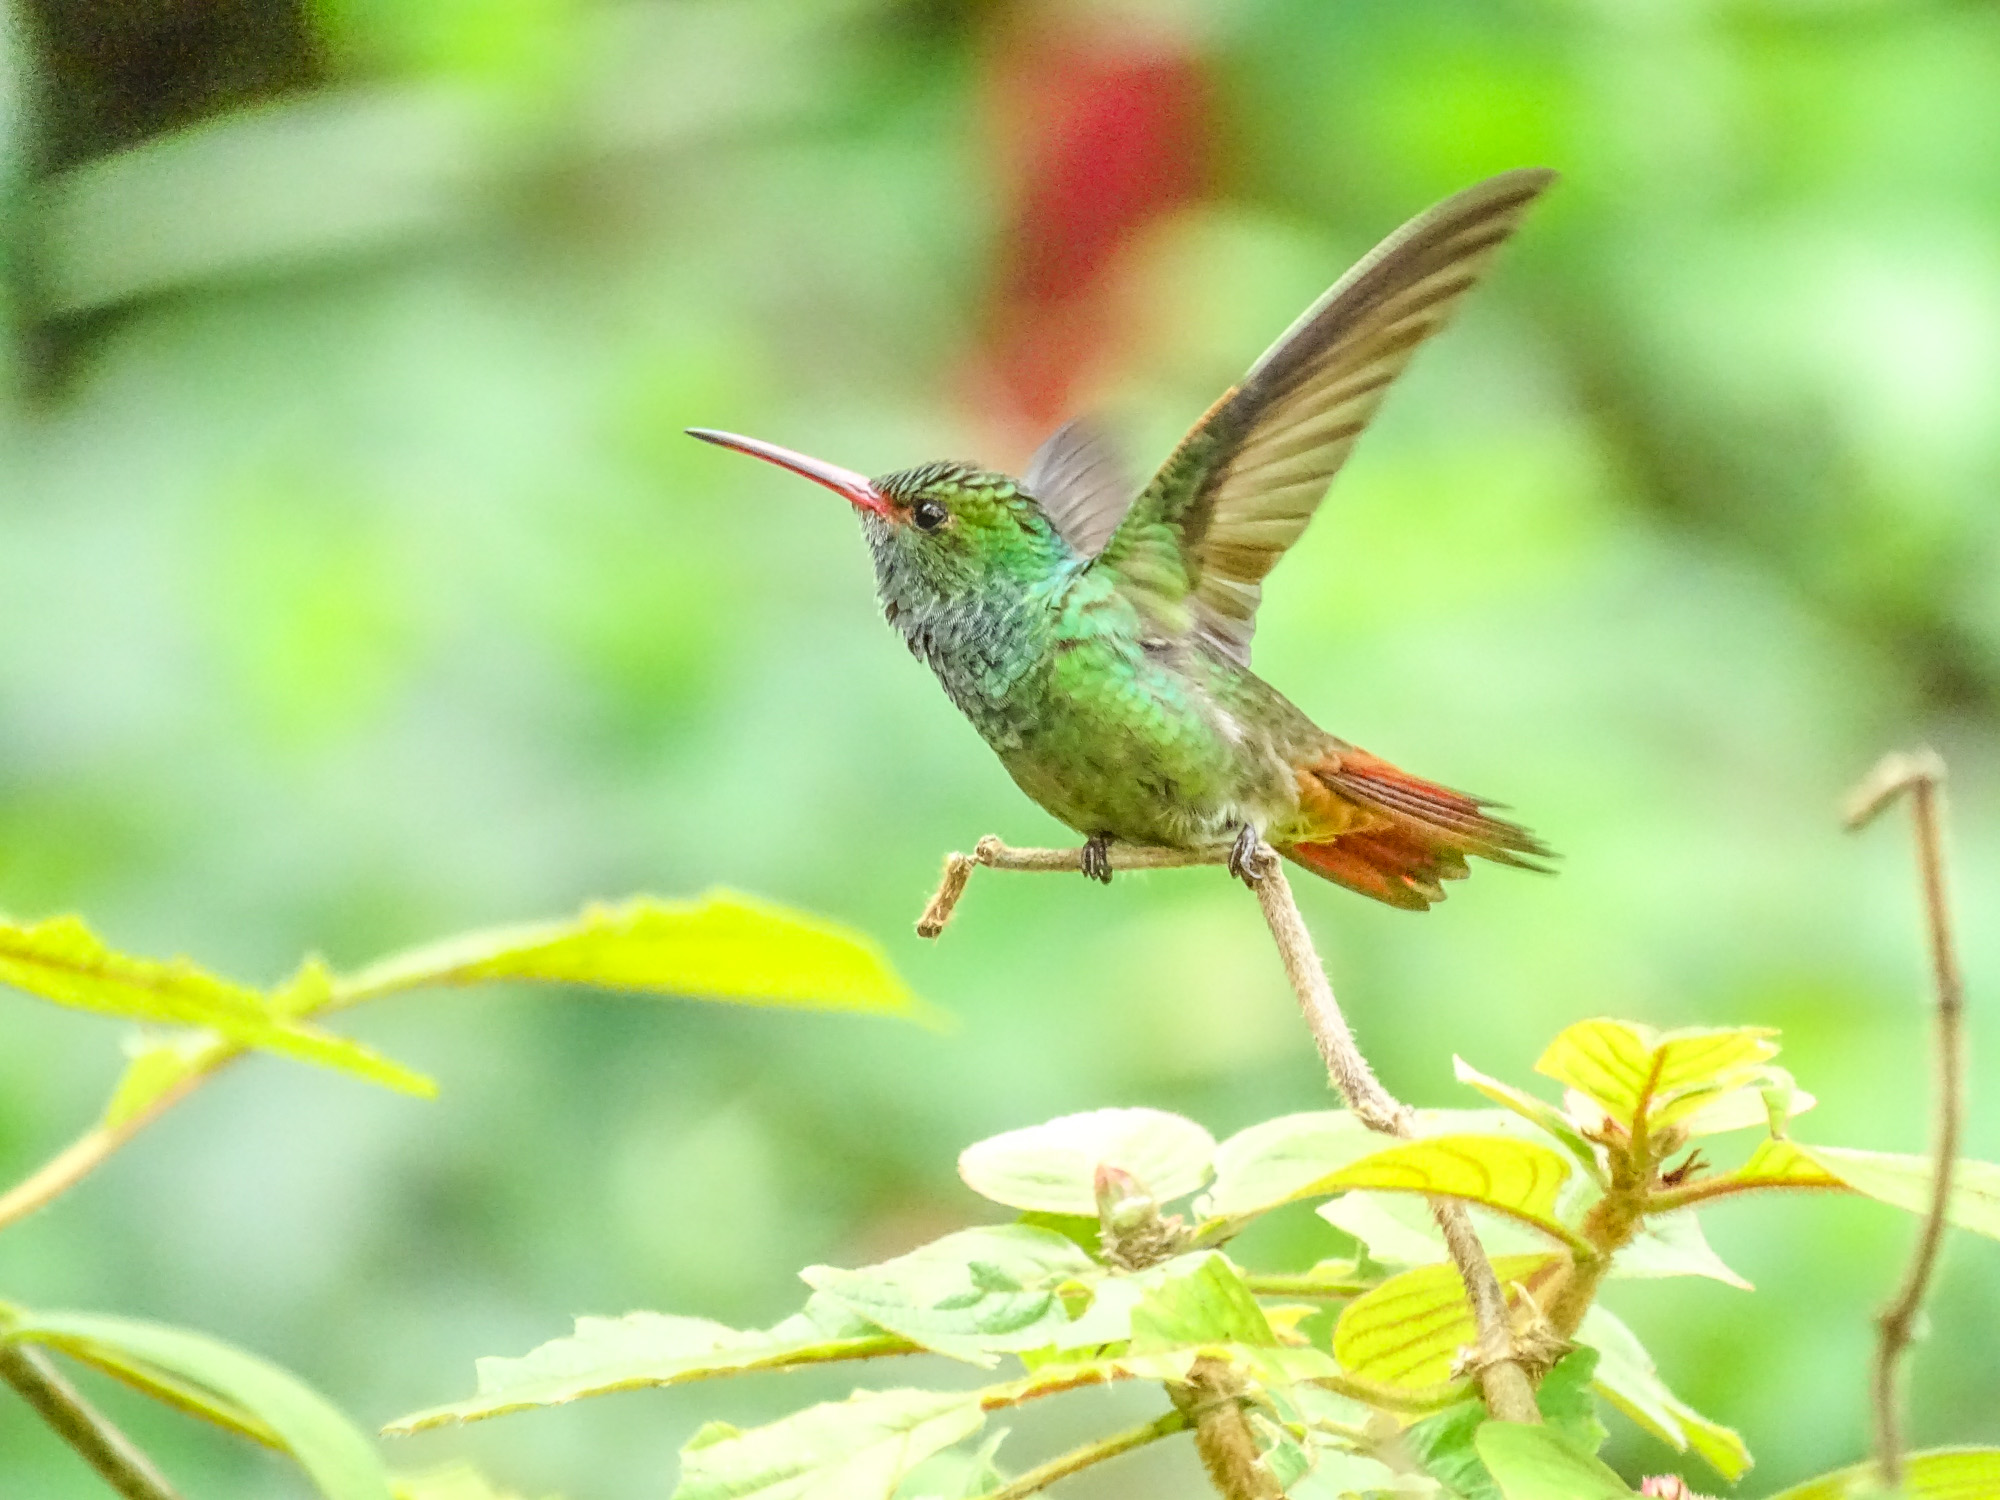
Rofous-tailed Hummingbird, Tranquilo Bay Lodge, Panama
Prothonatory Warbler, Tranquilo Bay Lodge, Panama
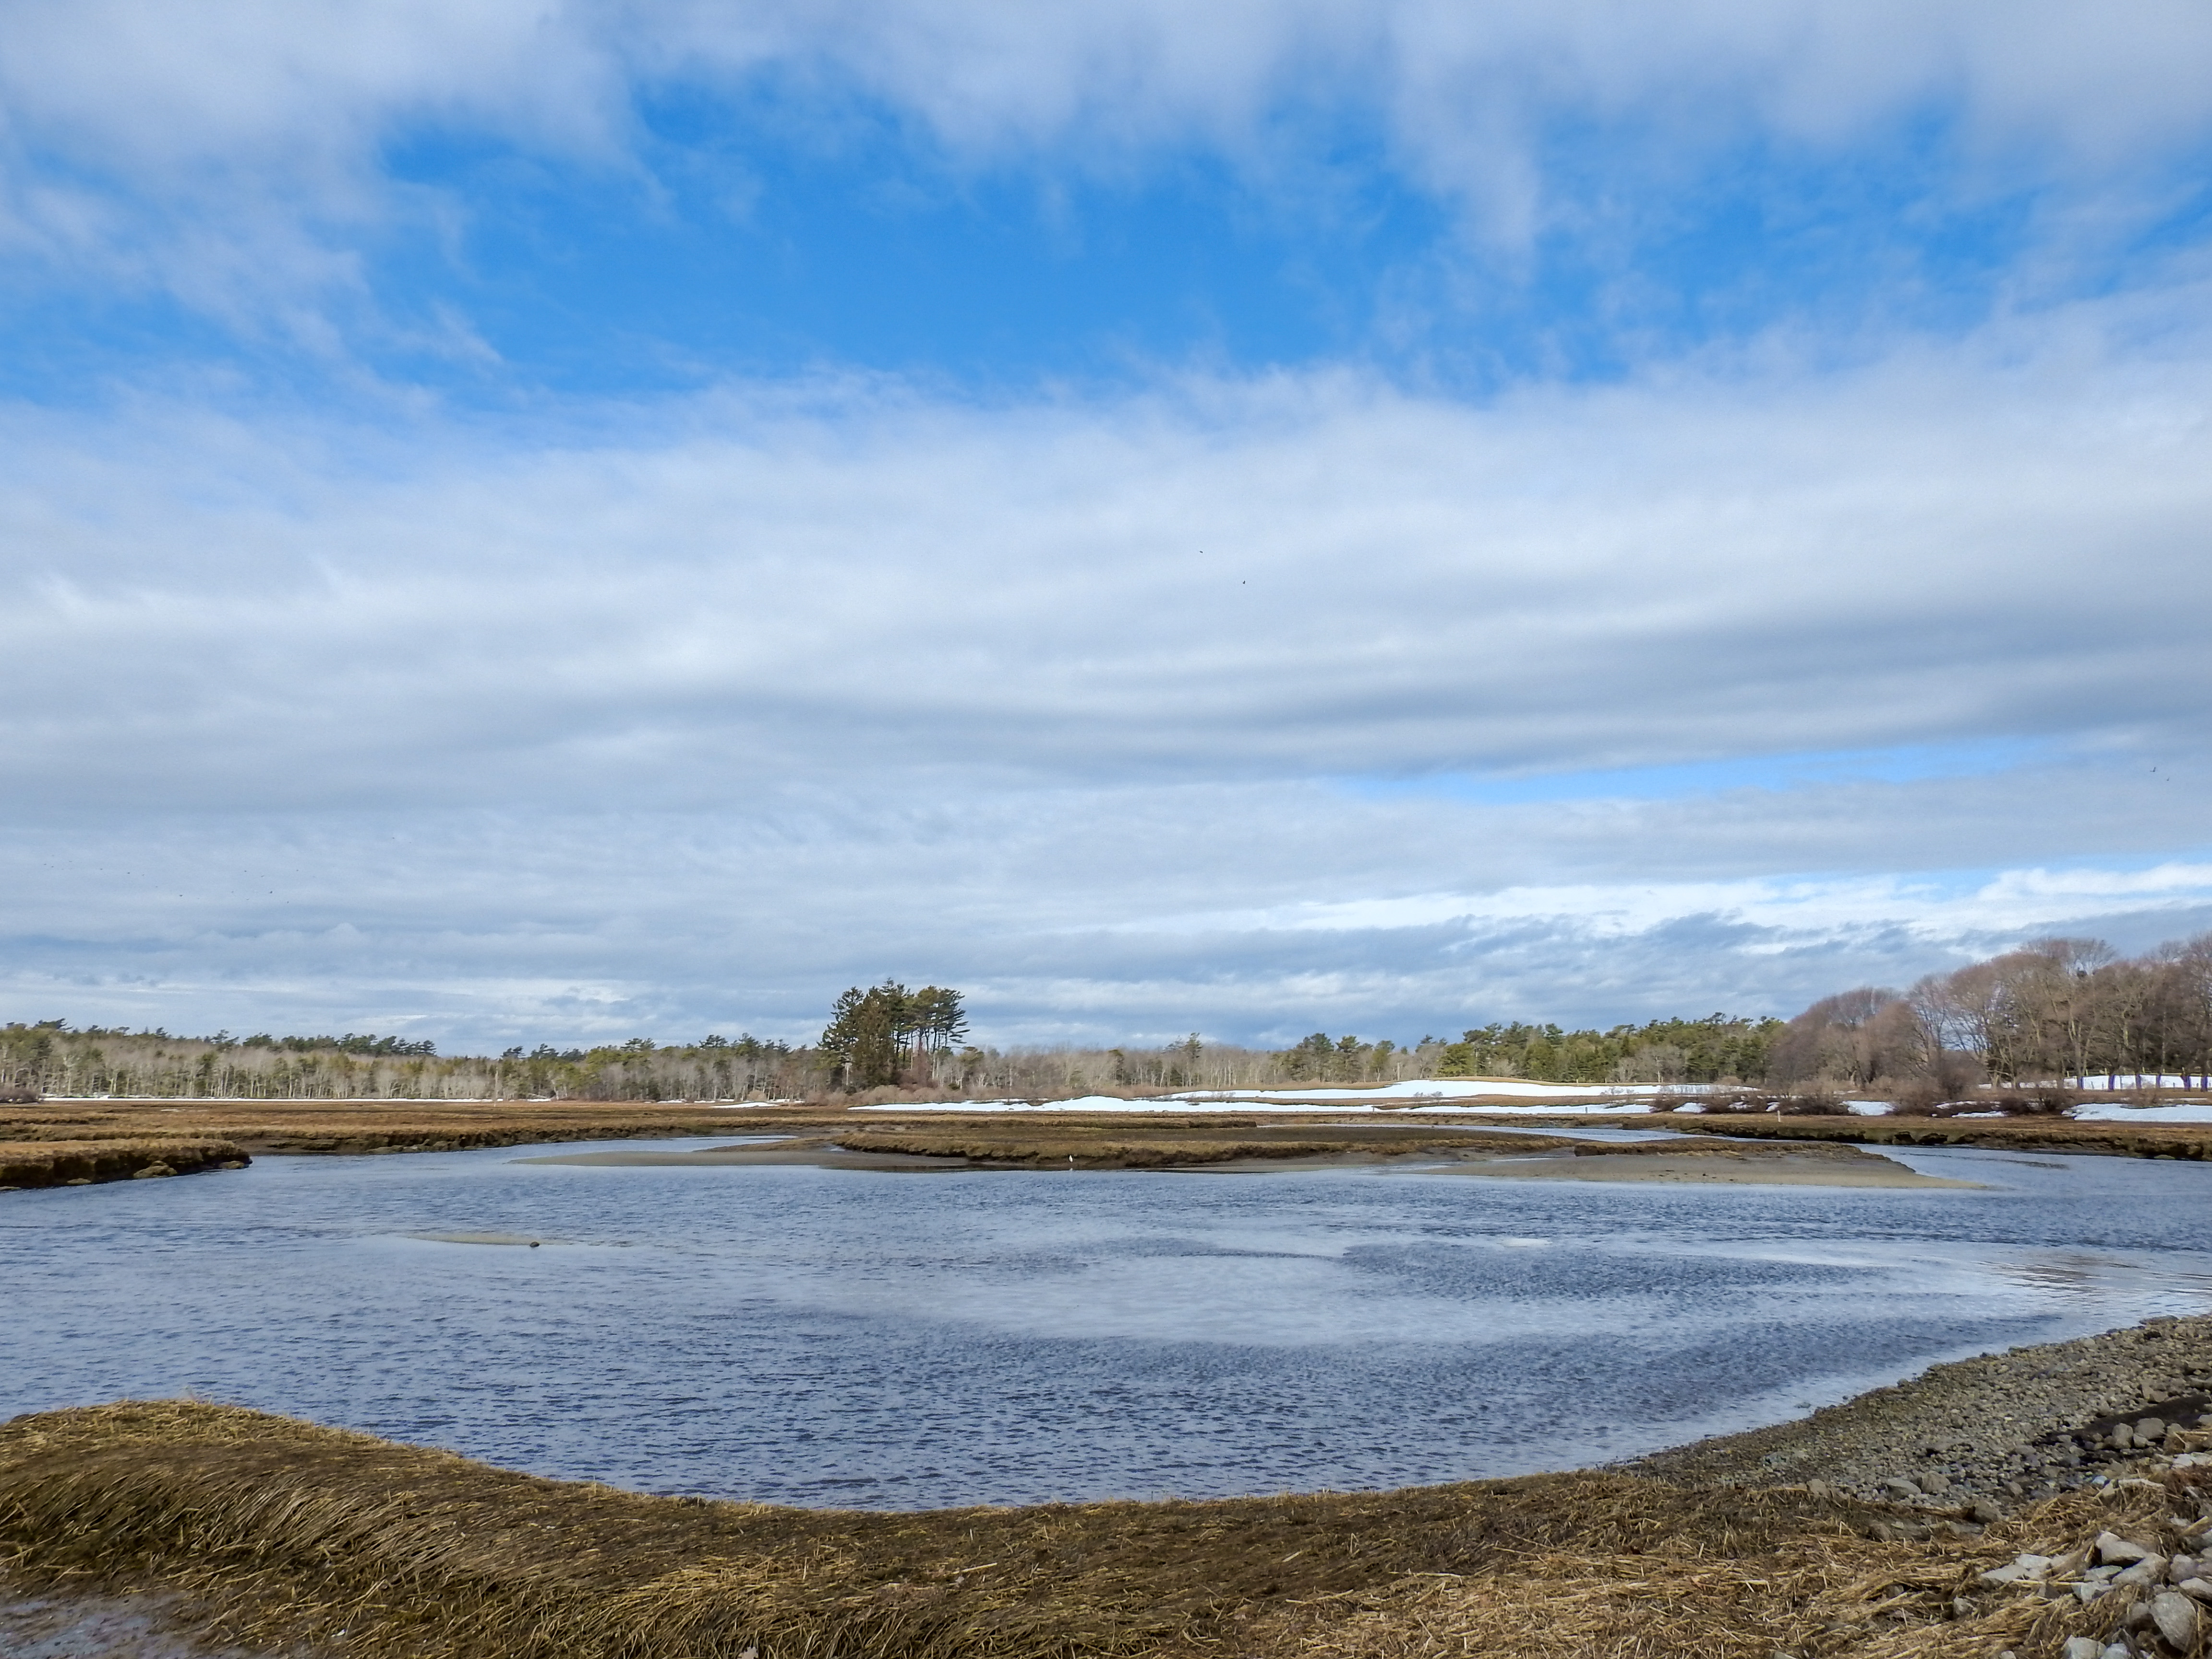
View from the deck, Tranquilo Bay Lodge, Panama
Red-legged Honeycreeper (f) Tranquilo Bay Lodge, Panama
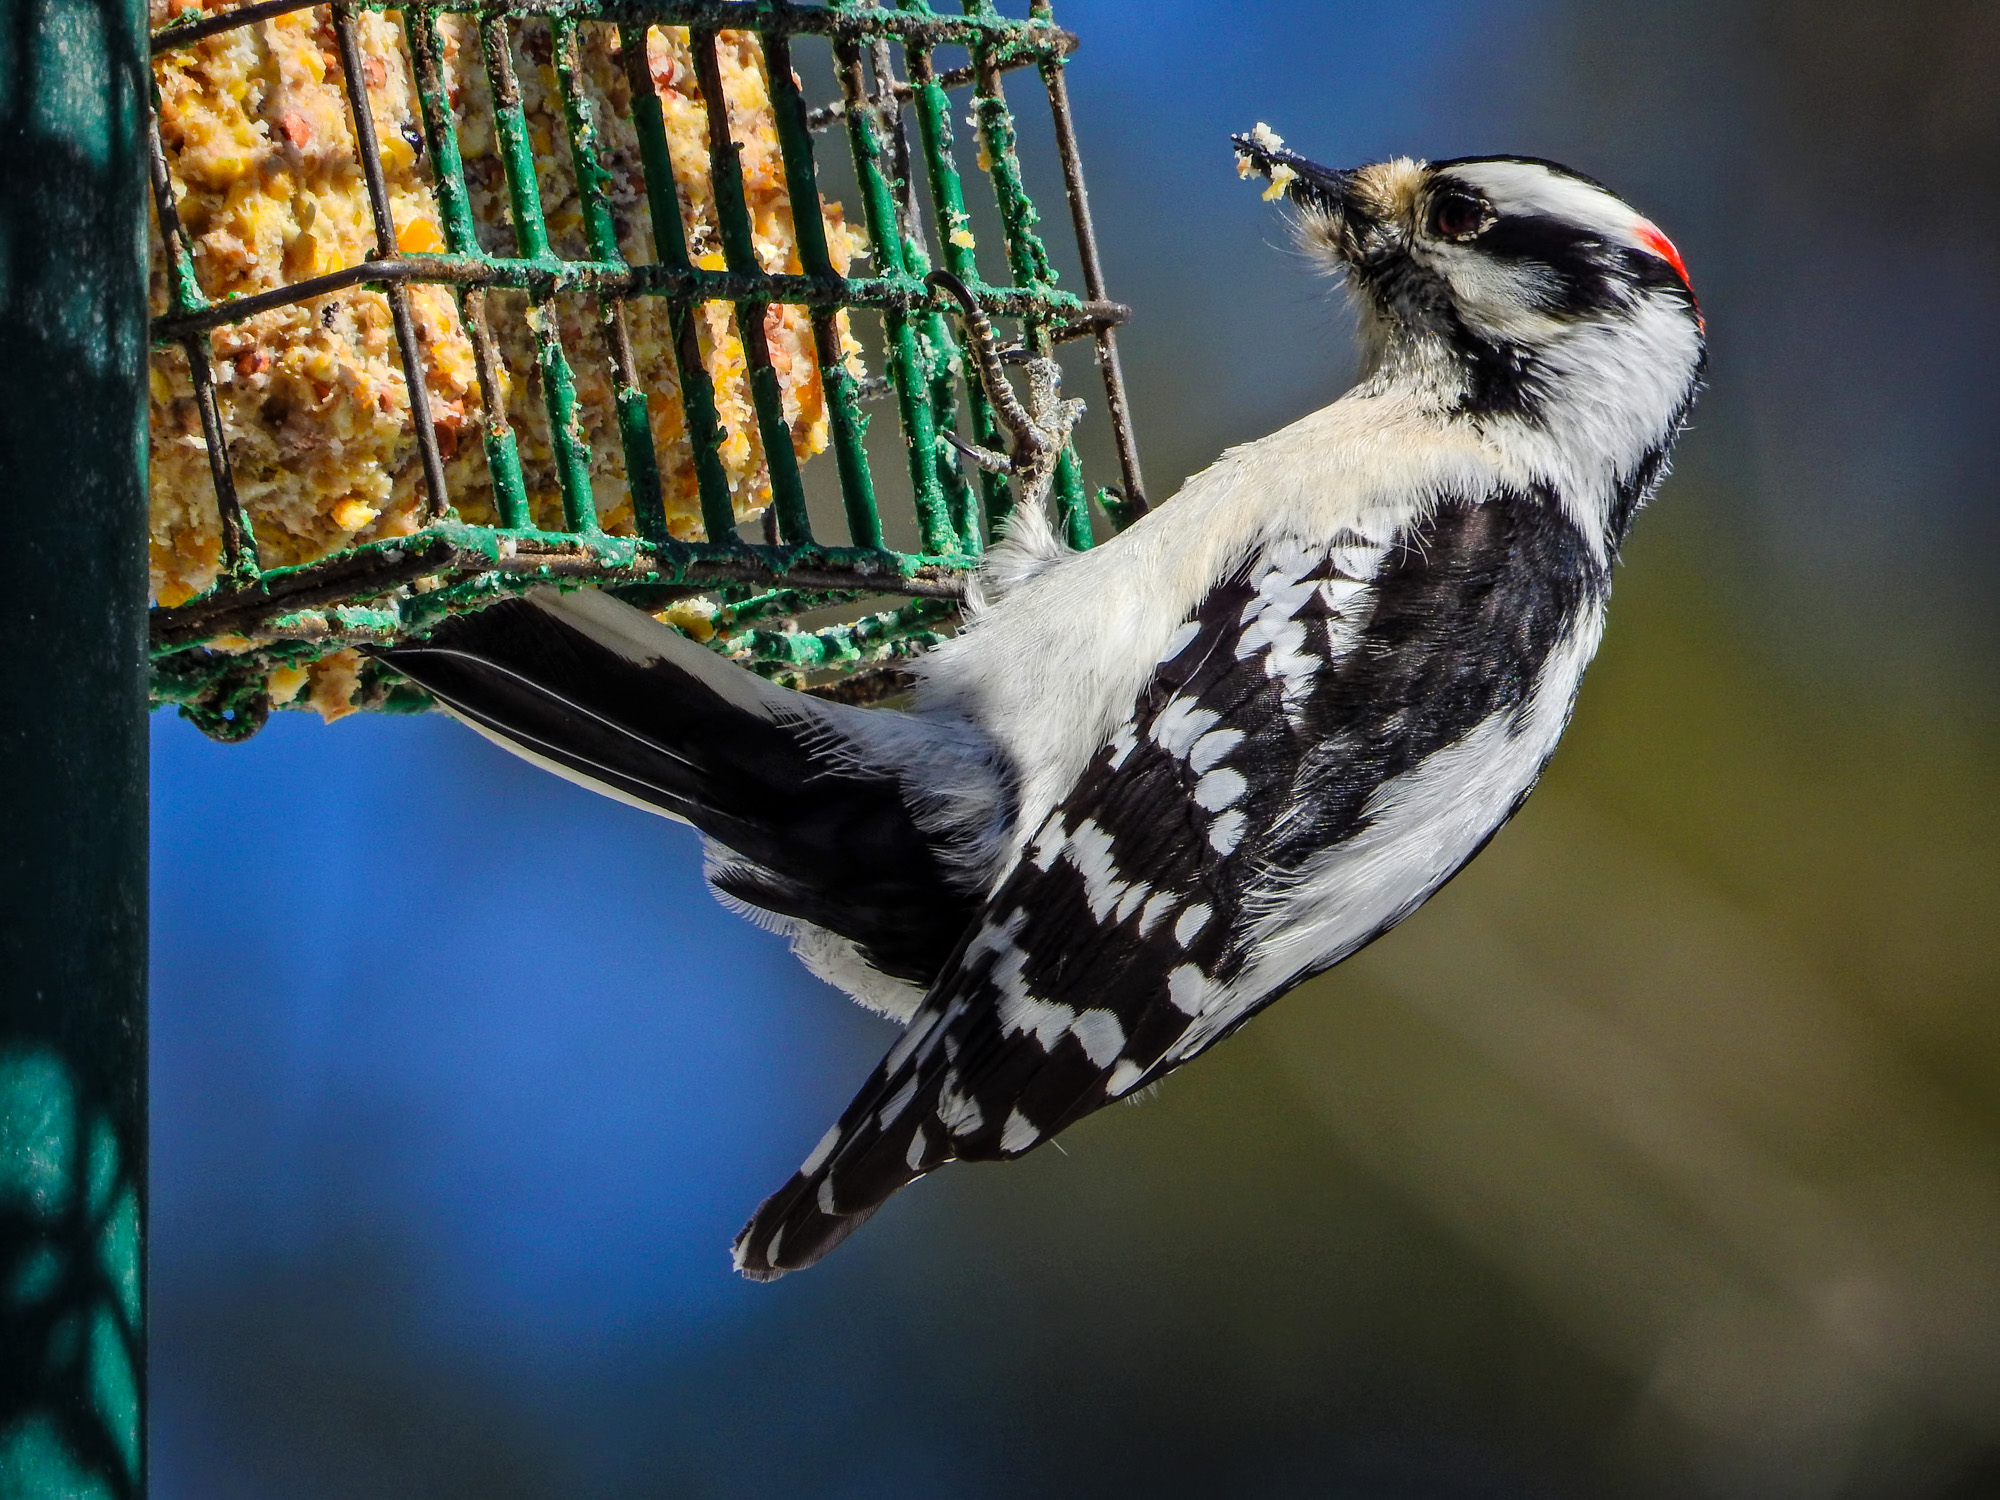
Black-cheeked Woodpecker, Tranquilo Bay Lodge, Panama
Shinning Honeycreeper, Tranquilo Bay Lodge, Panama
Rose-breasted Grosbeak, Tranquilo Bay Lodge, Panama
Shinning Honeycreeper, Tranquilo Bay Lodge, Panama
Forest Elaenia, Tranquilo Bay Lodge, Panama
Tranquilo Bay Lodge, Panama
Green Honeycreeper, Tranquilo Bay Lodge, Panama
White-fronted Pigeon, Tranquilo Bay Lodge, Panama
Molting Summer Tanager, Tranquilo Bay Lodge, Panama
Green Honeycreeper (f), Tranquilo Bay Lodge, Panama
Tranquilo Bay Lodge, Panama
We hiked out, one afternoon, to see a Bird-eating Tree Snake the workers had found on the edge of the cleared ground at the Lodge. While we were out, and already wet, we hiked on into the rain-forest to see Golden-collared Manakins on the leck under deep canopy (in the rain). The Manakins are miraculous shots, considering the conditions. Hand held. And great birds. The males clear a lecking pad about 2.5 feet square, removing all vegetation. There they put on their wing-popping display to try to attract females.
Bird-eating Snake, Tranquilo Bay Lodge, Panama
Golden-collared Manakin, Tranquilo Bay Lodge, Panama
Golden-collared Manakin, Tranquilo Bay Lodge, Panama
Frogs and lizards (spiders too) from Popo Island. Also some Keel-billed and Black-mandibled Toucans and a Snowy Cotinga photographed from the boat on the way.
Our frog guide. Popa Island, Panama
Poison Dart Frog, Popa Island, Panama
Anole, Popa Island, Panama
Popa Island, Panama
Popa Island, Panama
Poison Dart Frog, Popa Island, Panama
Poison Dart Frogs, Popa Island, Panama
Popa Island, Panama
Popa Island, Panama
Poison Dart Frog, Popa Island, Panama
Popa Island, Panama
Popa Island, Panama
Popa Island, Panama
Popa Island, Panama
Green Basalisk Lizard, Popa Island, Panama
Green Basalisk, Popa Island, Panama
Black-mandibled Toucan, Popa Island, Panama
Black-mandibled Toucan, Popa Island, Panama
White Cotinga, Popa Island, Panama
Popa Island, Panama
Popa Island, Panama
We got to the Green Acres Chocolate Farm late, due to rain in the morning, so many of the birds had already moved in deeper and up higher for the day. Still it was a great location. I am certain it is spectacular on a nice clear morning.
Orchid, Green Acres Chocolate Farm, Bocas del Toro, Panama
White-lined Bat, Green Acres Chocolate Farm, Bocas del Toro, Panama
Purple-throated Fruit Crow, Green Acres Chocolate Farm, Bocas del Toro, Panama
Yellow-headed Gecko, Green Acres Chocolate Farm, Bocas del Toro, Panama
Poison Dart Frog, Green Acres Chocolate Farm, Bocas del Toro, Panama
Green Acres Chocolate Farm, Bocas del Toro, Panama
Walking Palm, Green Acres Chocolate Farm, Bocas del Toro, Panama
Three-toed Sloth, Green Acres Chocolate Farm, Bocas del Toro, Panama
Green Acres Chocolate Farm, Bocas del Toro, Panama
Golden Orb-weaver Spider, Green Acres Chocolate Farm, Bocas del Toro, Panama
Green Acres Chocolate Farm, Bocas del Toro, Panama
Blue-eyed Sailor, Green Acres Chocolate Farm, Bocas del Toro, Panama
Green Acres Chocolate Farm, Bocas del Toro, Panama
Green Acres Chocolate Farm, Bocas del Toro, Panama
Green Acres Chocolate Farm, Bocas del Toro, Panama
Green Acres Chocolate Farm, Bocas del Toro, Panama
White Peacock, Green Acres Chocolate Farm, Bocas del Toro, Panama
One of the best things about Tranquilo Bay is that the islands are off-shore from the highest point in the mountains that make up the backbone of Central America…and there is a good road right up and over a 4000 foot pass, which takes you well into the Cloud Forest, and then on down the Pacific Slope. It is a 40 minute boat ride to the mainland dock, and then you can be in Cloud Forest via van in less than an hour…or you could be if you could resist stopping to bird along the way 🙂 But then you would miss the spot where the Boat-billed Herons nest behind the gas station, or the nesting Plumbeous Kites, the Sloths and Toucans. We got rained out on the Caribbean side of the pass, but on a normal day, we could have birded both slopes of the mountains for a wide variety of species. As it was we found a number of high altitude species, as well as some North American Warbler passing through.
Brown Boobie, Chiriqui Grande, Panama
Chiriqui Grande, Panama
Chiriqui Grande, Panama
Chiriqui Grande, Panama
Laughing Falcon, Chiriqui Grande, Panama
Laughing Falcon, Chiriqui Grande, Panama
Turkey Vultures, Chiriqui Grande, Panama
Migrating Plumbeous Kites, Punte Peña, Panama
Paserini’s Tanager (m+f) Punte Peña, Panama
Keel-billed Toucan, Punte Peña, Panama
Reserva Forestal De Fortuna, Panama
Dragonfly, Reserva Forestal De Fortuna, Panama
Squirrel Cuckoo, Reserva Forestal De Fortuna, Panama
Black and White Warbler, Reserva Forestal De Fortuna, Panama
Chestnut-sided Warbler, Reserva Forestal De Fortuna, Panama
Blackburnian Warbler, Reserva Forestal De Fortuna, Panama
Banded Peacock, Reserva Forestal De Fortuna, Panama
Reserva Forestal De Fortuna, Panama
Glass-winged Butterfly, Reserva Forestal De Fortuna, Panama
Reserva Forestal De Fortuna, Panama
Reserva Forestal De Fortuna, Panama
White Hawk, Reserva Forestal De Fortuna, Panama
Five-striped Sparrow, Reserva Forestal De Fortuna, Panama
Grove-billed Ani, Punte Peña, Panama
Plumbious Kite, Punte Peña, Panama
Black Jay, Punte Peña, Panama
Brown-headed Chaculaca, Punte Peña, Panama
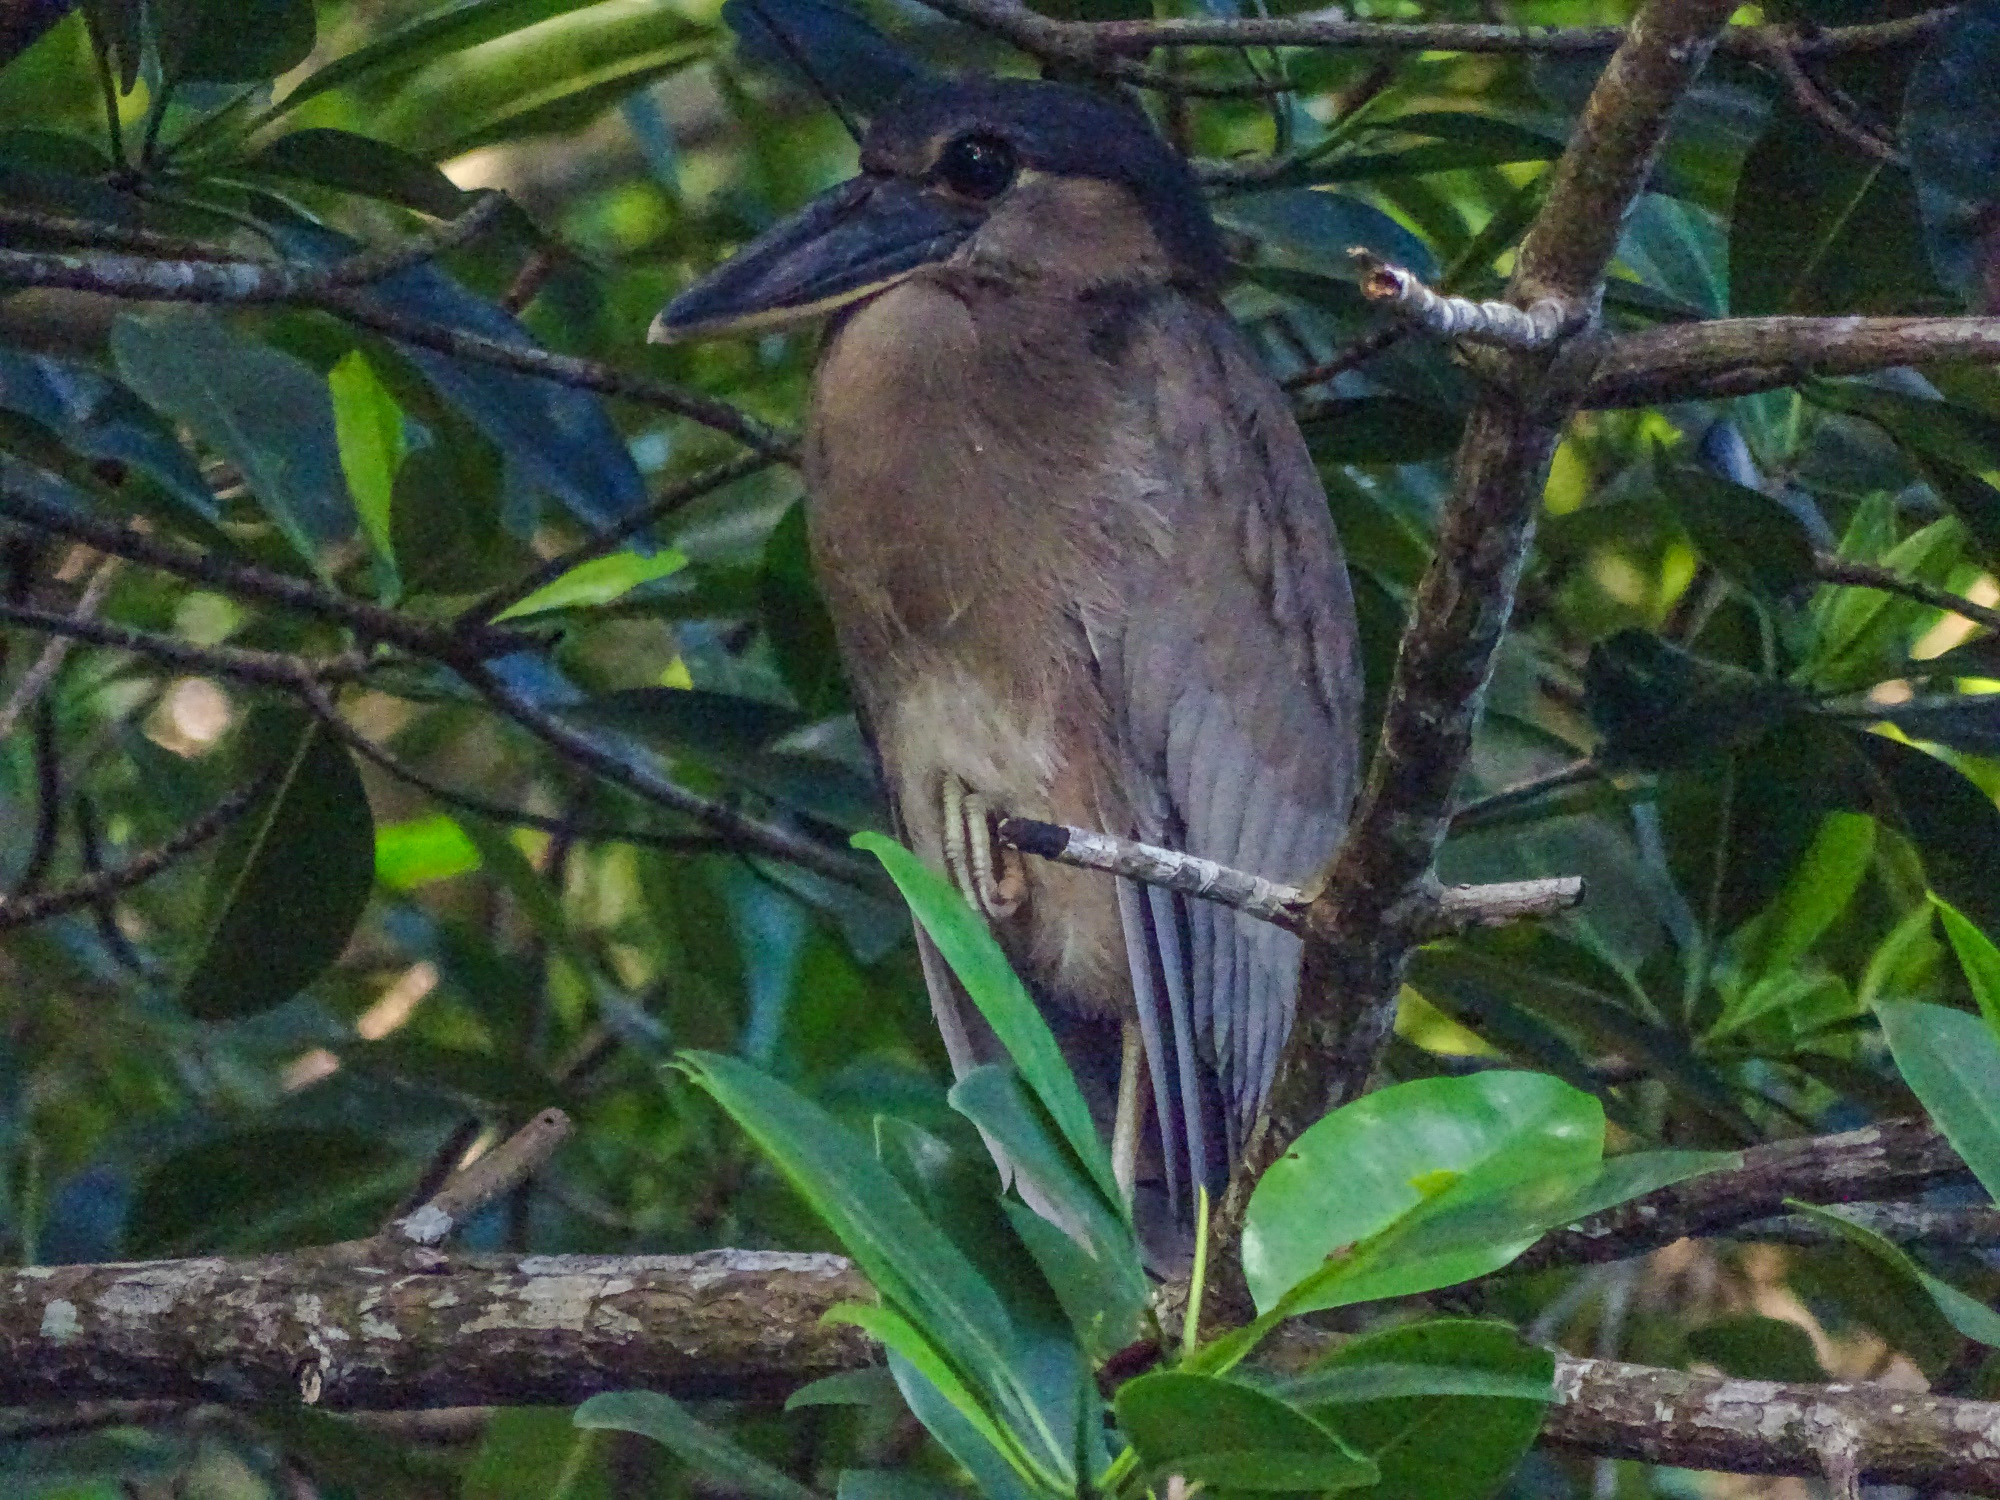
Boat-billed Heron, Punte Peña, Panama
Boat-billed Heron, Punte Peña, Panama
Brown Jay, Punte Peña, Panama
Green Ibis, Punte Peña, Panama
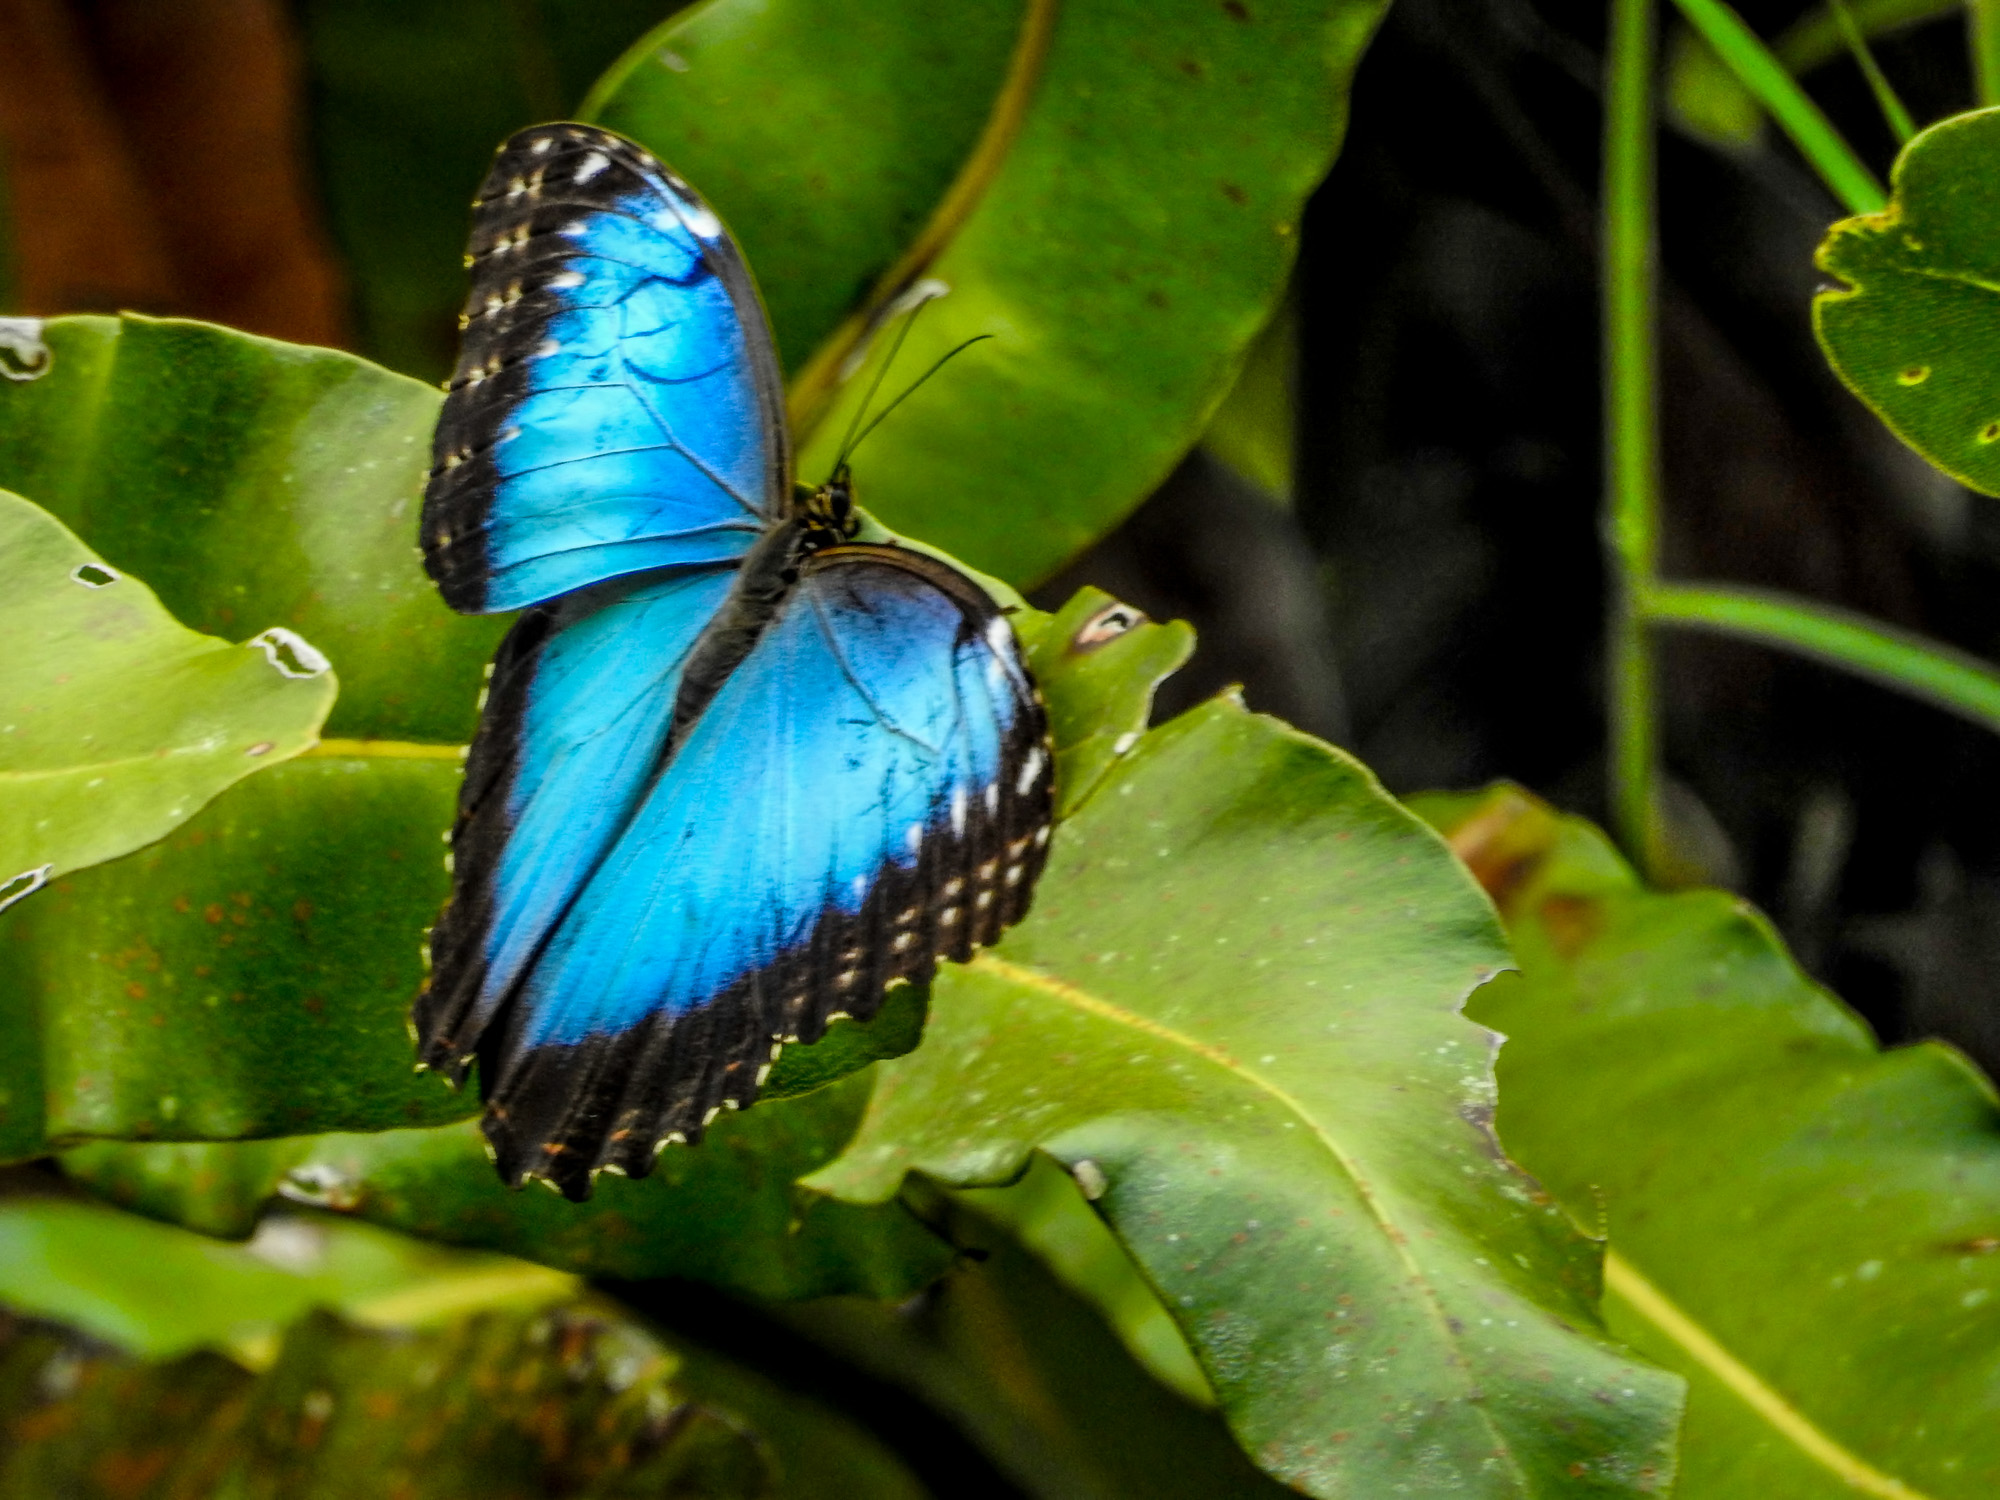
Our final trip out from the Lodge was to the old Synder Canal…a banana canal built by the United Fruit Company to open a new area to banana cultivation in late 1800/early 1900s. It only operated for 4 or 5 years, before an expanding rail system made it obsolete and it was abandoned. Today, it is kept open (mostly open) by the local people who use it to reach dwellings along its shore, and by a few tour operators who take folks through for the unique views of wildlife and forest. It runs though a Biological Reserve for much of its length. This will always be a memorable trip for me, since I saw, and photographed, my first perched Blue Morpho Butterfly with its wings open. They are common enough in the tropics, starting in Mexico and running south into South America. They float down forest trails and water courses at eye-level, their intense blue color and lazy flight making them unmistakable. They never perch with open wings! But one did along the Snyder Canal the day we visited.
Blue Morpho, Snyder Canal, Changuinola Panama
Snyder Canal, Changuinola Panama
Beach on Carribean, Snyder Canal, Changuinola Panama
Lessor Nighthawk, Snyder Canal, Changuinola Panama
Snyder Canal, Changuinola Panama
Snyder Canal, Changuinola Panama
Snyder Canal, Changuinola Panama
Snyder Canal, Changuinola Panama
Snyder Canal, Changuinola Panama
Dragonfly, Snyder Canal, Changuinola Panama
Snyder Canal, Changuinola Panama
Snyder Canal, Changuinola Panama
Northern Jacana, Snyder Canal, Changuinola Panama
Sissor-tailed Flycatcher, Snyder Canal, Changuinola Panama
Snyder Canal, Changuinola Panama
Snyder Canal, Changuinola Panama
Postman Butterfly, Snyder Canal, Changuinola Panama
Green Iguana, Snyder Canal, Changuinola Panama
Snyder Canal, Changuinola Panama
Green Kingfisher, Snyder Canal, Changuinola Panama
Green Kingfisher, Snyder Canal, Changuinola Panama
Snyder Canal, Changuinola Panama
Snyder Canal, Changuinola Panama
Mangrove Swallow, Snyder Canal, Changuinola Panama
Off-shore from either end of the canal there are two islands, collectively know as Bird Island, where Magnificent Frigate Birds, Brown Bobbies, and Red-billed Tropicbirds roost and nest. Though the sea was much rougher than normal the day we visited, it is a place I would love to try again. When I got back from this trip, I realized that though I had been shooting from a moving boat all day, I had never switched to Active VR on the camera. Another reason to return. 🙂
Bird Islands, Bocas del Toro Province, Panama
Magnificent Frigatebird, Bird Islands, Bocas del Toro Province, Panama
Brown Boobie with chick, Bird Islands, Bocas del Toro Province, Panama
Frigatebirds, Bird Islands, Bocas del Toro Province, Panama
Red-billed Tropicbird, Bird Islands, Bocas del Toro Province, Panama
Bird Islands, Bocas del Toro Province, Panama
Bird Islands, Bocas del Toro Province, Panama
Bird Islands, Bocas del Toro Province, Panama
Frigatebirds, Bird Islands, Bocas del Toro Province, Panama
Bird Islands, Bocas del Toro Province, Panama
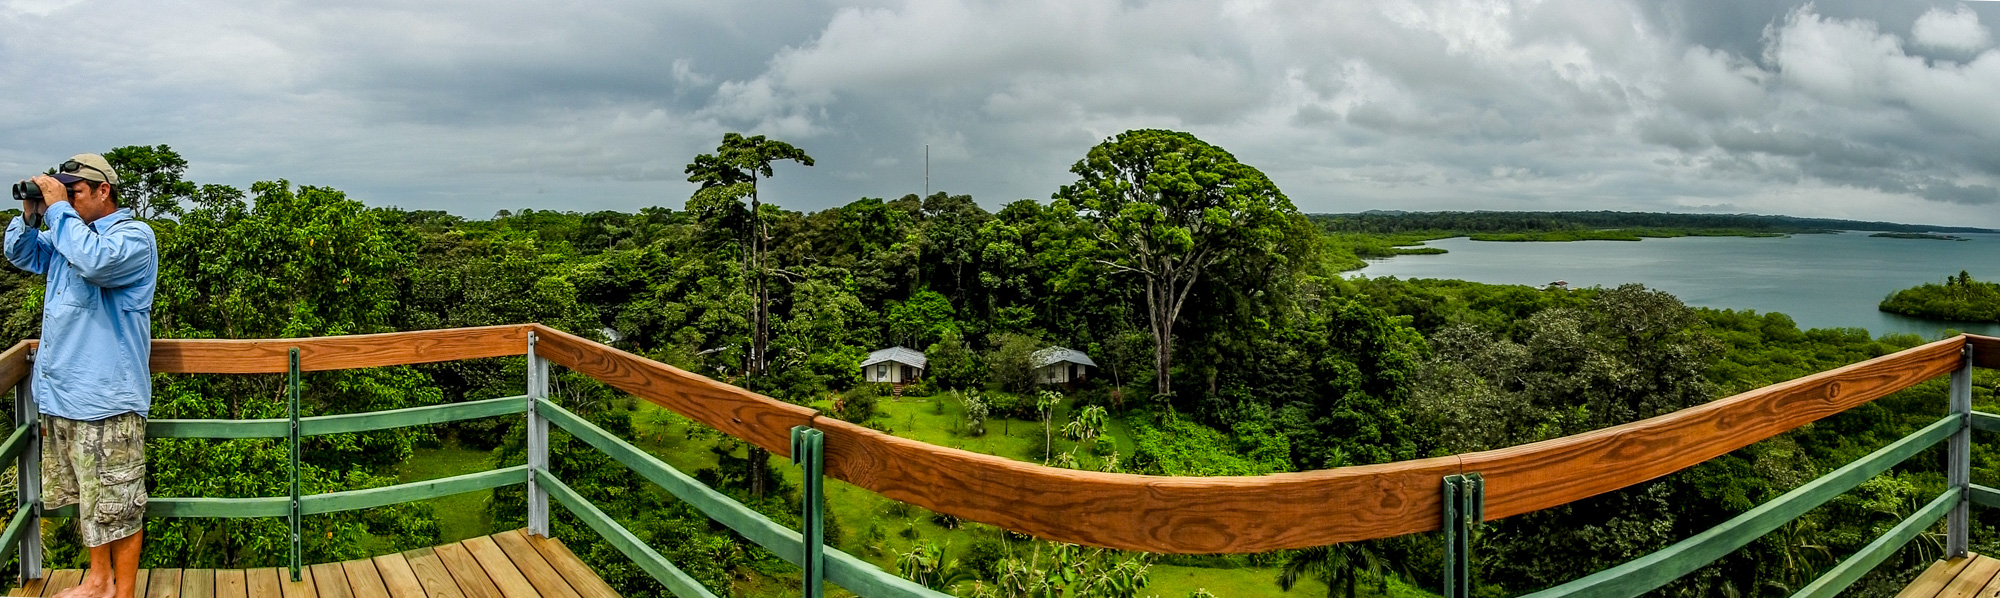
On my final morning at Tranquilo Bay I decided, rather than getting muddy on the trails, I would spend some time on the Canopy Observation Tower up by the cabins. This tower was fashioned from obsolete cell phone towers, purchased in the US and shipped to the Bocas del Toro. It reaches well above the canopy, topping the tallest trees by many feet. The view is unique. I was hoping to be up there early enough for roosting parrots and White-faced Capuchin Monkeys. I got both.
This is a 180 dregree panorama from the top of the tower. There is 360 degree pano in the gallery.
Tranquilo Bay Lodge, Panama 180 on the tower
Blue Land-crab, Tranquilo Bay Lodge, Panama
Small Blue Morpho sp. Tranquilo Bay Lodge, Panama
Tranquilo Bay Lodge, Panama
Tranquilo Bay Lodge, Panama
Tranquilo Bay Lodge, Panama
Tranquilo Bay Lodge, Panama
Tranquilo Bay Lodge, Panama
Tranquilo Bay Lodge, Panama
Blue-grey Tanager, Tranquilo Bay Lodge, Panama
Red-lored Parrots, Tranquilo Bay Lodge, Panama
Tranquilo Bay Lodge, Panama
Tranquilo Bay Lodge, Panama
Tranquilo Bay Lodge, Panama
Tranquilo Bay Lodge, Panama
White-faced Capuchin, Tranquilo Bay Lodge, Panama
White-faced Capuchin, Tranquilo Bay Lodge, Panama
Tranquilo Bay Lodge, Panama
Tranquilo Bay Lodge, Panama
Montazuma Oropendula, Tranquilo Bay Lodge, Panama
All in all, the performance of the Nikon P900 under tropical conditions was pretty near awesome!
If you are not convinced by now, I can only say again that Tranquilo Bay and the surrounding area in Bocas del Toro Panama is one of the best places for bird and wildlife photography that I can imagine…and I was not there on a good week. I am planning, if I can round up a group of six eager Point and Shoot Nature Photographers who want to join me, to return to Tranquilo Bay in mid-October (Columbus Day week). The weather is promised to be more cooperative, the North American migrants are moving through on their way south keeping things stirred up. Seas should be calm. And Tranquilo Bay should be at its best. Want to come. Contact me at lightshedder@gmail.com.
Even if you don’t join me…Tranquilo Bay should be on any photographer’s bucket list!
P900 with my custom modified tulip shade. Big glass!
For several months the Nikon P900 was rumored around the internet. The optimistic claimed a 83x zoom! A Superzoom to top all superzooms! From Nikon.
A lot of digital ink went into poopooing the rumor. Something between “Fat chance!” and “Dream on!” seemed to be the consensus. I will admit, I was not a believer either…especially not after Nikon announced the P610 for delivery in early March….a significant upgrade to the P600, with improved focus speed and reliability, improved buffer clearing times for continuous shooting, and, by all reports, at least slightly improved image quality…and that on top of IQ that was already rated “best in class” for 16mp superzooms by many. I put one on pre-order the day it was announced!
And then, only a few weeks later, before, in fact, the P610 was readily available at retail, Nikon officially announced the P900 for delivery in late March. What? Unbelievable!
And, yes indeed, the zoom reached 83x…and the new camera included all the focus and buffer improvements of the P610. As you might expect, given the huge zoom, it is a big camera…twice the size and weight of the P610. Still, 2000mm equivalent field of view…and perhaps decent digital enhancement out to 4000mm for truly desperate situations. I debated less than a day before canceling my P610 order and preordering the P900.
Before the first units were in the hands of users, eager photographers had filled two P900 threads on the Nikon Coolpix forum at dpreview. That is over 300 posts. And that was before anyone outside the industry insiders had actually seen the camera. And those were not the only threads going either. In fact, the P900 was also under discussion on the Canon Powershot forum and several others. I think it safe to say that no superzoom (with the possible exception of the Canon SX60HS, the replacement for the wildly popular SX50HS) has generated as much interest before it shipped.
And once the first units reached customers, it became apparent from early posts on the forums that, unlike the SX60HS, for most people, the P900 was not going to be a disappointment! There were a few nay-sayers, but they were mostly people who had unrealistic expectations of a Point and Shoot superzoom, and did not give the camera a fair chance, or a few who clearly got defective early production units. (Those with defective cameras were able to trade in for new units, and in every case the problem was solved.)
My P900 came direct from Nikon a few days after the first units were in the hands of eager dpreview forum members, and I was out in the yard the next morning testing it against the Canon SX50HS and the Sony HX400V. We are still experiencing the dregs of winter in Maine, with snow on the ground, and not much color showing, so I had ordered some artificial parrots (made of dyed chicken feathers) specifically for testing. Between shots of my artificial parrot tree and the brick work on the chimney, I was pretty well convinced by the end of the morning that Nikon had done the big zoom right. And as I continue to experience the camera in my daily trips afield, I have come to appreciate what a marvel it really is.
Image Quality:
For most photographers, no matter how long the zoom, overall image quality comes first. We all know that the small sensors in our P&S superzooms will never equal the performance of an APS-C or full sized sensor, but we want something that comes close…close enough to produce satisfying images when viewed as large as we are likely to ever view them…and that will make the occasional print up to 13×17 or so. That means a sensor and image processor that produce images with good detail, as little noise as possible, and few if any “digital artifacts.” We want an image that looks like a real photograph, and not like a water-color painting. We expect some water-color effect…smearing of fine details and blotching of smooth color patches…when the image is viewed at 100% or greater…that comes with the tiny sensor…but it can not be obtrusive or obvious. And any defects should be invisible at normal viewing and printing sizes. Like I say…a photograph not a painting.
In my tests the image quality of the P900 did not really break any new ground, but it was easily as good as, and maybe slightly better than, the 12 mp Canon SX50HS…which is still, even after the introduction of the SX60HS, widely perceived to provide the best image quality of any superzoom. There is a little more noise in empty backgrounds, but also slightly more detail in detailed areas of the image. The P900 also easily matched and slightly surpassed the image quality of the Sony HX400V, which has been my go to camera for more than a year, showing less digital artifacts, equal or better detail, and about the same level of noise. And this is true throughout the ISO range, from 100-1600 where I did my testing.
Test shots are from the same distance at the same zoom setting, 1200mm…the Nikon and Sony images are resized from 16mp and 20mp scale to match the scale of the 12mp Canon. You can click on any image to open at at full size in your browser.
ISO 100: Canon SX50HS, Nikon P900, Sony HX400V
ISO 400: Canon SX50HS, Nikon P900, Sony HX400V
ISO 800: Canon SX50HS, Nikon P900, Sony HX400V
ISO 1600: Canon SX50HS, Nikon P900, Sony HX400V
Of course Image Quality is more than the pixel level performance of the sensor and processor. You also have to consider overall color representation, balance (or fidelity), and clarity (or vividness), as well as the balance of light and dark tones (dynamic range). To be honest, I have not liked the way Nikon has reproduced color and tones in the past. To me Nikon Point and Shoot images were always “flat” and “poster-like” with colors that were just a bit off. That was one of my major concerns in preordering the P900, but I was somewhat reassured by the sample images being posted by Nikon and early adopters.
I have written about the apparent aesthetic differences in the way different camera companies choose to “render” the digital image, and that is also apparent in comparing the images from the Nikon P900, Canon SX50HS, and Sony HX400V. Straight out of camera (sooc), the Nikon images look a little “thin” compared to the Canon or Sony. Partially this is due to the fact that even at the same settings in the same light the Nikon images are always lighter overall than the other two. Either, to be charitable, the Nikon sensor is simply more efficient (requires less light for an equivalent exposure), or Nikon has mis-calibrated the ISO settings on the P900. I choose to be charitable…especially since in a long zoom camera, lower ISOs and higher shutter speeds are always welcome!
Partially because of the difference in brightness, though, the colors in the sooc images from the Canon and Sony look richer, and more saturated. Even when the Nikon images are adjusted for brightness, in direct comparison some may still prefer the colors in the Canon images. However, in actual use in the field, under a wide variety of conditions, I find the Nikon colors to be relatively accurate, and quite pleasing, once the images have gone through my standard post processing work flow.
Still experimenting with the best in-camera setting for landscapes
The difference between the Nikon and Sony is harder to pin down, since there I am convinced there are real aesthetic differences in how the two companies render images. The Sony sooc images are more impressive at screen resolution, with vivid colors, great tonal range, and lots of apparent detail…and they require less work in PP to bring them to a finished state…however, if you look at them at 100% they are much more painting-like than the Nikon images. The Nikon images can be punched up in PP to show the same vivid and full toned effect as the Sony, but maintain more “real” detail at larger sizes. They are more photo like…with “grain” instead of digital artifacts.
In general any doubts I might have had about Nikon color have put the rest but actual use in the field. I would rate it the equal of the Canon SX50HS or Sony HX400V…different but equal. 🙂
Lens Quality
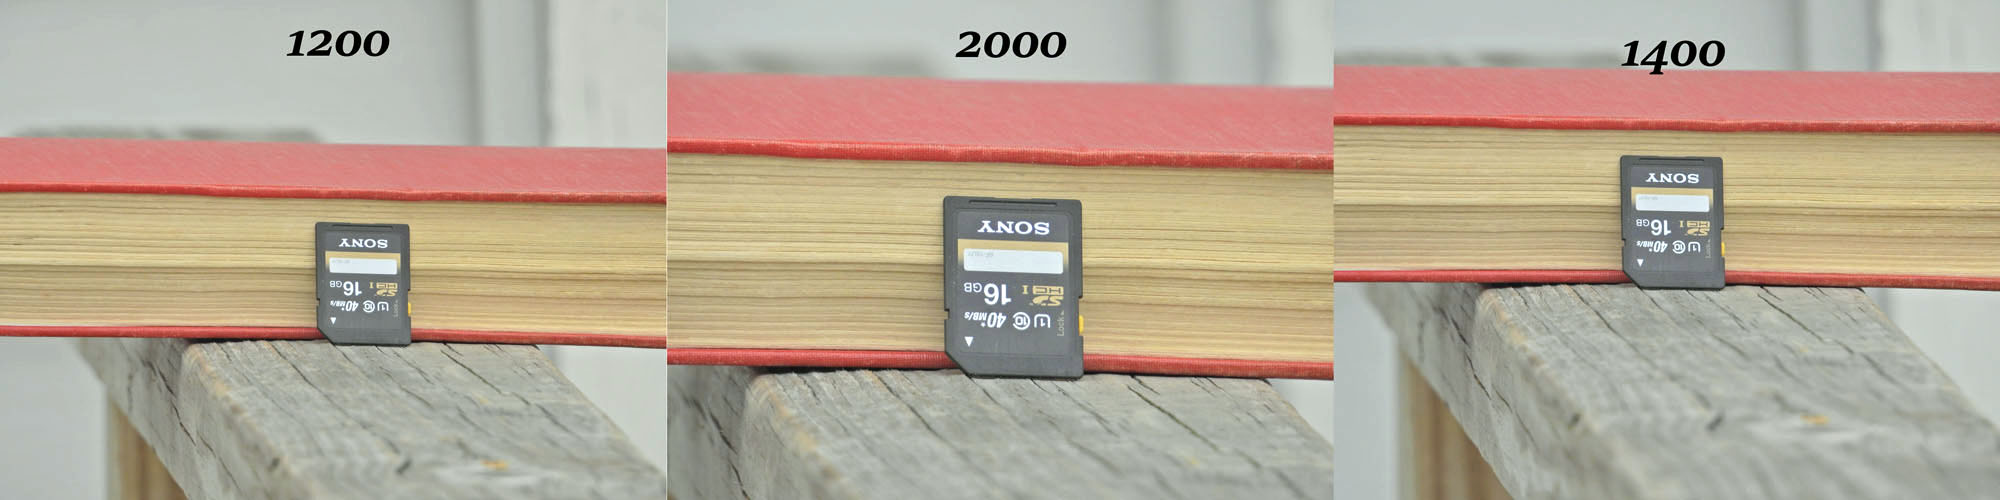
Clearly the stand out feature of the P900 is the huge zoom…83x…a leap and bound beyond its closest rival, the Canon SX60HS with 65x (though the Canon only reaches 1365mm since it starts at 21mm.) The next longest zooms, including the Nikon P610, are 60x, 24mm – 1440mm equivalent field of view. The P900 stretches from 24mm to 2000mm. That is a significant advance.
Relative size from the same position at 1200, 1400, and 2000mm equivalents
Well and good, but more zoom is only useful if the lens is sharp, with sufficient contrast, and relatively free of distortions…and that is a tall order for such an extreme zoom range. Yet, the lens and software designers at Nikon have managed it to perfection. The lens is sharp throughout its range, from 24mm to 2000mm, and produces images with excellent contrast. I am certain if we could see the RAW files, that there is a lot of distortion and some serious chromatic aberration (color fringing) in a lens this long and this complex, but by the time the software finishes with the jpeg, all distortions and almost all color fringing has been removed. Impressive indeed.
Maximum aperture at wide angle is f2.8, quite bright by superzoom standards, and it manages to hold to f6.5 at the long end. Though f6.5 might not sound impressive, this is actually, all things being relative, one of the brightest zooms on any superzoom…and certainly the brightest long range zoom ever made. Not bad at all.
This is not just a long zoom, it is an excellent long zoom, an excellent lens period…one of the best lenses I have ever used. Amazing!
These two image serve as demonstrations of lens quality, VR effectiveness, and image quality.
Both are hand held at 2000mm equivalent field of view.
Image Stabilization.
Superzoom cameras would not be nearly so popular (or so much fun) if they did not have image stabilized lenses. Being able to work a long telephoto shot without a tripod is essential, in my opinion, to the superzoom experience. Nikon calls Image Stabilization, “Vibration Reduction” and with the P610 and P900 claims a new system that provides a 5 stop advantage. You don’t have to understand camera stops to understand that 5 stops is a lot…and in practice, the VR on the Nikon P900 is simply the best I have ever used. It is completely possible…indeed, it is easy…to hand hold shots at 2000mm and 1/500th of a second. (see images above). I have gotten good results down to 1/125. That is simply amazing. Of course, I have had a lot of practice hand holding superzooms…but, honestly, the Nikon P900’s VR performs above and beyond expectations.
And, for reasons I can not quite fathom, the view on the LCD and in the EVF during framing is among the most stable I have ever seen, even at 2000mm equivalent. There is none of the distracting (not to say debilitating) jitter you see at high power in the viewfinders of the Canon SX50HS for instance. This extra stability and ease of framing makes an excellent lens a joy to use!
One difficulty I had in testing was that the Nikon, as mentioned above, consistently used higher shutter speeds at any given ISO than the Canon or Sony (and even so the Nikon images were the lightest of the three). That meant that the Canon and Sony image stabilization was more severely challenged than the VR on the Nikon. I had to shoot a lot more frames to get a critically sharp image with the Canon than the Sony, and more frames with the Sony than the Nikon. In fact the Nikon gave me a sharp image the first time, every time. Since I am able to easily hand hold the Nikon at 2000mm equivalent, and even 4000mm equivalent with digital enhancement (what Nikon calls Dynamic Fine Zoom) I am convinced that Nikon’s claimed 5 stop Vibration Reduction system actually works.
2000mm not enough? How about 4000mm with digital enhancement?
Focus speed and reliability.
One of the often mentioned weaknesses of the Nikon P600 was its slow and unreliable focus. Even in good light the P600 often had to “hunt” for correct focus, and in poor light it sometimes could not find it. Not so the P900. The P900 has, hands down, the fastest and most reliable focus of any superzoom I have used to date. It is as fast and more reliable than the focus on my Olympus 4/3s mirrorless camera. Where the Canon SX50HS and Sony HX400V were hunting and sometimes failing to find focus, the P900 snapped to focus all but instantly on the first press every time. Again, this is an impressive achievement on the part of Nikon.
Eastern Bluebird. A difficult focus problem for many cameras.
And, again for reasons I can only guess at, the auto focus is very discriminating. You can control the focus area, from 9 area Target Finding Auto Focus(where the cam era tries to locate the most likely subject in the frame), down to a very small square that you can move around the frame manually with the control wheel on the back. I have been using the “normal” manual focus square, and time and again it has found focus on birds mostly hidden in small branches, and even hidden behind foreground twigs. Perhaps some of the “Target finding” magic is at work even in manual square auto mode, but whatever is going on, it is magic! It is sometimes necessary to let the camera know the approximate distance to your subject by focusing on something in clear view (a branch, a leaf, etc.) at the same distance…but once you do, the camera will find the bird deep in the bush and focus on it, and not the branches around or in front of it. Did I say it was magic? I will say that it is so much fun…and that I am getting shots I could only dream of without resorting to manual focus in the past. And the P900 does have manual focus and focus peaking (a white outline on in-focus objects), controlled by the thumb wheel on the back of the camera, or the zoom lever on the lens, for those times when you really do need it…it is just that with the precision and apparent intelligence of the auto focus, I am not sure most folks will ever need it.
Magic! This is auto focus, hand held at 2000mm equivalent.
Continuous shooting
I am into birds and wildlife, and I suspect most people who are interested in the P900 will be as well. The long zoom is the attraction. However, when shooting moving (which is to say, living 🙂 birds and wildlife, a good continuous mode is essential for catching live action and for insuring at least one sharp shot out of the sequence.
The second most common complaint about the P600 was how slow the buffer cleared after a continuous burst. The 7 frames per second for 7 frames, or 2 frames per second for 60 frames, continuous rates were fine, but it took up to 30 seconds for the buffer to clear after a burst of 7 shots. That is 30 seconds when the camera is locked up…you could not even frame your next shot. This alone was enough for me to drop the P600 from consideration as a serious P&S nature camera, despite its other fine features and reported excellent image quality.
Buffer clearing is also one of my only disappointments in the Sony HX400V. It too is locked up for many seconds after a burst.
With the P900, Nikon has at leased addressed the problem, if not solved it. The P900 has the same 7 fps and 2 fps, High and Low speed, continuous modes, but on High the buffer clears in about 7-9 seconds (depending on the amount of processing you have set the camera to do on each image) after a 7 shot burst. In Low speed continuous, it can take about one second per shot to clear the buffer, but you can begin to frame your next shot before the buffer is cleared, since instead of blacking out the view finder, as it does in High speed mode, all you have is a little animated swirl of dots to indicate “clearing in progress” in the center of the frame…and you can start your next sequence before the current one is completely cleared. In fact, with 90mbs UC-1 Class 10 SD card (IQ at Fine, Noise Reduction at Low, Picture Control at Standard, and Active D Lighting to Low) there is no buffer clearing delay at all in Low speed continuous. In both modes, during the actual burst the view stays live. In High speed, the display flickers. In Low speed, there is a very brief blackout between frames but the view comes live again to show you where you are.
I generally use the Low Speed Continuous for the faster clearing, and because 7 fps often gives me 7 identical images…2 fps is fast enough for most bird and wildlife action.
There are several other, lower resolution continuous modes for capturing really high speed action, and there is a Best Shot Sequence mode which shoots up to 10 frames and only saves the sharpest. I am still experimenting with that to see if it might be useful for birds…but with the exceptionally fine VR, I am not sure it is of much use.
(I might note here, that if continuous shooting is your thing, either the Canon SX50HS or, even better, the SX60HS, will have better continuous performance. And, second note, in my experience the P900 will benefit from the fastest SD card you want to throw at it 🙂
EVF and LCD
One of the new features of the P610 and P900 is the higher resolution Electronic View Finder. At 908k it is tied for top resolution with the SX60HS, and far superior to either the previous P600, the SX50HS, or the Sony HX400V. Like the SX60HS, it is relatively small for all its detail, so the Sony might impress as better at first glance since it is both bigger and brighter. However the higher resolution comes in handy in the field, in making it easier to pick your subject out of a confusing background. After a few days of using it on factory default, I found the menu entry to turn the brightness up (Settings:Monitor:EVF options) and that helped a lot! It is, all said and done, the easiest EVF to use that I have seen on a P&S superzoom.
The monitor itself is fully articulated, from folded in against the back either facing the camera (for protection) or facing out for viewing…to off to the side and angled for ground level or over the head shooting. It even faces forward for selfies. It too is relatively high resolution at the same 908k dot pitch. I found it easy to use in just about any light, and I really enjoy the full articulation. It is, by the way, if you are keeping score, only equaled by the Canon SX60HS (the SX50HS has the same articulation but much lower resolution), and clearly superior to the single axis articulation on the Sony.
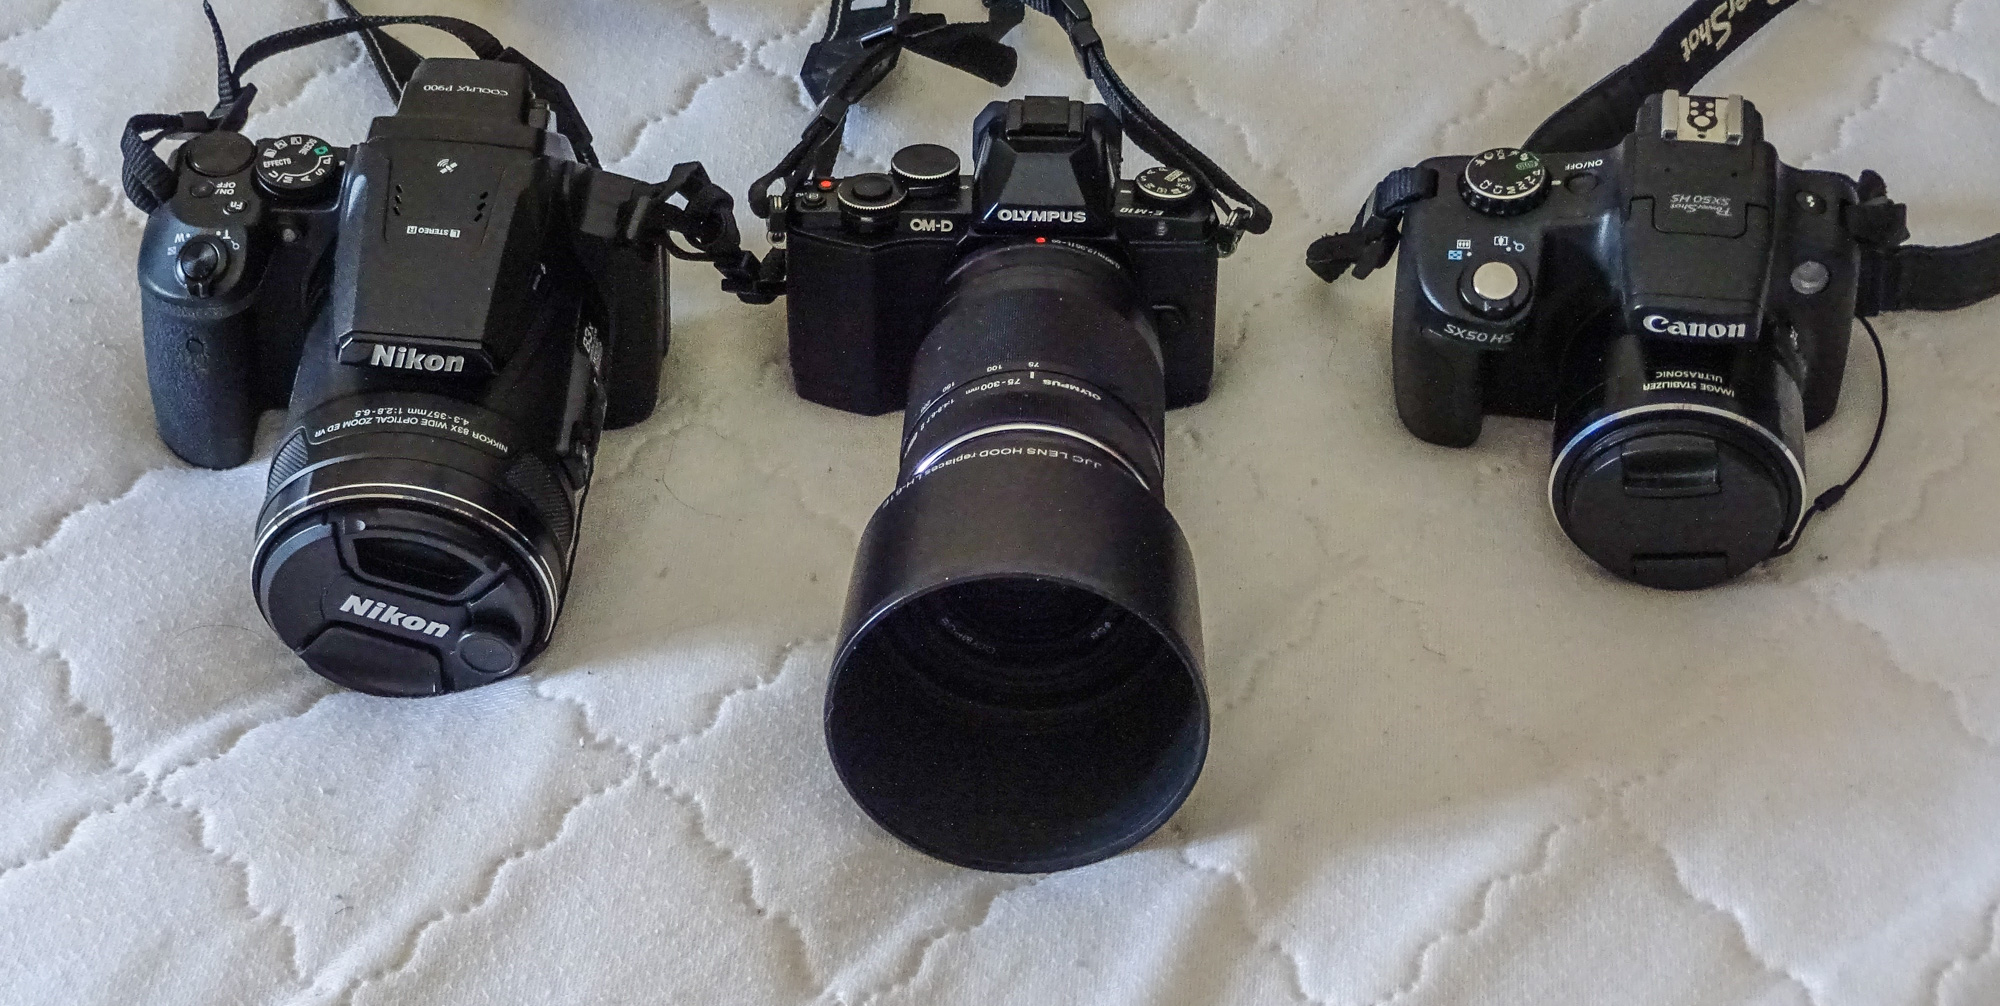
Size and weight
Nikon P900, Olympus OM-D E10 with 75-300 zoom, Canon SX50HS
Okay, this is really the elephant in the room. 🙂 The P900 is big, and it is relatively, by superzoom standards, heavy. It is over twice the size and weight of the SX50HS, and a third again as big and heavy as the already large Sony HX400V. It is a size larger than my Olympus 4/3s body and the 70-300mm zoom. In fact I have to use the same size case for the P900 and the Oly and zoom, and the P900 is a tighter fit. It is not a compact camera. But then, it could not be. A zoom reaching 2000mm equivalent at f6.5 is going to be big. Think of it in terms of a larger sensor. This is really a 4.3 to 357mm zoom. Look at any f6.5 300-400mm zoom lens for any camera. How big is it? Yes…it is about the same size. That is just physics. The zoom on my P900 is just slightly larger than the 70-300mm f6.7 zoom for my Oly. And with a zoom that large, it makes sense to make the body larger too. Nikon could have fit the P900 body into the same space as the P610 body, but it would have looked really funny behind that big lens, and the handling would, in my opinion, have been seriously compromised. As it is, the camera over all is very well balanced and feels great in my average male hands. Even with the zoom fully extended, it still feels “right”. Nikon has provided an excellent grip around front, a raised and angled thumb pad, and textured griping areas near the end of the zoom housing on the body…all perfectly placed for my hands with the camera in shooting position. Already, after only a week of using the camera, the SX50HS, and even the Sony HX400V feel “dainty” and slightly “fussy” by comparison. This is real camera, built to feel like a real camera…and it does.
It is a handful…but a comfortable handful.
(Most of the weight of the camera is undoubtedly glass. The lens elements are so heavy that you can feel the inertia when you zoom, like hanging on to a gyroscope, especially when everything is in motion in turning the camera on or off. For a second there, the camera seems to have a mind of its own.)
I find that I can carry the P900 easily all day, without much more fatigue than a more compact solution…and, given the advantages of the long zoom, that is all I need.
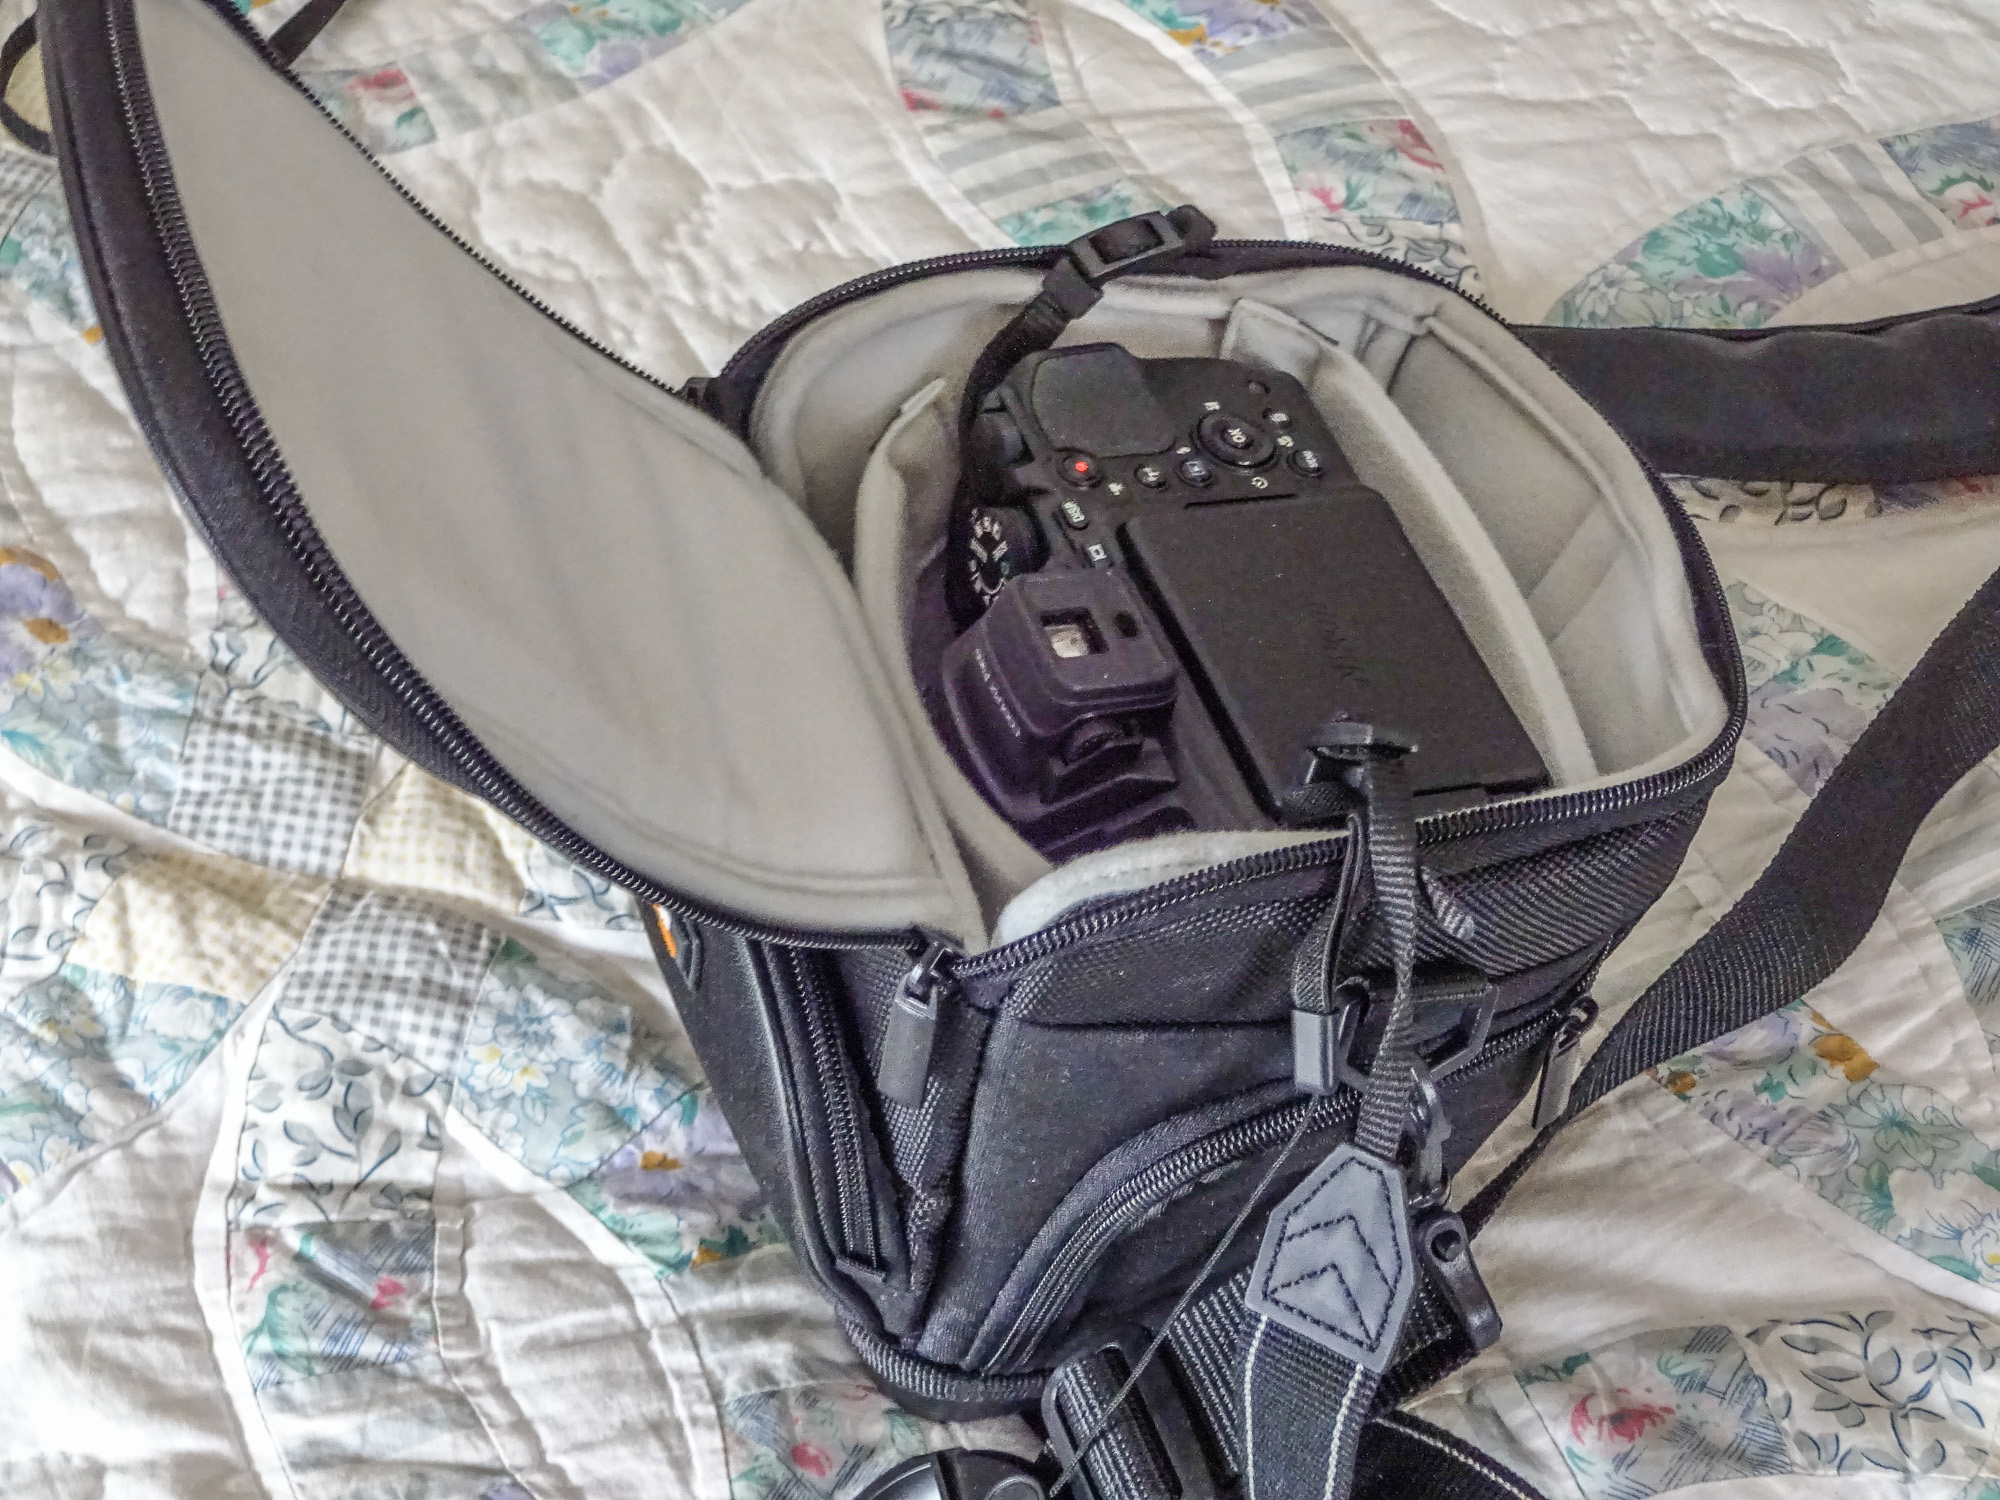
P900 nestled in an Amazon Basics DSLR holster. Including the tulip shade.
Controls and layout
The Sony HX400V has the best set of controls and best layout of any camera I have used, except for my Oly Micro 4/3s. Fortunately, the P900 is a close second. It lacks some of the control features of the Sony…it only has one User Settings memory instead of two, there are less options to control what Sony calls Creative Styles and Nikon calls Picture Controls, the HDR settings options are sparse by comparison, as are the Dynamic Range extension options, etc. And the Sony Function button brings up a full selection of the things you might want to set…at your fingertips, while the Nikon function button only really provides easy access to one function at a time (the others are available but they are hidden behind a separate Function icon…another layer deep). The Sony thumbwheel is better integrated with the control system and easier to use. (On the other hand, the Canons have no thumbwheel at all). Zoom control on the Nikon zoom housing is handy, and it can be switched to manual focus when your are using manual focus, but there is nothing as intuitive as Sony’s fly by wire lens ring for either zooming or focus. And why, Nikon, can you not set the zoom control to override auto focus in the auto modes (as you can the ring on the Sony)?
But all that is really just quibbles. If I had never seen the Sony, I would be completely satisfied with the controls and layout of the Nikon. The thumbwheel is there and works. The menu layout is rational and easy to access. The function button, if slower than the Sony, does give you pretty quick access to commonly changed functions. The only thing clearly lacking is an ISO button or the ability to set one of the other controls to ISO.
The Snap-back-zoom button (also available on the Canons…a button on the zoom housing that increases the field of view when at high zoom with a single press, so you can find your subject, and then returns the zoom to full extension when released) is a great feature, but with the high resolution and exceptionally stable EVF, I find that I am not using it as much as I might.
All in all Nikon as provided the P900 with a usable set of controls and an intelligent layout. What more could you ask?
Scene modes.
I carry a superzoom because of the extreme versatility it provides. For me it has to be a “does it all” camera. I retired the SX50HS for the Sony HX400V in order to get two features that I had come to value in a Samsung pocket compact that I got in between: in-camera HDR, and sweep panorama…both of which I enjoy.
In-camera HDR takes three exposures at different settings, and then combines the three into one full range composite showing a higher dynamic range than any single exposure could manage. When done right it makes for extra dramatic, though still realistic, landscapes (especially with clouds), and a sense of heightened reality in shots of buildings etc. The Sony HX400V is hard act to follow here. It has the best, most flexible, HDR modes of any camera I have ever used. You have fine control over how the final image will be composited, and it does it so well and so smoothly that there is really no reason not to use it for every landscape and much street photography. The detail recorded is a rich and as beautiful as any standard shot…only more-so. And you never needed a tripod. Hand held HDR was totally possible with the Sony.
One of my greatest disappointments in the SX60HS was just how poorly the in-camera HDR had been implemented. It was there, but, short of using a tripod, I never got it to produce acceptable results. The fine detail in the images it produced was always completely smeared, and the colors were always off. Not pretty.
The Nikon is somewhere between the two. In-camera HDR is buried in the Scene Modes under Backlighting, where it is one of two options (the other is using fill flash.) You have no control over how the composite is produced, and there is (again, short of using a tripod and turning VR off) always, to my eye, a slight decrease in fine detail due to the way the three images are stacked. On the other hand, it makes really nice skies with clouds! They require some extra processing due to the added noise introduced in combining the three images (something Sony evidently processed out before writing the image to card), but the cloud effects can be very impressive. So, in-camera HDR: not great but usable.
Usable in-camera HDR with nice cloud effects.
Sweep Panorama, on the other hand, in the few I have had a chance to try, seems to work quite well. Sweep panorama is when you press the shutter release and sweep the camera around in an arc in front of you, 120 degrees,180, 360, etc. while the camera records the scene one sliver at a time and writes the whole sweep to the card as a single image. It is much soother and organic than the kind of panorama where you take overlapping images and try to assemble them in software afterward. On the other hand, it does not produce as high resolution images. Still, for use on the web, or casual printing of the wide and wonderful sweep of the landscape, they are fine: 4800 x 960 for 180 degrees, or 9600 x 960 for 360 degrees.
Sweep Panorama, or as Nikon calls it “Easy Panorama”
Sports mode generally makes focusing on moving subject easier and sets the camera for burst to catch action. On the Canons and Sony, it worked well, very well, for birds in flight…one of the trickiest subjects the Point and Shoot Nature Photographer can attempt. While I did not try the Canon SX50HS, the Sony also worked really well for particularly active birds…like feeding Reddish Egrets…keeping the bird in focus and facilitating a burst at the critical moment. My limited experiments with the P900 are promising. I need to get somewhere with a lot of bifs, but I think it is going to work fine.
The Close-Up scene mode seems to work well for macro. It presets the lens to macro range, and it might do some extra processing on the background for separation of subject (I am not certain yet, and Nikon is not saying). Macro, either selected by the Close Up mode, or manually using the control wheel on the back of the camera, works within a zone at the short end of the zoom, focusing from 0 cm at full wide, out to about 3 cm at 100mm equivalent. Excellent! Close up mode also gives you a second exposure option, where the camera takes three images at a fast shutter speed, and stacks them for the correct exposure…to eliminate noise.
Close up mode, about 100mm equivalent from less than an inch.
Landscape Mode, while still technically a scene mode, has a dedicated icon on the control dial, right along with Auto, Program, Scene, etc. It is a one turn set. There are two options available via the Menu button: Normal single shot, and Noise Reduction burst. Both options set exposure, Active-D Lighting, contrast, sharpening, and saturation to what the Nikon engineers deem is most pleasing for a landscape shot. Single shot is what it sounds like: press the shutter and click. NR Burst takes three images at low ISO and “sums” them to achieve the correct exposure, which should, in theory produce a resulting image with lower noise. In my testing, it appears that there is a light level threshold before NR kicks in, even when you have it set. In normal daylight you still get a single shot. In lower light, near dawn or dusk, you get the NR burst.
The good news is that the Nikon engineers and I apparently agree on what a landscape ought to look like. The rendering is rich and vibrant, with lots of detail (without being over-sharpened). It is particularly effective for landscape with clouds and the cloud rendering is almost as good as the built in HDR. In fact, once a bit of PP is applied, Landscape mode images look a lot like the images produced by the built in HDR, only they have a lot more fine detail! This is good. I like it. I will use it!
In-camera HDR, processed in Lightroom
Landscape mode, processed in Lightroom. Notice the greater detail and equally as fine clouds.Great Landscape mode clouds!
I have not yet tried most of the the other scene modes. I will get back to you at least on Hand-held Night Scene.
There is a Birdwatching Mode (clearly Nikon recognizes that one of their major customer groups are birders). Unfortunately it seems pretty much useless. In theory, it starts with a wide view to find the bird, then with a press of the OK button, zooms into 800mm equivalent and takes a burst of pics. That is were it breaks down. I can find no way of returning the zoom to the wide position without zooming it back manually. That I can do myself thank you, without any scene mode. And I am not sure why anyone would use this setting instead of the snap-back zoom button which is there all the time and gives you the option of the full 2000mm reach ????
Drawbacks and disappointments.
Biggest: close focus at the 2000mm end is only 16.5 feet, and that is far…maybe not for most birds and wildlife, but it is very far for bugs! Average working distance for dragonflies and butterflies is in the 6 foot range. That is where the SX50HS shines, focusing to 4.5 feet at 1200mm gives you amazing close-ups of dragons and butterflies in the field. I will have to experiment with readjusting my expectations and shooting from further away, but already I am missing the close focus. I may have to resort to carrying the SX50HS on bug specific outings…that or buy a P610 (6 feet at 1440mm). We shall see.
And then, as I mentioned, HDR could be better implemented. I will also miss the “Anti-Motion Blur” mode from the Sony…which I used for indoor shots quite a bit. The previously mentioned lack of a dedicated ISO button is a drag, as is the missing option to reprogram any of the existing buttons. Oh, and wifi is poorly implemented…it only really works with the Nikon app on Android and iOS devices. There is, as far as I can see, no way to transfer images via wifi from the camera direct to your laptop. And, from what I hear, the Android and iOS apps are pretty basic. I mean, why bother with wifi at all if you are not going to do it right?
The tripod screw socket is way off to one side, making it unnecessarily difficult to balance the camera on the head of the tripod. Why?
Some will complain about the lack of RAW shooting, but I am not one of them. I have yet to see the advantage of RAW for the work I do. And the same goes for a hotshoe. I don’t use external flash and would not carry it the field. No loss.
And that is really about it. Not a long list at all, considering.
Conclusion.
There is very little that Nikon did not get right in this very ambitious attempt to blaze new ground in the superzoom market. Longest zoom, and a great zoom to boot. Excellent Image Quality overall from a more than averagely efficient sensor and an excellent jpeg image processing engine. The best image stabilization of any superzoom to date, making hand holding this huge lens totally possible. Fast, reliable focus (the fastest and most reliable I have experienced, with a bit of magic built in that makes focusing through foreground twigs and leaves possible). Excellent EVF and fully articulated LCD monitor. Decent continuous mode. Excellent macro mode. Usable in-camera HDR. Excellent Easy Panorama mode. And balance and handling layout that make using this admittedly big superzoom a joy in the field.
Can you tell I like it?
A week from today, I leave for a week in Panama at Tranquilo Bay Resort to scout for a Point and Shoot Nature Photography trip to be scheduled for next year, and then a week in St. Augustine FL to teach Point and Shoot Nature Photography workshops at the Florida Birding and Photo Fest. By the time I come back I will have a lot more experience with the camera under my belt and perhaps will have more to say…but for now…I think Nikon did the big zoom right!
Hairy Woodpecker a the feeder. Hand held at 2000mm equivalent. What the P900 is all about!
[Note! 5/12/15. Today Nikon released firmware update 1.1 for the P900 which may address some or all of the issues mentioned below. I will let you know as soon as it has a fair trial. 🙂
Be aware that a significant number of P900 owners are experiencing apparently random system crashes requiring removing the battery to reboot the camera. One user (at least) has suffered complete failure after a crash. Also, as of the middle of April, there are NO P900s available for sale from reputable dealers. A few continue to appear on ebay and from Amazon partners at inflated prices, but it appears that all official channels are out of stock. Rumor has it that it might be 5 months or more before the P900 is available again. My own P900 has frozen twice…and recovered each time after removing the battery and reinserting it. I still stand my the review. It is an amazing camera, but there might be some issues in the first production run.]
Rufous-tailed Hummingbird, Rio Santiago. Sony HX400V
The tropics provide one of the richest and most varied arrays of photographic opportunities of anyplace on earth…but they also provide definite challenges for any photographer…including, of course, Point and Shoot Nature Photographers. From the dense, dark, dim (and often damp) canopy of the rain and cloud forests to the harsh light of the dry forest and uplands in the rain-shadow of the mountains, exposure is always a difficult issue. Then too, focus in the rain forest, with all the vegetation, and the dim light, can be a real problem. It is not much easier in the glare of the dry forest.
I recently enjoyed a week at the Rain-forest Lodge at Pico Bonito in Honduras, spending each day in different location in the area…from deep rain-forest on the shoulders of the mountains, to coastal mangrove lined rivers, to the Honduran Emerald Reserve in the dryer country inland.
It was not a photo expedition…we were primarily birding…but it gave me a chance to experience the joys and challenges of the tropics first hand, and to put my super-zoom point and shoot to the test. For stationary and particularly cooperative birds (and since it was a ZEISS sponsored trip and I was one of the leaders), I also carried a light-weight digiscoping rig…the compact ZEISS DiaScope 65FL spotting scope, a 30x wide-field eyepiece, a Canon S120 on the Digidapter for ZEISS, and the wonderful Roadtrip carbon fiber travel tripod from MeFoto…the whole thing weighing in at something under 6 pounds.
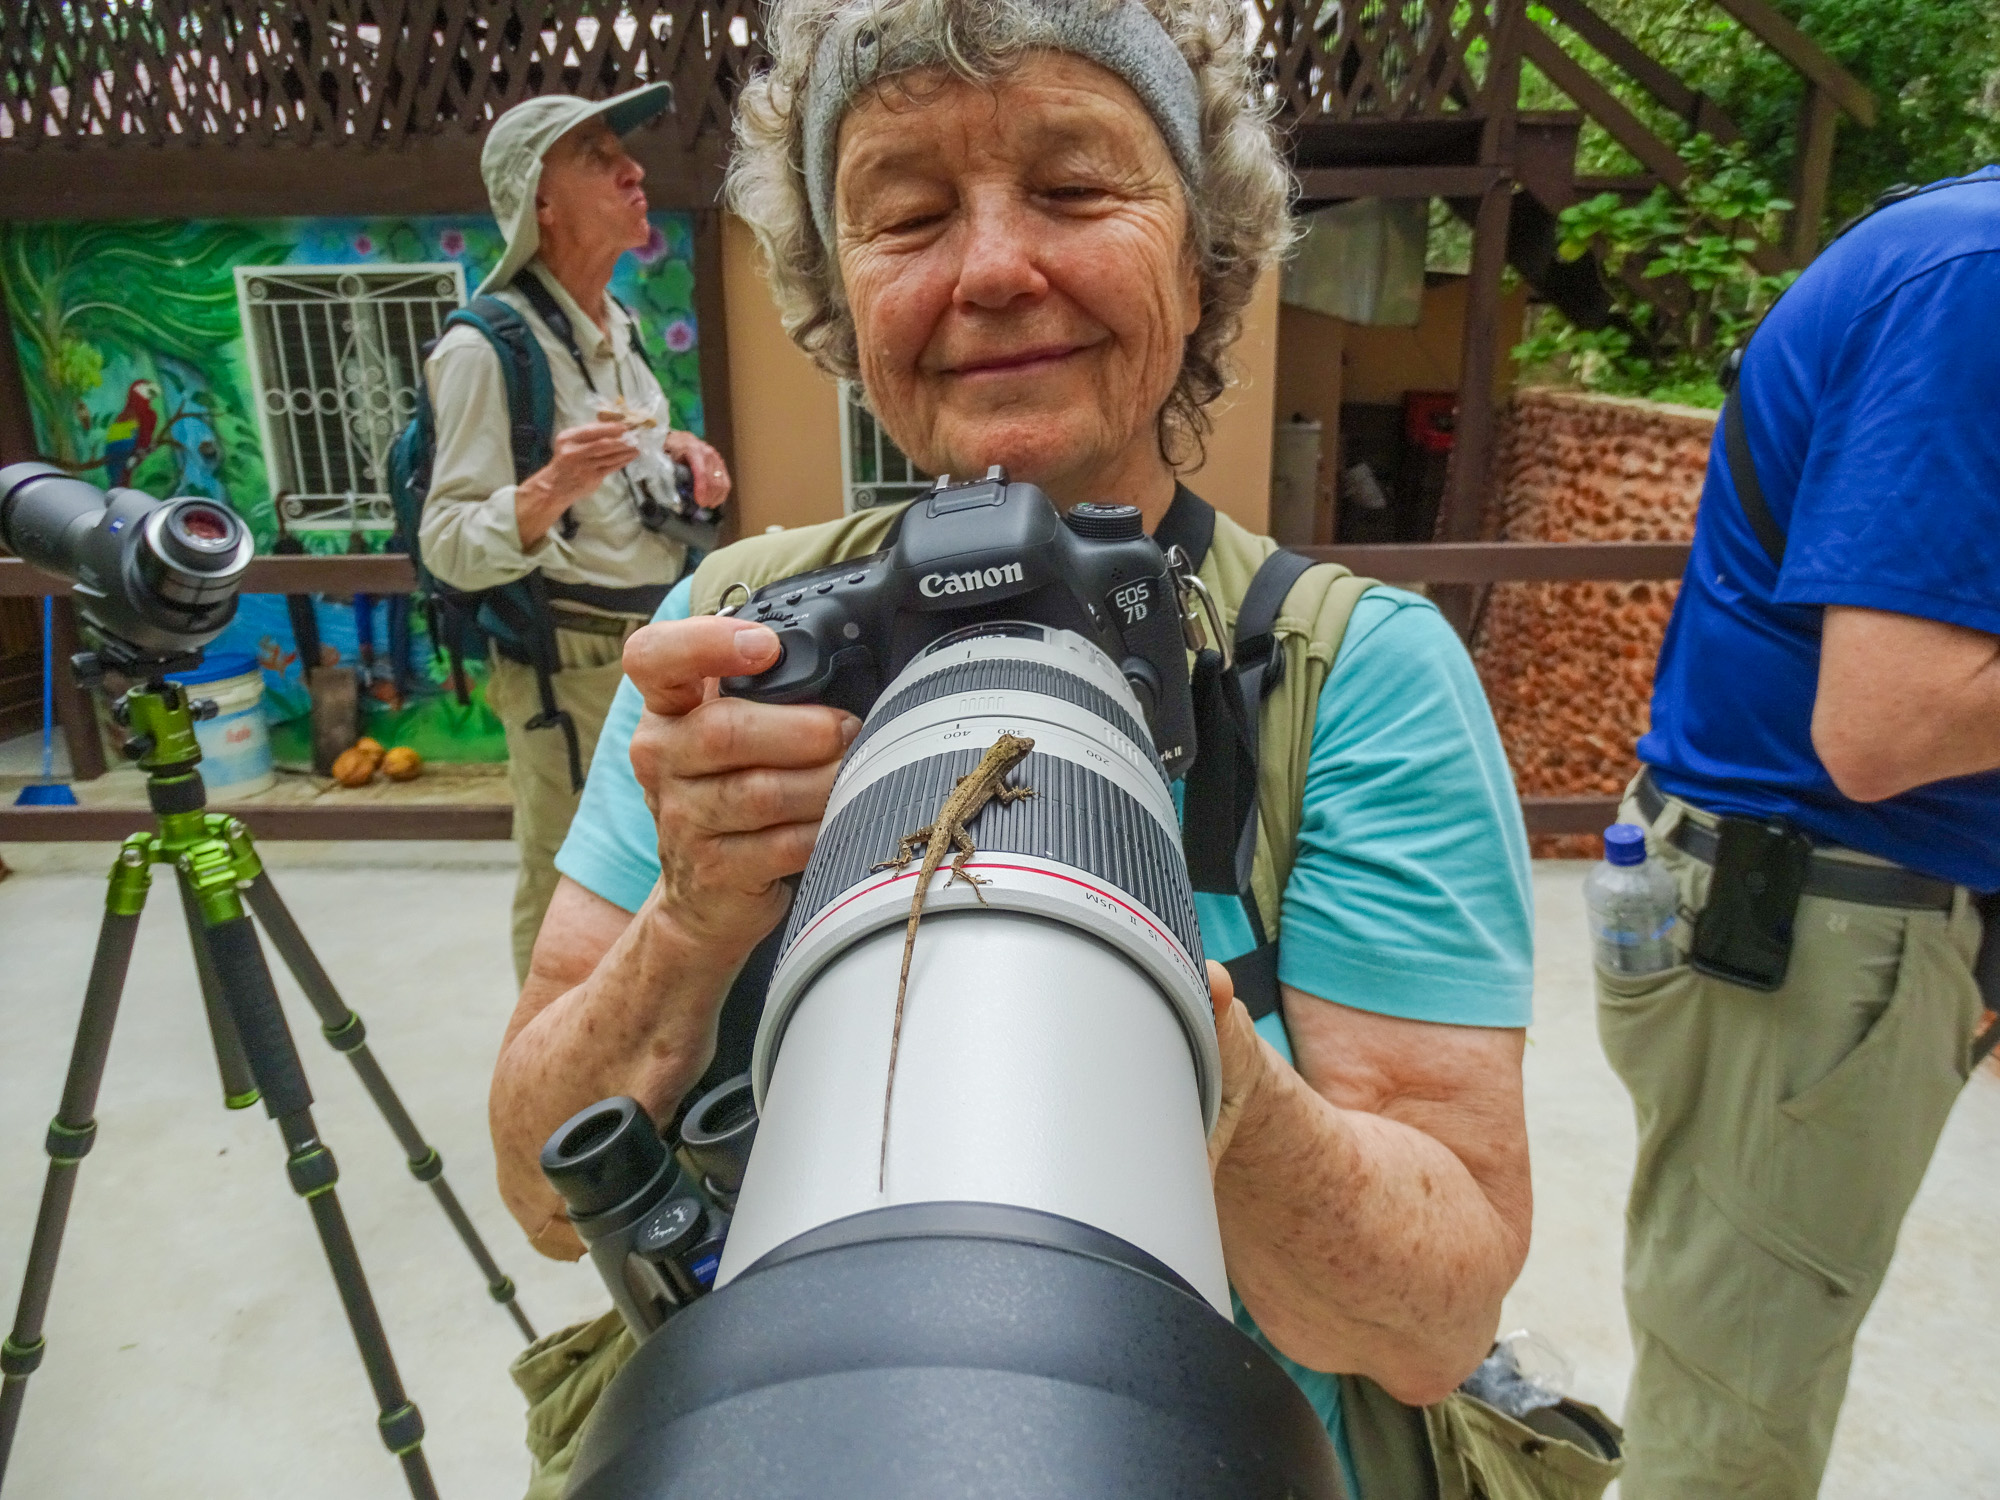
Most of my digiscoping rig. The camera and adapter are in a pouch on my waist. Great tripod! You can see the two 7Ds and long lenses in the group.
In my group there were, of course, people carrying Canon 7Ds and either the 400mm prime or the 100-400 zoom, so I had a chance to observe and compare how the full DSLR/Long Lens rig handled the same tropical situations. I have to say, my complete outfit, super-zoom P&S, and the digiscope rig, weighed less than their body and lens…even if they were shooting off-hand. One gentleman carried a full sized tripod and a gimbal head on every outing. That is real dedication. 🙂
Blue-crowned Motmot, Lodge at Pico Bonito. Digiscoped with the ZEISS DiaScope 65FL
The first challenge in the tropics is always going to be light. My DSLR toting friends were shooting at ISO 6400 most of the time in the rain-forest, and I was pushing ISO 3200 for most shots. Even-so I had to dial the shutter speed down from my usual 1/640th of a second to 1/250th or even 1/160th to get enough light for a decent exposure. The Image Stabilization on the Sony HX400V handled the slower shutter speeds well, but detail at ISO 3200 suffered. I got the shots, but not always totally what I might have wanted. The tropics push any camera to its absolute limits.
To complicate matters, most P&S super-zooms have a maximum aperture of between f6.3 and f6.7 at the telephoto end…a far cry from a Canon 400mm f2.8 or even the 400mm f4. However, that is f6.x at 1200mm or greater equivalent. If you zoom back to 400mm the aperture will be not much different than the fixed Canon lens. It is always a trade off when it comes to cameras.
Boat-billed Heron, Cuero y Salado Wildlife Refuge, Sony HX400V at ISO 2500 at 1/160th second.
For the Point and Shoot photographer I recommend my standard wildlife settings: shutter preferred, Auto ISO (with the upper limit set as high as possible). Even so, at least in rain and cloud-forest, you will find yourself using slower shutter speeds than you are comfortable with…but the Image Stabilization on most Point and Shoot super-zooms is up to the challenge. On the Sony, changing shutter speed in shutter preferred on the fly is super-easy…you simply spin the wheel under your thumb…your mileage with other brands may differ. 🙂
I regret that I did not try the High Sensitivity modes on the Sony, which would have given me ISO 6400-12800 in a pinch. It might have made a difference. I will certainly give it a try on future trips to the tropics.
Blue-crowned Motmot. Sony HX400V. ISO 3200 @ 1/250th @ f6.3. Pushed to the limits.
Focus is a whole other issue. Point and Shoot cameras use Contrast Detection Auto Focus, which is slower and less precise than the Phase Detection Auto Focus on full sized DSLRs. It also requires more light to work effectively. You will certainly want your focus area set to the smallest possible square in the center of the field, so that you have a chance to focus on the bird through the dense foliage.
Even then, I found myself resorting to Dynamic Focus Assist on the Sony HX400V much more often than ever before. The Sony focus system allows you to maintain auto focus, and fine-tune it using the focus ring around the lens barrel, just as you would focus a manual focus lens. It is, without a doubt, the easiest manual override auto focus of any P&S camera on the market, and I certainly appreciated it by the end of my time in Honduras. The only thing that would have made it better would have been a higher resolution Electronic View Finder so I could have seen when the bird was in focus more easily.
Almost all P&S super-zooms today have some kind of manual override on the auto focus…or straight up manual focus…but none are as quick, easy, and intuitive as the Sony system. Still, if you are headed for the tropics, dust off your manual and find out how to manually focus your camera. 🙂
Black-faced Grosbeak, Sony HX400V. Tricky focus requires manual override.
For all the difficulty in focusing, however, I am pretty sure I got as many sharply focused images as my DSLR friends. Birds under the canopy will generally sit still long enough to find focus.
Of course, there are areas in the tropics that have lots of light! We visited the Cuero y Salada Wildlife Refuge at the junction of two mangrove lined rivers near the Caribbean coast. To get there we rode a “banana train”…a narrow guage, open car, toy train that was used in the early 1900s to transport bananas from the plantation near the coast, 9 km inland to the railhead. Despite the fact that there were local paying passengers on the train, we stopped often for birds along the way.
Northern Jacana, Cuero y Salado Wildlife Refuge
Bare-throated Tiger Heron
Roadside Hawk, Cuero y Salado Wildlife Refuge
Bat Falcon, Cuero y Salado Wildlife Refuge
Even along the river we found some birds in good light. And, with enough light, the super-zoom P&S always performs well. These shots are satisfying, especially since they were taken hand-held from a boat.
Mangrove Common Blackhawk, Cuero y Salado Wildlife Refuge
Magnificent Frigatebird, Sports Mode.
Ringed Kingfisher, Cuero y Salado Wildlife Refuge
White-collared Puffbird, Cuero y Salado Wildlife Refuge
In the dry forest, and in the inland valleys, the super-zoom gave me the reach to capture birds from the bus on the road, and from respectable distances in the forest…as well of macros of some interesting butterflies.
Lesser Roadrunner
Clouded Sulphur
Crimson Patch
Green Kingfisher
Lineated Woodpecker
Grove-billed Ani
Wood Storks and Egrets
And of course, at the wide end the P&S super-zoom captures the grand tropical landscape.
Rio Santiago
Along the way to see the Honduran Emerald
Sports Mode, or tracking auto focus, even makes hummingbirds at feeders and perched possible.
Violet Saberwing
Crowned Woodnympth
Long-tailed Hermit
Crowned Woodnympth
Long-tailed Hermit.
White-necked Jocabin
Stripe-throated Hummingbird
Rofous-tailed Hummingbird
Crowned Woodnymph
Just for sake of interest I will share one more digiscoped image, again taken with the Canon S120 P&S through the 30x eyepiece on the ZEISS DiaScope 65FL spotting scope, using the Digidapter for ZEISS and the MeFoto Carbon Fiber Roadtrip tripod. This is a particularly difficult shot due to the low light and the foliage between me and bird.
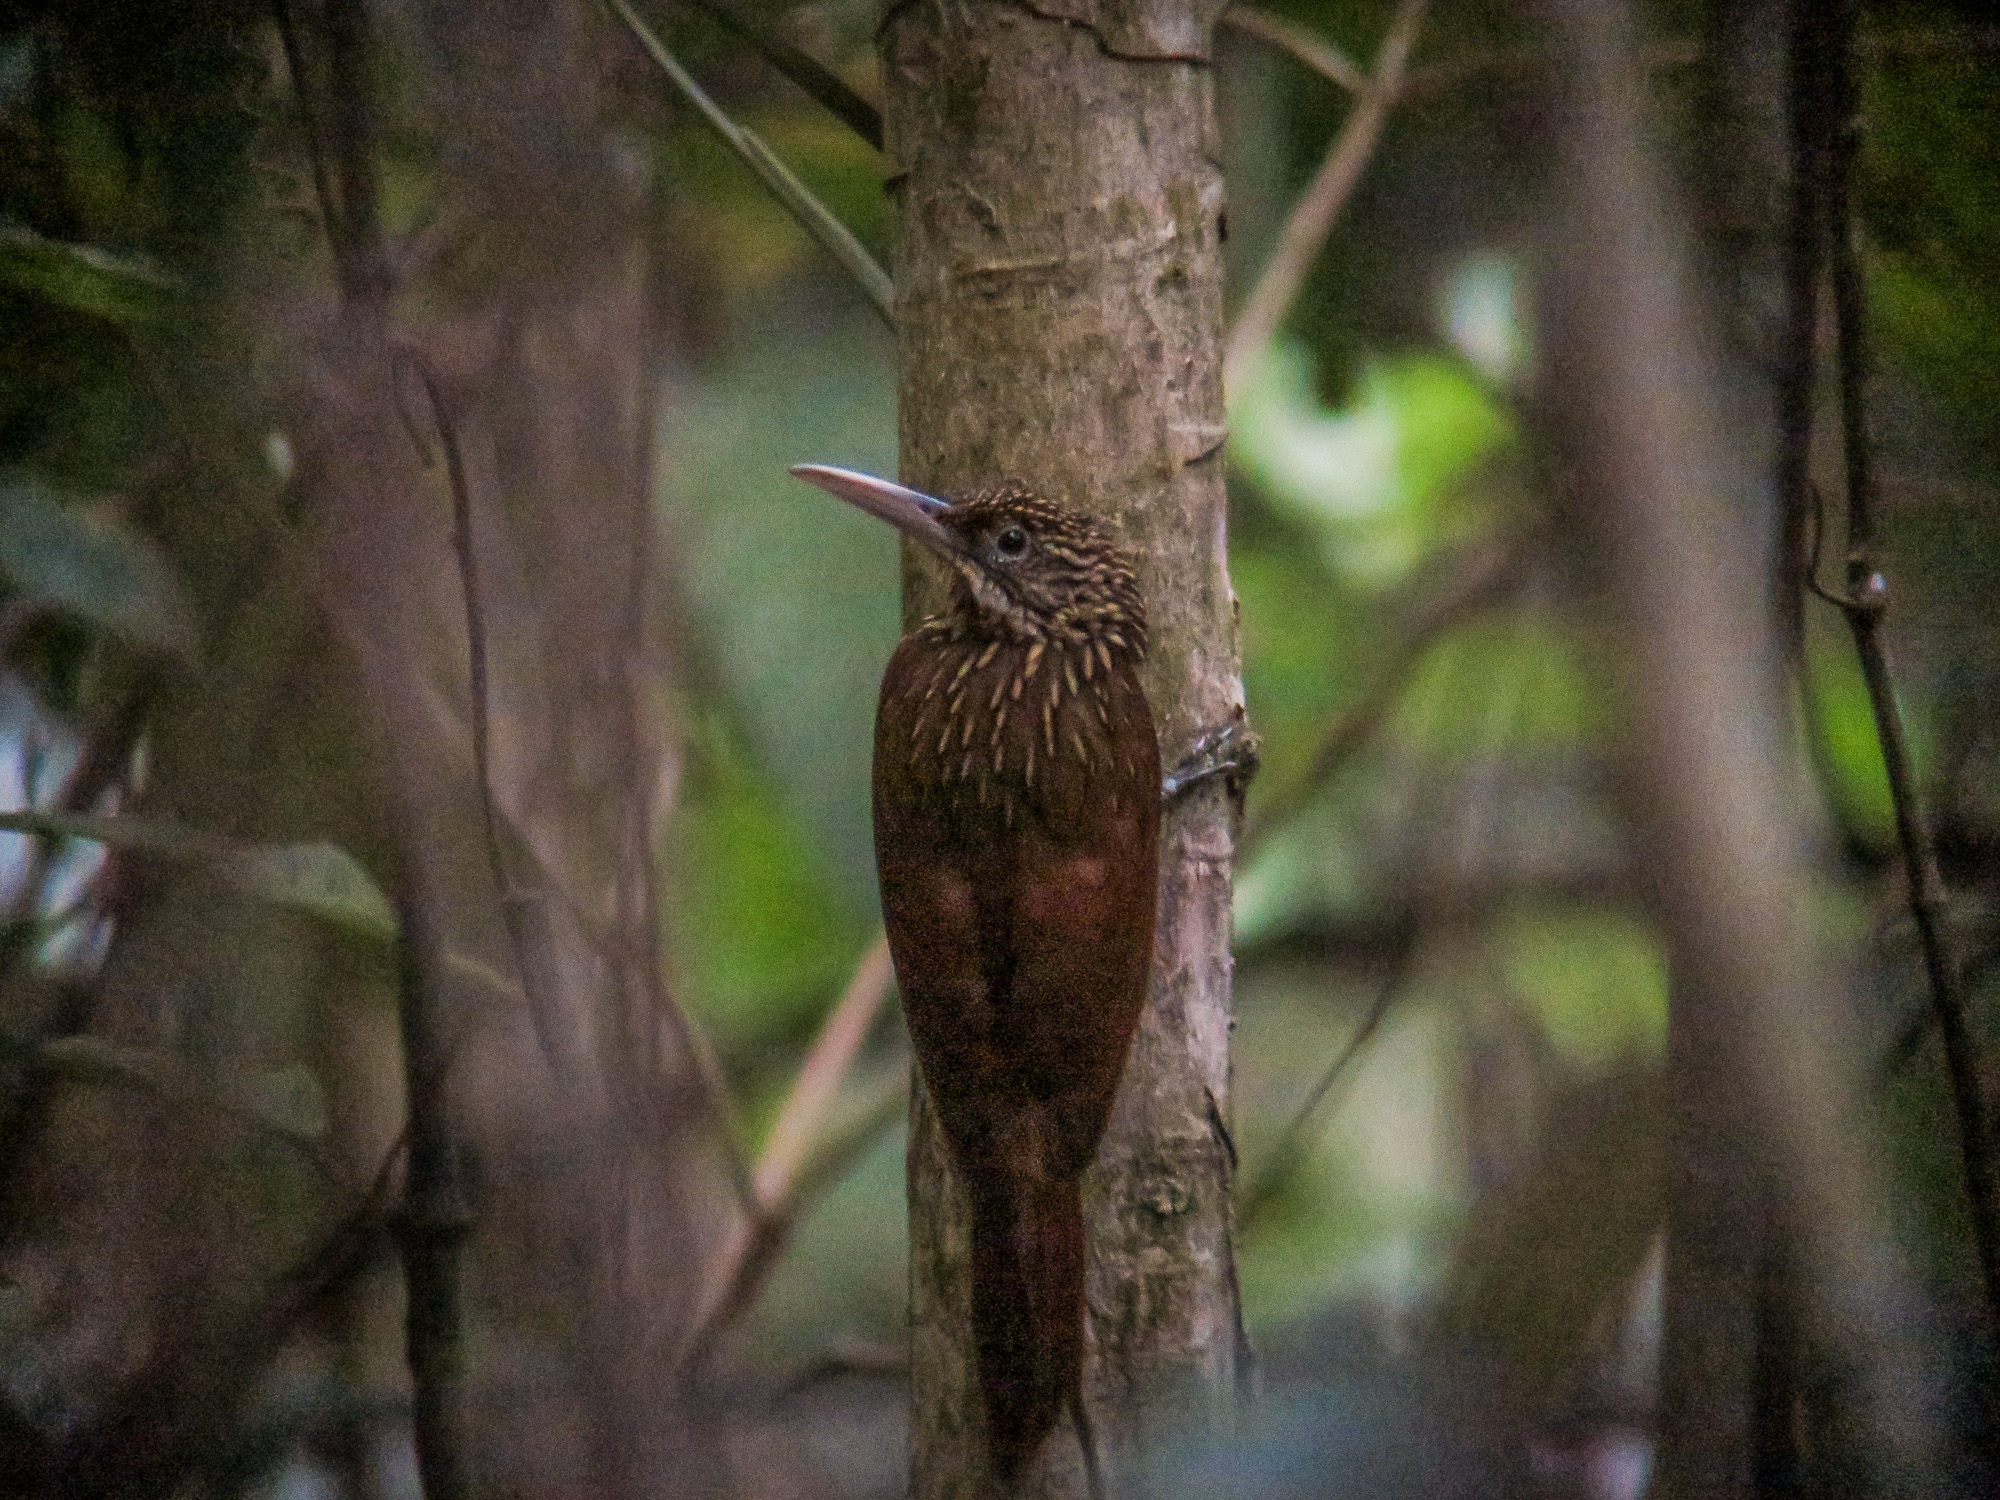
Ivory-billed Woodcreeper, digiscoped at ISO 3200.
So, how does the P&S super-zoom fair when compared to a full scale DSLR/Long lens rig in the tropics. My good friend Diane Porter was shooting beside me most of the trip, with her Canon 7D Mk2 and the 100-400mm Canon IS Zoom. She has kindly allowed me to borrow a few of her shots for comparison. Of course, her shots had to be heavily cropped to equal the scale of the 1200mm equivalent zoom on the Sony. It is a testimony to the quality of the Canon 7D Mk2 that the images hold up so well to heavy cropping.
Diane Porter. Canon 7D Mk 2, 100-400mm zoom. ISO 6400. 1/500 @ f7.1 Cropped for scale.
Sony HX400V @ 2400mm equiv. Ferruginous Pygmy Owl, Lancetilla Botanical Gardens. @ ISO 2500 @ 1/250 @ f6.3
You will notice that the better the light, the closer the Sony P&S comes to the full sized rig. The first comparison is not totally fair to the Sony, as I used the full 2x Clear Image zoom for the equivalent of 2400mms of reach. Digital zoom (while the Sony system is among the best), will never equal the quality of optical zoom.
I will give you one more comparison. This time it is a digiscoped Trogon, digiscoped at the short end of the digiscoping range…and again at 3200 ISO to cope with the low light levels under the rain-forest canopy.
ZEISS DiaScope 65FL. 30x eyepiece. Canon S120 on the Digidapter for ZEISS. MeFoto travel tripod. ISO 3200.
(Just for fun, here is Diane and her rig, playing host some kind of whiptail lizard.)
Diane Porter and a visitor. This is a trick you can not do with a P&S.
Photography is about choices as much as anything. When we choose the compact ease and flexibility of a Point and Shoot super-zoom over the more conventional DSLR/long lens rig, we know that we will sacrifice some image quality. Conditions in the tropics test the limits of any camera and lens, but all in all I will still be packing my P&S super-zoom on my next tropical adventure!
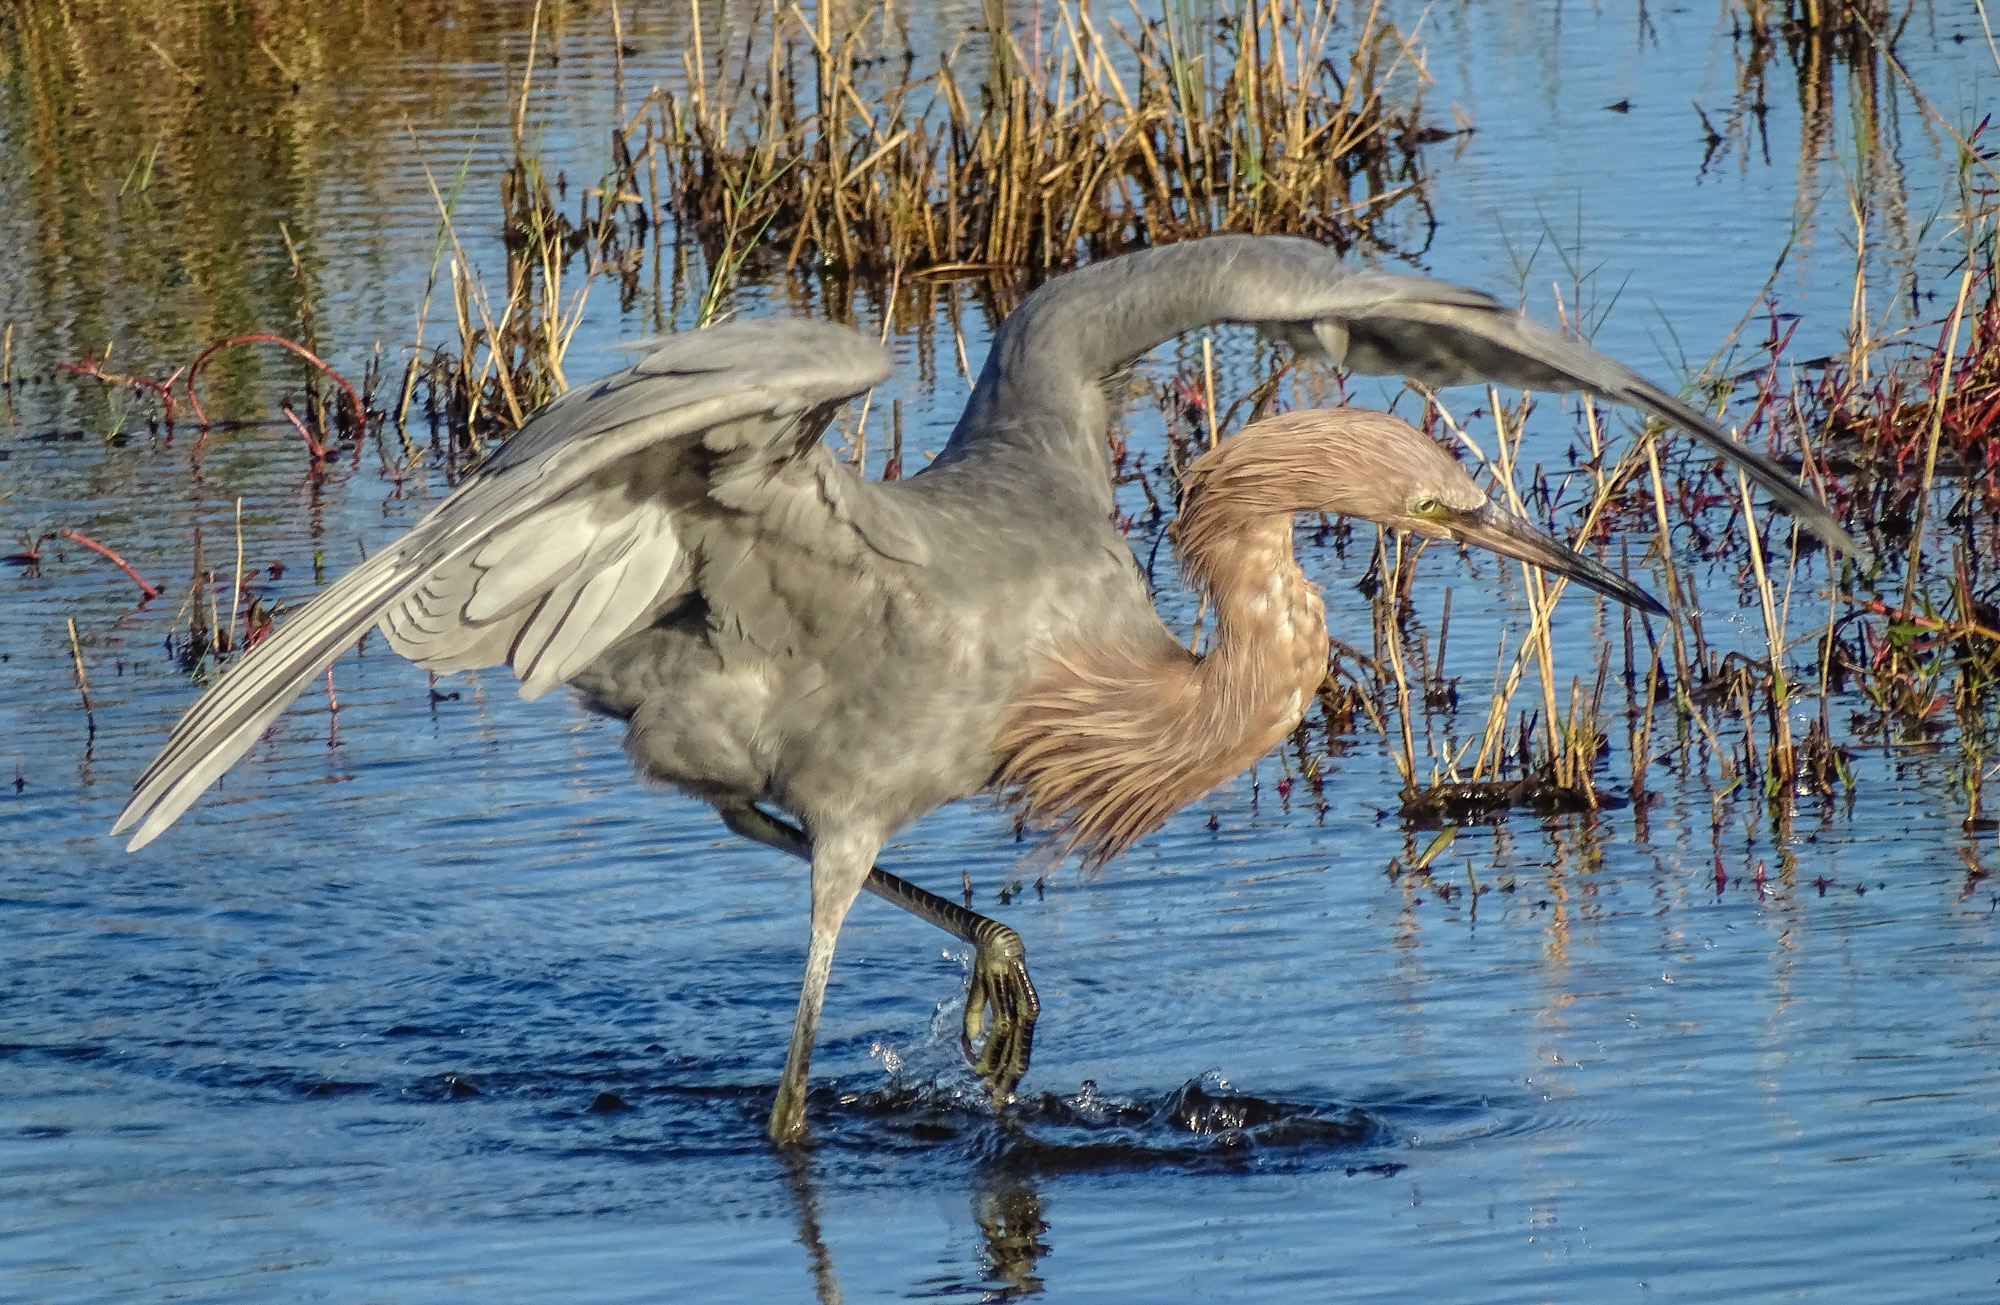
Reddish Egret, Blackpoint Wildlife Drive, Merritt Island NWR, FL
One of the limitations of Point and Shoot cameras, even advanced Point and Shoot cameras like the super-zooms, is that they use a simpler, and less effective, auto focus sensor system than full fledged DSLRs. This matters not at all when you are shooting landscapes…and seldom when you are shooting people, even active people at parties, etc…but it can matter a lot when shooting wildlife…especially active wildlife.
Nothing is more active than a feeding Reddish Egret. I have tried to catch the wing-thing the Reddish Egret does periodically as it dances and prances about feeding…but this is one time when my choice of camera makes photographic life more difficult. The bird is literally all over the place…near and far…running to the left…hopping back to the right…and it seems impossible to predict when it will raise its wings to shadow the water so it can see its target fish. And the whole wing thing takes only a second. Done and gone.
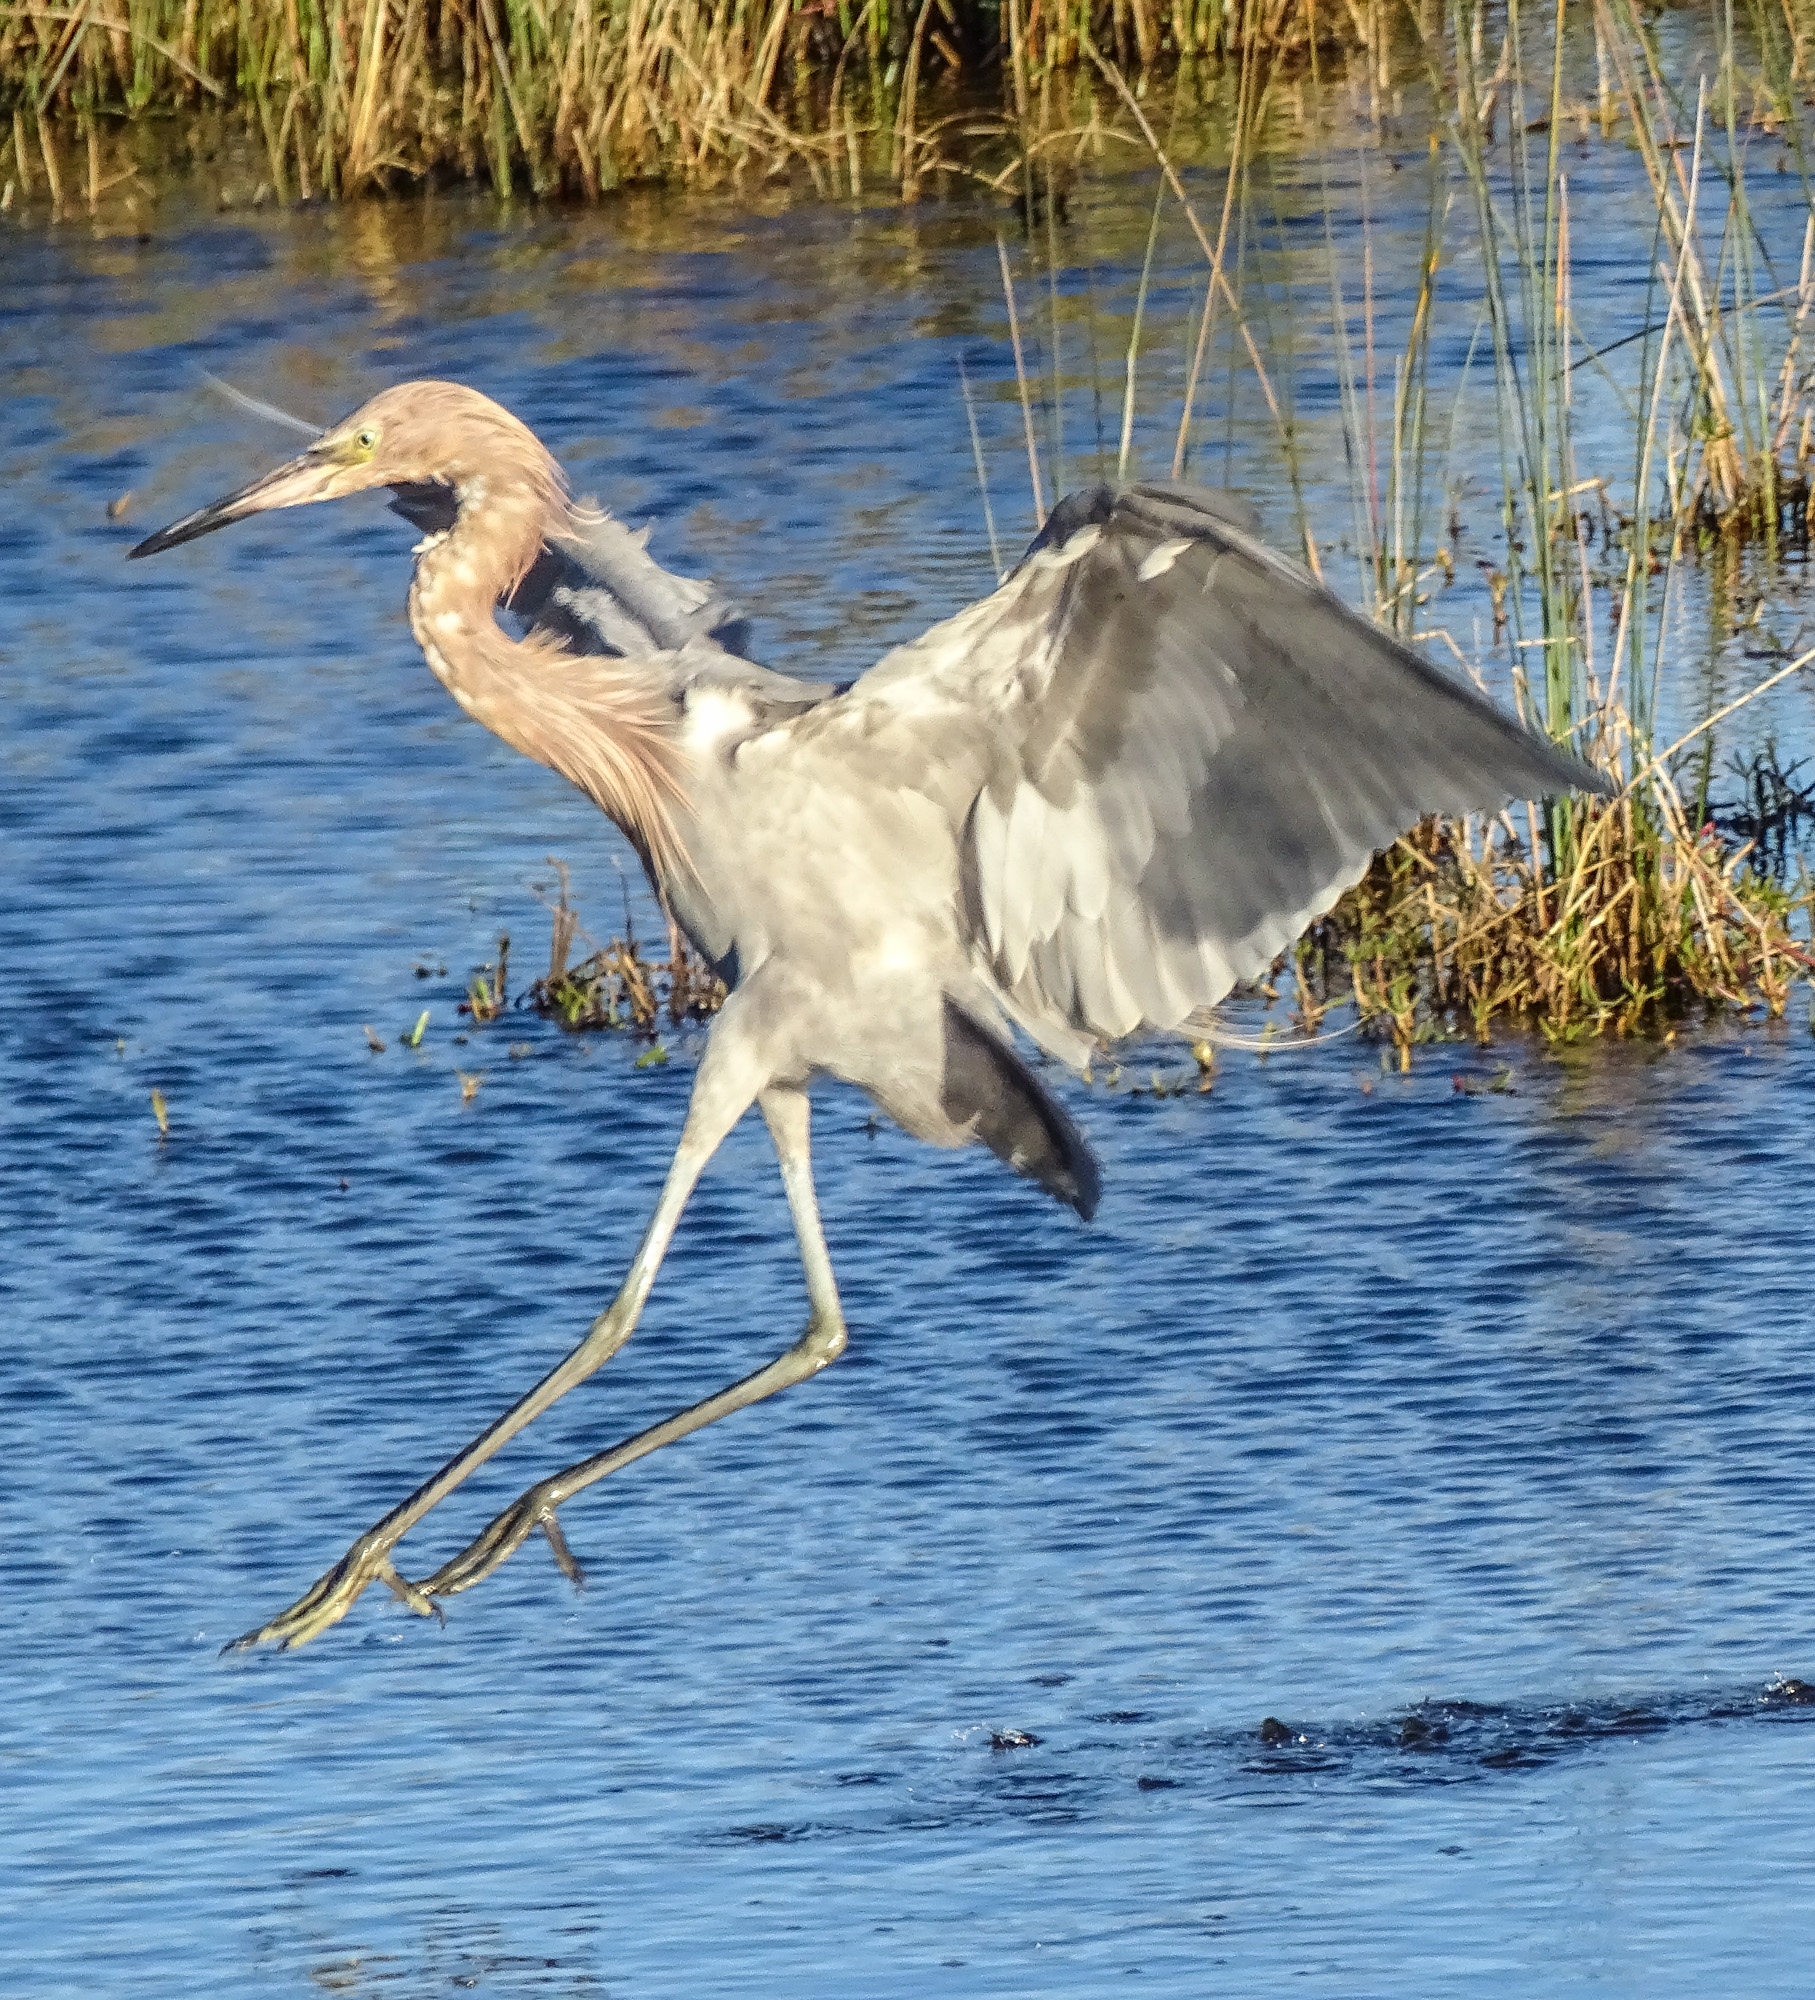
Recent generations of super-zooms, however, have borrowed the “follow focus” mode from their larger cousins. Follow focus, or focus tracking, allows you to lock focus on a moving subject in the frame, and then the camera will track that subject and keep it in focus. On some superzooms, putting the camera in Sports Mode automatically activates tracking auto focus, and sets the focus programming to favor moving subjects.
You might remember that I recommend Sports Mode for birds in flight, but I had the opportunity to put Sports Mode and tracking auto focus to the test with a few cooperative Reddish Egrets along Blackpoint Wildlife Drive at Merritt Island National Wildlife Refuge. It is worth noting that if tracking auto focus is going to work anywhere…it will work best in the brilliant winter sun of Florida.
And work it did. Unlike some P&S superzooms, with the Sony HX400V it is not even necessary to half press the shutter release. The camera automatically locks focus on any moving subject when it is centered in the finder, and then all you have to do is keep the subject roughly centered. The camera does the rest, and you are focused and ready when the action you want to capture happens. Combined with the Sony’s fast 10 frames per second continuous mode, I was able to capture many wing-things, and several dramatic sequences of the Egret striking at fish. I was even able to catch the Egret in mid-hop. 🙂
This slideshow requires JavaScript.
Mid-hop. Reddish Egret. Blackpoint Wildlife Drive, Merritt Island NWR, FL
Some superzooms do not have a Sports Mode, or on some Sports Mode might work differently. If so, look for the Tracking Auto Focus, or Follow Focus under the auto-focus settings in your menu.
Find some active wildlife and give it a try. I think you will like it. 🙂
Photo geek discussions of image quality often revolve around the presence or absence of artifacts in the image when viewed at high resolution and large sizes. The theory among serious photographers seems to be that a good digital image should have very few visible artifacts, no matter how big you blow it up.
Digital artifacts come in several flavors. One of the more obvious ones is color, tone, and detail smearing, often referred to as the water-color-effect. In areas of the image with very fine visible detail the colors tend to run together in a muddy mix, and fine detail looks smeared as though a wet brush had been dragged across it. This is especially evident in grass at distance and at the edges of the frame and foliage. Then there is postering. Areas of smooth tone, like the human face, clothing, or the sky take on a poster like look, with visible edges between two areas of tone that should blend into each other. Another is blocking, where jpeg compression creates a pattern of tiny blocks instead of smooth color gradations. This is generally accompanied by the jaggies…another jpeg compression artifact, that produces a step like line where a smooth curve should be. Finally there is an artifact called over sharpening, which produces hard edges and even halos (bright lines) along the edges of objects in the image, as well as contributing to the postering effect.
In addition, small sensor cameras can suffer from mottling and color noise in smooth tone areas…especially in the sky. This produces a blotchy, freckled look where there should be a smooth expanse of blue. Color noise is especially easy to see in dark areas of the image. There might be little rods of red, green, and blue scattered in the shadows.
Generally speaking, none of these artifacts can been seen at normal viewing size or in prints under 8×10, though in an image where they are very present, the effect can be general loss of subtlety. People might say the photographic image looks more like a painting than a photograph. Generally though, you have to view the image blown up to nearly full resolution on a good high resolution monitor or LDC panel to see the artifacts. They can also show up clearly in large prints made from infected files.
This image from an older Point and Shoot superzoom shows most of the painterly artifacts discussed above.
It is a pretty standard criticism of Point and Shoot cameras and sensors that the images have too many artifacts. Some photographers will argue that the built in processing engine in any camera that saves the images only as jpeg files will produce an unacceptable level of artifacts…since many of them come from jpeg compression, and less than subtle in-camera processing. This is why P&Ss that record images in the RAW format (unprocessed) are generally considered higher quality than cameras that do not.
There is a name for those photo geeks who are really hung up on the artifacts issue. They are called pixel peepers (since they blow images up until they can see the individual pixels) by those with a more relaxed attitude. Of course I am pretty sure the pixel peepers consider the rest of us to be something less than serious about our image quality.
I will admit to having gone through my pixel peeping phase. Only a few years ago, some P&S cameras had such complex and such obvious artifacts that it was very easy to be disappointed with the results for anything but casual use. The images really did look like bad paintings at anything bigger than your standard laptop screen size.
Recently though I have come to suspect that there is more to this artifacting issue than might be immediately apparent. I began to wonder if the artifacts in the best of today’s Point and Shoot cameras might be intentional…the result of the aesthetic engineers attempts to get the best performance out of the tiny sensors in Point and Shoot cameras.
Part of my suspicion is fueled by the undeniable fact that the image quality of Point and Shoot cameras, at least when images are viewed at reasonable sizes, has improved steadily over the past few years…yet the pixel level artifacts remain.
And part of my suspicion is fueled by the realization that all digital images are in fact closer to paintings than to conventional photographs. All digital images are renderings of reality, not reproductions.
I believe what we are observing in recent Point and Shoot camera generations is that the computing power and the sophistication of the processing engines (software) built into today’s cameras has gotten to the point where the jpeg renderings of the files for display are simply very, very good…so good they consistently fool the human eye into seeing more detail and more subtle color that is actually in the file.
For years, the stated purpose, or at least the underlying assumption, behind digital photography as been to improve the technology so that the camera can accurately capture, or record, the full range of light and dark, every subtle shade of color, and finest detail of every texture that our eye can see in the world around us. And we have made great progress toward that goal.
However, the truth is that no matter how accurate our recording, to be of use, the data that we capture has to be displayed using a pattern of tiny glowing bits on a monitor or LCD panel, or transformed into a pattern of ink dots on paper that can be viewed by reflected light. The resolution and color depth of displays continues to improve, and printers to evolve, but we have to remember that, no matter what the camera records, we do not have an image until it is rendered for display.
And, of course, someone has to decide how the raw data is going to be translated into a file that will drive a display or printer. Most professional and many advanced amateur photographers want to be the one to make the decisions…admittedly subjective, aesthetic decisions…on how that translation is going to happen. They work with RAW files and process them at the full resolution and color depth the sensor provides, and only translate them for display or printing at the last possible moment.
But the fact is, of course, that no sensor made today can capture what the eye sees, and no display technology can display it. Therefore part of the process of translation is always to adjust the data captured to compensate for the limits of the sensor and then tailor that data to the limits of the display technology available. All with the goal, of course, of displaying what the eye saw, or at least what the mind (heart) intended.
That is what I have come to call rendering the image. All digital images today are rendered for display, in much the same way we understand that a painter renders the scene before his/her eyes or in his/her mind. We might use digital technology, but our photographs are as much paintings as the work of any impressionist, and actually use a very similar theory of imaging…breaking the image down into bits of color and pattern, and reassembling bits and patterns of color to represent what we saw. That is the essence, as I understand it, of impressionistic painting.
When the aesthetic engineers at the today’s camera companies are faced with getting the most pleasing results out of a tiny sensor, they have to make decisions based on how the image will be displayed. Knowing the likely limits of resolution and size of the display, and the likelihood that the display will be digital itself, they have opted to program the camera to render the image for apparent detail and smooth tones at those sizes.
This requires a different approach to rendering than you might use in an idealized large sensor camera.
A really good painting produces the illusion of much more detail than is actually there. Walk up close to any painting and see how quickly the image dissolves into artifacts…how close do you have to be, in fact, to see the individual brush strokes and blobs of paint? Or to see that what looked like grass in all its glory was actually a swath of green paint with some clever strokes of yellow and black that tricked the eye into seeing the detail that is not there? How close do you have to be to see that the fully formed human face that you appreciated from 6 feet is actually a single brush stroke with a suggestion of eyes and mouth dabbed in?
Okay, so that is an extreme example…but I believe it captures the essence of the quality we are seeing in today’s best Point and Shoot cameras…especially in the jpeg files the cameras are designed to produce.
Perhaps the aesthetic engineers at Sony, to pick a company often criticized for their artifacty images, are not attempting to produce a smooth toned, finely detailed reproduction of the world through the lens, so much as they are attempting to render an image that, when viewed or printed at reasonable sizes, produces a satisfying impression of fine detail and smooth tone.
Admittedly, if you pixel peep, the artifacts are still visible, just as you can see the brush strokes and blobs of paint in a painting if you get too close, but with each generation of Sony Point and Shoot cameras, with increasing pixel count and processing power…as well as increased software sophistication…the rendering of reality has gotten finer, more detailed, more subtle…more satisfying.
I do not believe there is any other way to get satisfying performance out of a small sensor. We know, in selecting a Point and Shoot superzoom that we are making a compromise based on flexibility and compactness. No other camera can offer us an equivalent range in such a tiny package. That is the attraction. To get that means a small sensor…and satisfying image quality at reasonable viewing sizes from a small sensor requires an impressionistic rendering of the image. That is just a fact of life.
In fact, it is pretty miraculous, and evidence of great skill and dedication on the part of the artist-engineers, that a tiny 20mp sensor and a tiny computer in the camera can render such a high quality image, in a compressed format like jpeg, that allows easy, fast file movement.
At the other extreme, at the true professional end of the photographic spectrum, we are seeing more and more high pixel count full frame sensor cameras…and more and more high resolution displays and printers. And ever increasing power in the desktop and laptop computers we use (even in tablets these days) to process the high resolution RAW files. That is the other way to produce satisfying renderings of reality…the only way if you are going to display images on 4D and higher resolution displays and at print sizes, say over 24 inches. But even with the rich clean data of a big sensor, some kind of intelligent, intentional rendering of the image for display will always be required, whether it is done in-camera or after the fact.
Need visuals?
Green Heron at screen resolution. Sony HX400V
Detail at approximately 1 to 1.
Detail at approximately 4 to 1.
In the images above we have an example of pixel peeping. The top image is presented at screen resolution. By clicking on it you can view it at its full uploaded resolution of 2000×1500 pixels. You will see at anything up to that size (and considerably larger actually) the image looks great…excellent rendition of detail and color…certainly very satisfying. Until recently an HD computer monitor or LCD screen was 1900 pixels across, so this image would fill the screen. It would make a 10×8 inch print at 200 dpi…excellent quality.
The next image shows a small segment of the first blown up so that you can see each pixel. That would be the equivalent of full screen view on a monitor with a resolution of 5184×3888 (twice the resolution of highest resolution LCDs currently in production), or a print 25 inches wide. At that size the artifacts are just beginning to show. Still, from anything more than a foot away, the image on an HD screen or the 25 inch print would look amazingly detailed, smooth, and satisfying.
The final image is an even smaller segment of the first, now blown up to 4 to 1…four times full resolution. At this scale the artifacts are obvious…but it is the equivalent of a print 100 inches wide! Even at that scale, from more than 4 or 5 feet viewing distance, the image would still look almost as good as it does on at screen resolution. Don’t believe me. Next time you are in an airport, take a really close look at one of those wall sized images. 🙂
So, bottom line. The artifacts you see in Point and Shoot images when you pixel peep are necessary to the pleasing effect of the images viewed at normal viewing sizes. If you have opted for the convenience, the flexibility, the compactness of a Point and Shoot superzoom…just enjoy the results it is designed to produce. Do not pixel peep. The artifacts you do not see can not hurt you…and you will get full enjoyment out of the images you bring back…images that you would be unlikely to get with any other camera!
I will admit to not being nearly as sensitive to background in my wildlife and nature shots as I should be. On the other hand, there are always two ways to become known for your photography. 1) you can work very carefully, and develop great skill in waiting for exactly the right light and working the angles for the perfect background on every shot you take…or 2) you can shoot a lot…all the time…every time you get any kind of chance at all…and then be very selective in what you show to other people 🙂 Either method works…and most honest photographers will tell you that their success rests on a combination of the two. It is important to be able to take an exceptional photograph when the opportunity comes your way…and to be able, within the limits of what nature offers, to create that opportunity when ever you can…but it is just as important to shoot all the time, to shoot a lot, a lot…and to learn to recognize the exceptional shot when you come to process it.
Either way, background has to figure into your calculations. By background I mean whatever is behind your subject…or whatever fills the space in the frame not occupied by the focus of your attention. It if it a picture of a bird, it is everything that is not the bird. If it is a picture of person or an elk, it is everything that is not person or elk. Etc.
Take the two images that lead the post here. It is the same Green Heron, taken from the same boardwalk…Anhinga Trail at the Royal Palm Visitor Center at Everglades National Park…moments apart. The difference is that I re-positioned myself and my camera a few feet down the boardwalk for the second shot in order to get a less cluttered background. I wish I could say it was a conscious choice…but honestly, I was just experimenting with different angles, and noticed the different effect of the background only while processing the images.
And the difference here is not as dramatic as it might have been. There are things I like about both images.
But take this comparison.
Zebra Longwing, Everglades NP
Zebra Longwing, Everglades NP
Here I am much less ambivalent about which is the better photo. I far prefer the contrasting, uncluttered background of the second shot. The second shot also displays an effect referred to, in photographic circles, as bokeh. Bokeh is the Japanese term that is used to describe the visual structure of the out of focus portions of an image. We say an image has nice bokeh when the out of focus background is pleasing to the eye. Pleasing to the eye, of course, is a judgement call, but there seems to be quite a bit of consistency in the way the term bokeh is used…which leads me to believe that we humans tend to agree, for the most part, on what kind of background is pleasing. An out of focus background that shows some abstract pattern, but not so much as to be distracting, seems to get the most consistent praise.
Tricolored Heron, Shark Valley, Everglades NP
Tricolored Heron, Anhinga Trail, Everglades NP
These are two very similar images taken of the same species of bird miles apart. One is from the Anhinga Trail at Royal Palms, the other is from Shark Valley, both in Everglades National Park. The difference between them is subtle…but it definitely hands on the background.
One more really obvious example, though in this case I could have done nothing about the background in either image. I was shooting from the car for the first image, across the passenger, and the bird was on the ground, so my options were limited. The second bird was simply perfectly posed on a post beside West Road in Shark Valley and sat there while I stopped my bike and got off a short burst of images, before flying away. There was no chance to reframe in either case.
Red-shouldered Hawk. Shark Valley
Red-shouldered Hawk, Flamingo
Obviously, if you have a choice, maneuvering for a less cluttered background should be part of your photographic habit. A few steps right or left, or a shift in angle up or down…or both…is often all it takes. This is the same spider at Shark Valley, from just a slightly different angle.
Spider, Shark Valley
Spider, Shark Valley
Snowy Egret, Shark Valley, Everglades NP
Sometimes it is totally the background that makes the shot, as in this image of a Snowy Egret at Shark Valley. Until I pressed the shutter and reviewed the image, I could not see the pattern that the light on the moving water made in the background, and it did not really come up until processing in Lightroom. But I have to tell you I was really happy to see it there!
The background effect is just one more thing to think about while shooting and while processing…but giving it the attention it deserves will improve your images and repay the effort. Eventually someone is going to say “nice bokeh” when you show them a shot (if you have any photo-geeks among your friends at all), and you will be able to say, “Yes…I worked hard to get that!” or, at the very least, “Thank you!”
Three Sanhill Cranes in flight. Bosque del Apache NWR
Birds in flight are such a challenging photographic subject that the category of images has its own internet acronym: BIF. Go to any of the camera forums (like those on dpreview.com) and you will see periodic discussion of the challenges and techniques of BIF photography. Mostly the challenges.
Standard BIF rig. Photo from Borrowlenses.com
Until very recently BIF was the sole domain of the long lens, DSLR photographer, generally shooting off a heavy duty tripod with a gimbal head (one of those heads that suspends the lens from above and allows free motion up and down and side to side for panning and following BIFs). Only a pro level DSLR had the focus speed to catch BIFs and most BIF photographers shot with 400-600mm lenses to fill the frame.
And they practiced, almost to the point of specialization, to develop the panning and following skills needed. I see photos of BIFs that just leave me speechless…they are that good, and that amazing.
Of course, that has never stopped me from attempting BIFs with my chosen Point and Shoot super-zoom cameras. Until a generation ago (camera generation…about 2 years) the results were spotty at best. I got an occasional keeper on a day and in a place where there were lots of birds in the air and I had lots of time to practice. Rookeries. National Wildlife Refuges that draw geese, ducks, and cranes. Etc. But it was more by chance and persistence than it was by skill when I came home with anything I wanted to share.
Canon SX50HS in Sports Mode
However, with the advent of the Canon SX50HS and its effective Sports Mode, suddenly BIFs with a Point & Shoot became a lot more possible and a lot more fun. Sports Mode on the SX50HS was programmed to lock focus on a moving subject and then to follow focus on that subject while it was still near the center of the frame. Combined with a 3.4 frames per second continuous shooting mode, Sports Mode made it really possible for the first time to get consistent BIF shots without investing in the full DSLR rig above.
In a place like Bosque del Apache National Wildlife Refuge or along the cliffs of Point Cabrillo in San Diego, where there are Snow Geese and Cranes or Pelicans in the air almost continuously, with practice you could pick up a bird and center it far enough out so you could pan smoothly and follow…half press the shutter release to lock focus…and then fire off a burst when the bird was near filling the frame…continuing to pan with the bird for best effect. You were half-blind once your pressed the shutter, since the viewfinder did not refresh fast enough to really follow the bird…but it could, with practice, be done. 🙂
Pelican off the Tide Pools at Point Cabrillo in San Diego. SX50HS in Sports Mode.
There was a good deal of debate on the forums (not helped by inconsistencies in the Canon documentation) about whether Sports Mode did in fact follow focus once you pressed the shutter release to start your burst. I was, and remain, in the “yes it does” camp, and have results to prove it, at least to me. The doubters have their demonstration sequences as well.
However it works, the Sports mode on the SX50HS (and I assume on the SX60HS as well), makes BIF fairly easy, given the right birds and a bit of patience and persistence.
I have been waiting for my yearly visit to Bosque del Apache NWR to really give the Sony HX400V Sports Mode a fair trial.
The Sony works very much like the Canon. There is a large rectangular focus frame in the center of the view. The Sony auto-focuses on whatever is nearest the center of that frame using continuous auto focus. When you half press the shutter release it locks on the subject, and then follows focus on that subject as it moves within the frame or as you pan with the motion.
The HX400V has two continuous shooting modes, and you can use either in Sports Mode. I have been using high speed burst which is 10 frames per second for 10 frames. It is possible to shoot a shorter burst than 10 frames, but you have to be really light on the shutter release. The finder flashes while shooting the 10 frames, but you get a pretty much continuous look at your subject to aid in panning.
Tandem Snow Geese. Sony HX400V in Sports Mode
In practice, I generally had to zoom the Canon SX50HS out to 600mm equivalent field of view to get consistent BIFs. On the Sony HX400V I can use the full 1200mm reach. It is that much easier to use. 🙂 (But then it is really two generations newer than the SX50HS.)
Three at a time. Sony HX400V
These shots are not perfect. If you blow them up to full resolution on the computer (pixel peeping) you see some artifacts, but at reasonable viewing and printing sizes they are simply very satisfying. And so easy!
Sports Mode on the Sony HX400V completely takes over control of the camera, so if you are not the trusting type, in might not suit you. The only thing you can change is the speed of continuous shooting. However, even in difficult light, Sports Mode on the Sony does the job.
Sandhill Cranes and Snow Geese against the sunset.Landing in the dawn lightCranes on a burning sky.
Of course, the better the light, the better the results.
Snow Geese against the Mountains to the West of the refuge.Solo Snow GooseCranes at 1200mm equivalent field of view.
Remember: patience and persistence. Take a lot of images. Try, try, and try again. And don’t grieve the close shots…the near misses…the not quite, but close stuff you have to delete from the card. Just keep shooting. Eventually you will get the shots you want.
And don’t try BIFs, at least at first, unless you have a lot of birds to practice on…even if it is only gulls at the local landfill. Even with the aid of the excellent Sports Modes on today’s Point and Shoot super-zooms, it takes practice!
My last image here was submitted to the Canon Print Challenge on Saturday at Bosque del Apache, along with many images from conventional long-lens, DSLR, tripod wielding photographers…and it won! At the end of the competition the Canon folks made me a 13×17 inch exhibition print on art paper…and it looks great! So don’t let anyone tell you you can’t, or should not even try to, shoot BIFs with a Point and Shoot. It can be done. Easier with each generation. 🙂
Tricolored Heron and Black-necked Stilts. Edinburg Scenic Wetlands World Birding Center, Edinburg TX
My DSLR, long lens, tripod totting, friend Paul and I spent several days photographing side by side in the Rio Grande Valley of south Texas. He shoots, much of the time, with his massive 400mm, f2.8 Canon Image Stabilized lens mounted on his 5D full frame DSLR and a heavy-duty carbon fiber tripod. It is a brilliant lens and a very capable camera, and he gets stunning results. However he found a few things to envy in my long zoom Point and Shoot rig (I was shooting with the Sony HX400V, 50x, 20mp camera.)
Of course I was shooting my first images while he was still setting up his tripod, and, of course, I had 4 times the reach he had…with 1200mm equivalent field of view. And of course, as the days wore on it became obvious which of us was carrying 8 pounds of lens…close to 12 pounds total equipment, and which could tuck his whole rig into a small bag at his waist. 🙂
But the thing Paul kept coming back to when we looked at our images later in the day was how much depth of field the small sensor camera gives you when compared to his full sized sensor…and most of the time he was comparing his depth at 400mm and mine at 1200mm. By depth of field, if you are not familiar with the term, I mean how much of the image, from foreground to background, is apparently in focus and sharp. For birds, wildlife, and macro work the depth of field can be critical, especially at the longer focal lengths needed to fill the frame. It is especially critical when shooting a group of birds (or other critters) as in the leading photo here. Paul was not able to get the Tricolored Heron in the foreground in focus at the same time as the Black-necked Stilts in the background, even if he stopped his 400mm lens down to f5.6 or so (reducing the aperture increases depth of field). As you see, even at 1200mm equivalent field of view, the Sony managed to get all the birds in relatively good focus.
For comparison here is one of Paul’s shots with his 400mm plus 1.4x extender for 560mm. He stopped down to f10 to improve depth, and was shooting at less than half the equivalent focal length of the Sony P&S, but still did not manage to get the same group of birds in focus.
Canon 5D with 400mm plus 1.4x telextender. f10
Here is another example: the Little Blue and the Snowy were separated by about 3-4 feet, yet the Sony managed to get both in focus at 1200mm equivalent and f6.3. Only a Point and Shoot superzoom is able to do that trick 🙂
Little Blue Heron and Snowy Egret
It has to do with sensor size, and the real focal length of Point and Shoot camera lenses. Since the sensor in my Sony is 5.6 times smaller than the sensor in Paul’s Canon 5D, it only takes a 215mm lens to make objects (or subjects) the same size in the image as thew would be with a 1200mm lens on his camera (215×5.6=1200). More practically for comparison, when I set my zoom to 400mm to match Paul’s 400mm Canon lens, my real focal length is only 71mm. He gets the depth of field of a 400mm lens, and, while framing the same group of birds so they look the same size in the image, I get the depth of field of a 71mm lens. That is a dramatic difference. Even at my 1200mm setting (remember 215mm real focal length), I still have twice the depth of field he does with his 400mm lens. That means that even if he crops his image to match mine, I will still have significantly more depth.
Depth of field differences also come into play when shooting close your subject. This shot of a Red Saddlebags Dragonfly from 7 feet at 2400mm equivalent field of view (1200mm optical plus 2x Clear Image zoom on the Sony), would simply not be possible in any single image from a conventional DSLR and lens, unless you shot from a few inches away with a 71mm lens (and even then you would have to crop the image by a factor of 2). And believe me, getting that close to a Red Saddlebag in the field is not easy 🙂
Red Saddlebags 2400mm equivalent from about 7 feet.
Or consider this true macro, taken from about an inch, using the Sony HX400V at about 61mm equivalent field of view. The real focal length of the lens at that zoom is 10.9mm…which on a full frame sensor would be a fish-eye wide angle. I get as much depth of field as I need in any macro setting.
Spider at about 1 inch.
The spider is relatively isolated, but in a macro like the one that follows, depth of field is critical to the effect.
Bee on the Blazing Star
Even when shooting at wild angle, for landscapes, the extra depth of field of the P&S superzoom can be used to good advantage. I enjoy a photograph with a great depth.
Low angle, wide angle, with great depth. 24mm equivalent (real focal length 4.3mm)
It is sometimes argued that the greater depth of field in small sensor Point and Shoots is a disadvantage when you do want to use selective focus…as in some wildlife, some macro, and almost all portrait photography…where you want your subject isolated against an out of focus background for the classic photographic effect.
Portrait at 400mm with a full frame DSLR. Nice separation and excellent bokeh.Same distance, about 200mm equivalent with P&S
If I had cropped in closer by zooming out to match Paul’s 400mm, the background would have been less sharp, but not as well isolated as the full frame shot. Still, as the macros above demonstrate, subject separation can be achieved even with a P&S.
All in all, I find the extra depth of field of the P&S superzoom to be an advantage for nature photography way more often than it is a disadvantage. It makes both telephotos of wildlife and macros of bugs and flowers easier, and produces great landscape effects. In fact, I am so used to working with generous depth of field that I am pretty sure I would be quite frustrated moving to a full frame system at this point. I love shots like this one of a Common Paraque in the half-light too much. Only a P&S superzoom could produce this result…with so much of the bird in focus at this distance and scale.
Common Paraque. Estero Llano Grande SP World Birding Center, Weslaco TX
So, just one more reason to enjoy Point and Shoot Nature Photography. 🙂
I recently spent several hours at the National Butterfly Center south of Mission Texas (and at Bentson State Park World Birding Center next door.) The NBC is one of my favorite places to photograph…the density and variety of butterflies and dragonflies found in the gardens right on the Rio Grande river can not be matched anywhere, at least in a natural setting (as in…not in a butterfly house). You an see the results in my WideEyedInWonder gallery. National Butterfly Center. If you pursue the exif data (available with the “i” information icon) you will see that most of these shots were taken with -.3 to -.7 EV exposure compensation. The ultra bright, high saturation, high contrast colors on butterfly wings tend to burn out…turn light or white…with normal exposures. Underexposing slightly keeps the colors as vivid as they are in life.
When you read the reviews of Point and Shoot cameras, especially the superzooms we favor for bird, wildlife, and nature photography, you are sure to come across comments about their less than stellar low light performance. No digital sensor camera does as well at high ISOs as it does at low ISOs. Digital sensors love light, and the more light, within reason, the better the image quality and the image detail you can expect. And the smaller the sensor, the common wisdom goes, the worse the high ISO, low light, performance you can expect. The tiny senors in the P&S Superzooms can not be expected to equal the performance of APS-C or full frame sensors.
Full overcast vs full sun: ISO 1600 ves 160
On the other hand, you will notice that with each new generation of digital sensors, the maximum ISO ratings increase. Full frame cameras will let you set ISO to 5 digits these days…totally unheard of, undrempt of even, ratings back in the days of film. Remember, ISO 800 color slide film (ASA 800 in those days) was revolutionary, and only to be used in emergencies, since its performance…with highly visible grain, limited contrast range, and muted colors…left a lot to be desired. Those were the days when Kodachrome 25 was still the standard for published photos.
Even today’s P&S cameras will reach 3200-6400 ISO, though to listen to the reviewers, anything over ISO 400 on some, and certainly ISO 800 on most, is simply unusable. Same issue: visible noise (the digital equivalent of grain), limited contrast range, and desaturated colors. However, each new generation of P&S cameras also has improved noise reduction built into the jpeg processing engines. Yet the common advice is still to turn it off if you can…or to shoot in RAW (again if you can)…and do any noise reduction in software after the fact. The Image Quality issues (watercolor effects and detail smearing) that are often claimed for P&S superzooms are often attributed to “overly aggressive noise reduction.”
Still, if you shoot wildlife…especially active birds…in anything but full sunlight, you sometimes find yourself making the hard choice between higher ISOs and slower shutter speeds. Nothing will destroy image detail quicker than camera or subject motion, so you pretty much have to keep the shutter speed up, and let the ISO got where it needs to. I do not like to shoot birds and wildlife at anything under 1/500th of a second, even with today’s excellent optical image stabilization. Even if the camera does not move, the critter is likely too. 🙁
On my latest photo trip to Cape May, New Jersey, for the Autumn Bird Festival, the days ranged from rain and overcast to full sun. If I wanted to shoot birds it was necessary to let the camera do its ISO thing, using the full range available to me. The first two days I still had not figured out how to set the camera so that it was not limited to ISO 1600 in Auto ISO, so that limited me even more. I did eventually figure out how to let the IsO ride all the way up to 3200.
Reflecting on the results, and my efforts around home over the past weeks and since returning from Cape May, I have come to a pretty startling conclusion. At least with the superzoom I am using (Sony HX400V), the high ISO results were not all that bad…in fact…they were very good…especially when you consider that I could not have gotten the images any other way. When choosing between some kind of pretty good okay image and no image at all…well, that is an easy choice for me. 🙂
The first thing I learned is that there is a lot of detail in underexposed images. While the camera was limiting me to ISO 1600, many of my bird and wildlife shots were seriously underexposed…by several stops. Yet, when taken into Lighroom, I was able to bring them up to quite acceptable levels and produce images that were satisfying, if not spectacular…and you might even consider them spectacular if you take into account the conditions they were taken under.
Consider this Red Squirrel from Laudholm Farm…taken before I left for Cape May. It was so dark in the under the apple trees and in the brush that I pushed the shutter speed all the way down to 1/160th at ISO 1600, stretching both the Image Stabilization of the camera, and the good will of the squirrel to the max…and the image was still several stops underexposed.
underexposed at 1/160th @ ISO 1600, processed in Lightroom
As you see, while not a great image, it is hard to tell the processed result was ever that underexposed. Color is pretty good. Detail is satisfying. Both noise and digital artifacts are visible in the finished result, but only if you view the image at full resolution. At normal screen sizes it looks pretty good okay! And…of course…I could not have done any better with any camera I could have been carrying…a full frame DSLR would have wanted even more light…pushing the ISO higher and the shutter speed lower…and no lens I could have hand-held…no…no lens I could have used even on a tripod…would have equaled the 1200mm reach of the Sony HX400V. I would have had to crop heavily to achieve this image scale. Given that, I am convinced that this image is better than I would have gotten with any other camera. You want more proof…
Deer at 1600 ISO. Well underexposed and brought up in Lightroom.
Common Yellow-throat, again underexposed at ISO 1600.
Again, not great shots, but satisfying, considering any reasonable alternative. 🙂
When I did figure out how to set Auto ISO for the full 3200 range on the HX400V, I was even more surprised by the results! The images, of course, required much less lightening in post-process, and maintained good color saturation, satisfying detail, and very few visible artifacts in the backgrounds (a problem area for any high ISO shot). And this is straight from the camera, with only my standard one click preset Lightroom processing. I did not, at first, even apply any extra noise reduction in Lightroom…though I did find that some slight Luminance NR, with detail emphasis, did produce an even more satisfying result.
Squirrel ISO 3200
White-throated Sparrow 3200
Squirrel ISO 3200
Golden-crowned Kinglet 2000
Ruby-crowned Kinglet 2000
It is even possible to crop an ISO 3200 image from the Sony HX400V and get acceptable results…pretty good okay results! This chipper is proof enough for me. In-camera Noise Reduction set to standard. Sharpening to -1. Saturation to +1. My standard one click processing in Lightroom with some added NR.
ISO 3200. Cropped.ISO 3200. Cropped.
So folks, here is my conclusion. Unless you are looking for magazine quality publication images…if, in other words, your main interest is sharing on the web and the occasional print for the wall or for a gift…you have no reason, with the latest crop of P&S superzooms, to fear the dark. Go boldly. Set your ISO high and bring back satisfying images of the birds and wildlife you encounter in less than ideal light…images you would be very unlikely to get with any other camera.


 Tranquilo Bay Lodge, Panama")


, Tranquilo Bay Lodge, Panama")


 Punte Peña, Panama")